Introduction
Discover a delightful treat that perfectly balances the rich flavors of chocolate with the refreshing notes of mint. Whether you are a vegan, health-conscious, or simply a lover of chocolate, these Minty Chocolate Indulgence Bars are an ideal dessert that combines wholesome ingredients with irresistible taste. This recipe is not just about satisfying your sweet tooth; it’s also about enjoying a dessert that nourishes your body. In this article, we will explore the recipe in detail, discussing the health benefits of each ingredient, step-by-step instructions, and ways to personalize this decadent dessert.
The Appeal of Minty Chocolate Indulgence Bars
What makes these Minty Chocolate Indulgence Bars so special? It’s the unique combination of flavors and textures that creates a truly indulgent experience. The rich, dark chocolate harmonizes beautifully with the cool, refreshing mint, making each bite an explosion of taste. Beyond the incredible flavor, these bars cater to various dietary preferences, including vegan and gluten-free options. This means that whether you are following a strict vegan diet or simply looking for healthier dessert alternatives, you can enjoy these bars without any guilt.
Moreover, the texture of these bars is a delightful contrast. The base is chewy and slightly crumbly, thanks to the almond flour and shredded coconut, while the melted dark chocolate drizzled on top adds a luscious creaminess. This balance of textures makes each bite satisfying and keeps you coming back for more. These bars are not just a dessert; they are an experience, perfect for sharing at gatherings or enjoying during a quiet moment of self-care.
Ingredient Breakdown
To truly appreciate these Minty Chocolate Indulgence Bars, let’s take a closer look at the ingredients that make them not only delicious but also nutritious. Each component plays a vital role in enhancing the overall flavor profile while providing health benefits.
Almond Flour
Almond flour is a gluten-free alternative that serves as the base for our bars. It is packed with protein and healthy fats, making it a great choice for those looking to increase their nutrient intake. Almond flour is also lower in carbohydrates than traditional wheat flour, which makes these bars suitable for those who are watching their carb consumption. Additionally, it provides a mild, nutty flavor that complements the chocolate and mint perfectly.
Shredded Unsweetened Coconut
Shredded unsweetened coconut adds both texture and natural sweetness to the bars. It is rich in dietary fiber, which aids digestion and helps to keep you feeling full longer. The coconut’s healthy fats can also provide a quick source of energy. By using unsweetened coconut, we avoid unnecessary sugars while still getting that delightful coconut flavor that pairs so well with chocolate.
Cocoa Powder
Cocoa powder is the essential ingredient for achieving that rich chocolate flavor we all crave. It is packed with antioxidants, which are known to combat oxidative stress in the body. Cocoa powder also contains flavonoids that can improve heart health and boost mood. Opting for high-quality, unsweetened cocoa powder ensures that you’re getting all the benefits without the added sugars.
Maple Syrup or Agave Nectar
For sweetness, we’ll use either maple syrup or agave nectar. Both are natural sweeteners with lower glycemic indices compared to refined sugars, which means they won’t spike your blood sugar levels as dramatically. Maple syrup offers a unique flavor profile with a hint of caramel, while agave nectar is milder and has a liquid consistency that blends seamlessly into the mixture.
Coconut Oil
Coconut oil is a versatile ingredient that provides creaminess to the bars. It is also rich in medium-chain triglycerides (MCTs), which are known to support metabolic health and provide quick energy. The healthy fats found in coconut oil help to bind the ingredients together while adding a subtle coconut flavor that enhances the overall taste of the bars.
Peppermint Extract
A key player in the flavor department, peppermint extract infuses a refreshing minty flavor into the bars. Not only does mint provide a cooling sensation, but it also has digestive benefits. Peppermint can help soothe an upset stomach and promote relaxation, making these bars an indulgent yet health-conscious choice.
Sea Salt
A pinch of sea salt is essential for balancing the sweetness of the bars. Salt enhances the flavors and brings out the richness of the chocolate, making every bite more delicious. It’s important to use high-quality sea salt for the best flavor and health benefits.
Dark Chocolate Chips
Finally, we can’t forget the dark chocolate chips. They offer a rich, satisfying chocolate taste and can easily be made vegan-friendly by choosing dairy-free options. Dark chocolate is also loaded with antioxidants and may have heart health benefits, making it a guilt-free indulgence when consumed in moderation.
Preparation Steps Explained
Now that we’ve explored the ingredients and their benefits, let’s dive into the preparation process. Making Minty Chocolate Indulgence Bars is straightforward, and with clear, concise steps, you’ll be able to follow along easily.
Step 1: Gather Your Ingredients
Before you start, ensure you have all your ingredients ready. This preparation will streamline the process and make it more enjoyable. Here’s what you’ll need:
– 2 cups almond flour
– 1 cup shredded unsweetened coconut
– 1/2 cup cocoa powder
– 1/2 cup maple syrup or agave nectar
– 1/4 cup coconut oil (melted)
– 1 teaspoon peppermint extract
– 1/2 teaspoon sea salt
– 1 cup dark chocolate chips (vegan-friendly)
Step 2: Prepare Your Baking Dish
Start by preheating your oven to 350°F (175°C). While the oven heats, line an 8×8 inch baking dish with parchment paper, allowing some overhang. This will make it easier to lift the bars out once they are set. Lightly grease the parchment paper with a bit of coconut oil to prevent sticking.
Step 3: Combine Dry Ingredients
In a large mixing bowl, combine the almond flour, shredded coconut, cocoa powder, and sea salt. Whisk these dry ingredients together until well mixed. This step is crucial as it ensures that the cocoa powder is evenly distributed throughout the mixture, which will lead to a more consistent flavor in your bars.
Step 4: Mix Wet Ingredients
In a separate bowl, mix the melted coconut oil, maple syrup or agave nectar, and peppermint extract. Stir until the mixture is well combined. The warmth of the melted coconut oil will help to dissolve the sweetener, creating a smooth and cohesive blend.
Step 5: Combine Wet and Dry Ingredients
Pour the wet mixture into the bowl of dry ingredients. Use a spatula to gently fold the mixture together until it forms a thick dough. Be careful not to over-mix; you want to combine the ingredients just until no dry flour remains visible. The texture should be somewhat crumbly but hold together when pressed.
Step 6: Press the Mixture Into the Baking Dish
Transfer the mixture into the prepared baking dish. Using your hands or the back of a spatula, press the mixture firmly into an even layer. Make sure to pack it down well, as this will help the bars hold their shape once baked.
Step 7: Bake the Bars
Place the baking dish in the preheated oven and bake for 20-25 minutes or until the edges are slightly golden. This step is essential for setting the bars and enhancing their flavors through the baking process. Once done, remove the dish from the oven and allow it to cool in the pan for about 10 minutes.
Step 8: Prepare the Chocolate Topping
While the bars are cooling, melt the dark chocolate chips. You can do this in a microwave-safe bowl in 30-second intervals, stirring in between, until smooth. Alternatively, use a double boiler for a more controlled melting process. Once melted, you can stir in a few drops of peppermint extract if desired for an extra minty kick.
Step 9: Drizzle the Chocolate
Once the bars have cooled slightly, carefully lift them out of the baking dish using the parchment overhang. Place them on a cutting board. Drizzle the melted dark chocolate over the top of the bars, ensuring an even coating. Use a spatula to spread the chocolate evenly if you prefer a thicker layer.
Step 10: Chill and Cut
Place the bars in the refrigerator for at least 30 minutes, or until the chocolate is set. Once the chocolate has hardened, you can cut the bars into squares or rectangles, depending on your preference. Store any leftovers in an airtight container in the refrigerator to keep them fresh.
With these initial steps, you are well on your way to creating a delicious batch of Minty Chocolate Indulgence Bars. Stay tuned for additional tips and variations to personalize this delightful recipe further!
Preparing the Base
Creating the perfect base for your Minty Chocolate Indulgence Bars is crucial for achieving a well-balanced flavor profile and a satisfying texture. Begin by carefully measuring and mixing your dry ingredients, including flour, cocoa powder, and any sweeteners. It’s essential to combine these ingredients thoroughly to ensure that flavors are evenly distributed throughout the mixture. This step not only enhances the taste but also ensures that every bite is consistent. Consider using a whisk to aerate the dry ingredients, which helps to prevent clumping and creates a uniform blend.
Once your dry ingredients are mixed, it’s time to incorporate the wet ingredients, which will bring your mixture to life. This is where the magic happens, so pay close attention to the consistency of your mixture.
Adding Wet Ingredients
The addition of wet ingredients, such as melted coconut oil and maple syrup, is pivotal in achieving the right consistency for your bars. When combining wet and dry ingredients, pour the wet mixture into the dry ingredients gradually. This method allows for better integration and prevents the formation of lumps.
Mix the ingredients using a spatula or a wooden spoon until you achieve a thick batter that holds together well. If the mixture feels too dry, you can add a tablespoon of water or almond milk to help achieve the desired texture. The goal is to have a thick, moist batter that can easily hold its shape when pressed into the pan.
Pressing into Pan
Once your mixture is well-combined, it’s time to transfer it into your prepared baking pan. Use a parchment-lined pan to facilitate easy removal later. To ensure a compact and even layer, use the back of a measuring cup or your clean hands to press the mixture firmly into the bottom of the pan. Start from the center and work your way outwards, applying even pressure across the surface.
An even layer is essential for consistent baking, so take your time with this step. If the mixture is sticking to your hands or the measuring cup, lightly dampen them with water to make pressing easier. Once the base is evenly distributed, you’re ready to chill it, which is a critical step in developing the right texture.
Chilling the Base
Chilling the base of your Minty Chocolate Indulgence Bars is vital for firming it up and enhancing the overall texture. Place the pressed base in the refrigerator for at least 30 minutes. This cooling period allows the fats to solidify, providing a sturdier foundation for the chocolate layer that will go on top. Additionally, chilling the base helps meld the flavors together, ensuring that each bite is rich and satisfying.
Melting the Chocolate
While the base is chilling, it’s the perfect time to prepare the chocolate layer. Melting chocolate can be tricky, as it burns easily if not done correctly. The best method for melting chocolate is to use a double boiler or a heatproof bowl set over a pot of simmering water. This gentle heating method prevents direct contact with heat, reducing the risk of scorching.
Stir the chocolate frequently as it melts to ensure an even consistency. Once melted, remove it from heat and let it cool slightly before pouring it over the chilled base. This cooling period is essential, as pouring hot chocolate directly onto the base can cause it to melt and lose its form.
Pouring the Chocolate Layer
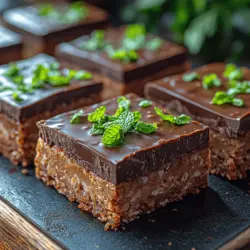
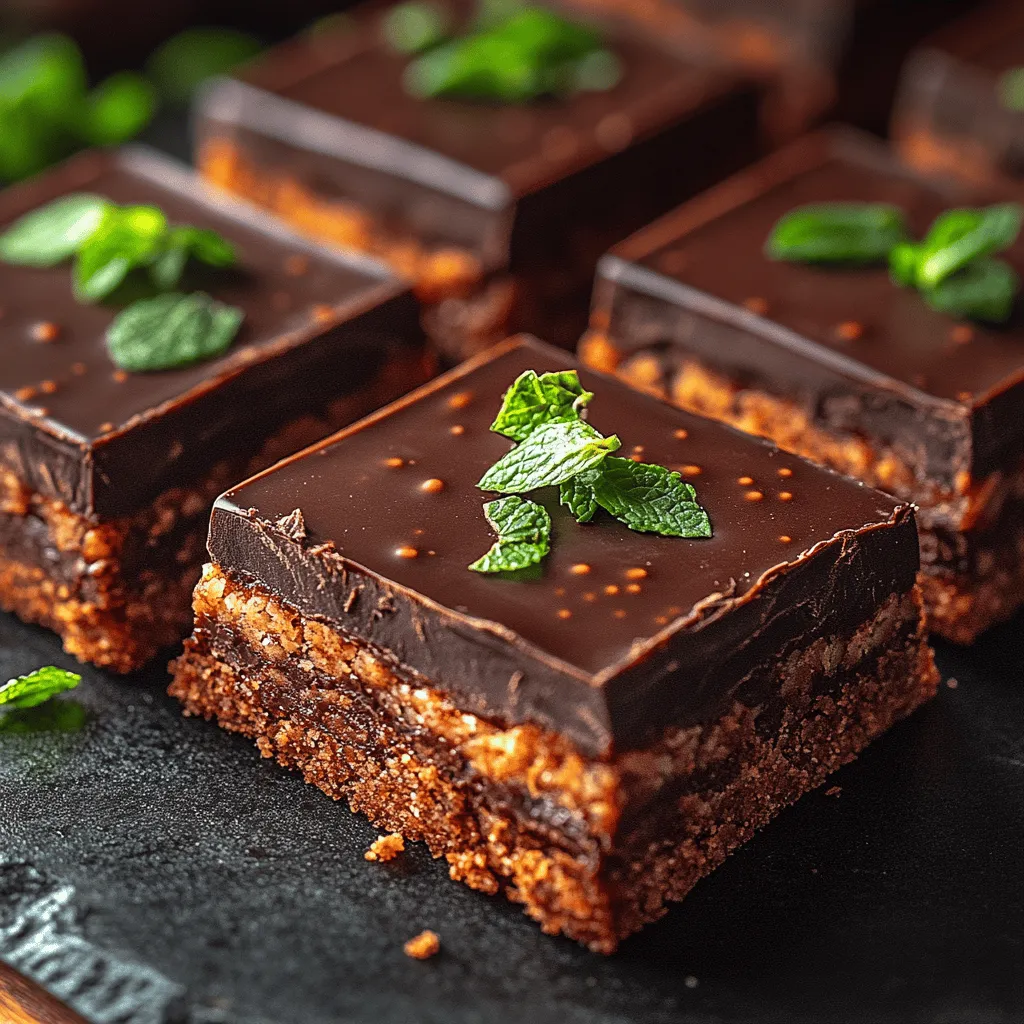
With your chocolate melted and cooled to the right temperature, it’s time to pour it over the chilled base. Use a spatula to spread the chocolate evenly across the surface of the bars, ensuring that every inch is covered. This layer not only adds rich flavor but also creates a glossy finish that elevates the visual appeal of your Minty Chocolate Indulgence Bars.
For a decorative touch, consider using a spoon to create swirls in the chocolate, or simply leave it smooth for a classic look. After pouring, you may want to gently tap the pan on the countertop to remove any air bubbles that may have formed, ensuring a flawless finish.
Adding Mint Garnish
To elevate both the visual appeal and flavor profile of your bars, add fresh mint leaves as a garnish. Simply place a few mint leaves on top of the melted chocolate layer before it sets. This not only adds a pop of color but also enhances the minty flavor, complementing the chocolate beautifully. The freshness of the mint contrasts wonderfully with the richness of the chocolate, making each bite a delightful experience.
Chilling and Setting the Bars
Now that your bars are fully assembled, it’s time to chill them again. Place the pan back in the refrigerator for at least 2 hours, or until the chocolate layer has completely set. This chilling process is crucial; it helps the chocolate harden and allows the flavors to meld together beautifully. When fully chilled, the chocolate layer will have a satisfying snap, while the base will remain chewy and flavorful.
As the bars set, the time spent in the refrigerator not only enhances the texture but also deepens the flavors, making each bite even more enjoyable. Once set, remove the bars from the pan using the edges of the parchment paper for easy lifting.
Serving Suggestions
Minty Chocolate Indulgence Bars are versatile and can be served in various ways, making them perfect for any occasion. For casual snacking, cut the bars into smaller squares for easy portioning. They also make a delightful addition to any dessert platter or buffet, where they can be displayed alongside other sweet treats.
For a more elegant presentation, serve the bars with a side of herbal tea, such as peppermint or chamomile, which complements the minty flavor beautifully. Alternatively, they can be enjoyed as a decadent dessert after a rich meal, offering a sweet yet refreshing finish.
These bars are also a fantastic choice for gatherings, whether it’s a birthday party, holiday celebration, or a simple get-together with friends. Their rich flavor and appealing appearance are sure to impress your guests.
Storage Tips
To maintain the freshness and flavor of your Minty Chocolate Indulgence Bars, store them properly. Keep the bars in an airtight container at room temperature for up to a week. If you live in a particularly warm climate, it’s best to store them in the refrigerator to prevent the chocolate from melting.
For longer storage, consider freezing the bars. Wrap each piece individually in plastic wrap and then place them in a freezer-safe container. They can be stored in the freezer for up to three months. When you’re ready to enjoy them, simply remove the desired amount and let them thaw at room temperature for about 30 minutes.
Nutritional Information
Each serving of Minty Chocolate Indulgence Bars offers a delightful combination of flavors while providing some nutritional benefits. These bars are rich in antioxidants from the cocoa and contain healthy fats from the coconut oil. Additionally, using natural sweeteners like maple syrup reduces the overall glycemic index compared to traditional refined sugars.
While enjoying these bars, keep in mind that moderation is key. Each bar contains approximately 150 calories, with healthy fats and a good amount of fiber, making them a satisfying treat that can fit into a balanced diet.
Conclusion
In summary, Minty Chocolate Indulgence Bars are not only easy to make but also a delicious way to satisfy your sweet tooth while keeping health in mind. With their rich chocolate flavor and refreshing minty notes, these bars are perfect for any occasion. Enjoy the process of making them and the joy they bring to your table. Whether you serve them at a gathering or keep them for personal indulgence, these bars are bound to become a favorite in your dessert repertoire.