Snack wraps have become a beloved staple in the world of quick meals and convenient snacks. Their versatility allows for endless variations, making them perfect for any occasion—whether it’s a busy weekday lunch, a family dinner, or an on-the-go snack. One particularly exciting twist on the traditional snack wrap is the Hatch Chili Chicken Snack Wrap. This recipe combines tender chicken with the unique flavor of Hatch chilies, creating a deliciously spicy experience that tantalizes the taste buds.
Hatch chilies, named after the region in New Mexico where they are grown, are renowned for their rich flavor and varying heat levels. These chilies are harvested during the late summer and early fall, and their vibrant taste has made them a favorite among chefs and home cooks alike. The distinctive flavor profile of Hatch chilies—sweet, smoky, and mildly spicy—adds a depth to any dish they grace. Incorporating these chilies into your chicken snack wraps not only enhances the overall taste but also brings a touch of regional flair.
Beyond the delightful flavor they impart, the ingredients in this recipe are packed with health benefits. Chicken is an excellent source of lean protein, essential for muscle growth and repair, while Hatch chilies are loaded with vitamins A and C, antioxidants, and capsaicin, which is known for its anti-inflammatory properties. Additionally, using Greek yogurt instead of sour cream can boost the nutritional profile by providing probiotics and extra protein. This recipe is not just about indulgence; it’s about enjoying a quick meal that nourishes your body while satisfying your cravings.
Let’s dive into the steps to create these mouthwatering Hatch Chili Chicken Snack Wraps. This easy-to-follow recipe will guide you through preparing a flavorful filling that can be ready in no time, making it perfect for busy weeknights or impromptu gatherings.
Understanding Hatch Chilies
Before we plunge into the preparation, it’s essential to understand what makes Hatch chilies so special. Originating from Hatch, New Mexico, these chilies are celebrated for their unique flavor and the variety of heat they can offer, ranging from mild to hot. The growing conditions in Hatch, with its rich soil and ideal climate, contribute to the chilies’ distinct taste and texture.
When selecting Hatch chilies, consider purchasing them fresh during their peak season, typically from late August to early September. Fresh chilies can be roasted to enhance their flavor, and they can be frozen to enjoy year-round. If fresh chilies aren’t available, canned Hatch chilies provide a convenient alternative, retaining much of their flavor and nutritional benefits.
In addition to being a star ingredient in our snack wraps, Hatch chilies can be incorporated into various dishes such as salsas, stews, and even salads. Their versatility makes them a worthy addition to your pantry, ready to elevate any meal.
Ingredients Breakdown
Now that you have a grasp of Hatch chilies, let’s take a look at the key ingredients that will make up our Hatch Chili Chicken Snack Wraps.
Tortillas
The base of any wrap is the tortilla, and choosing the right type can significantly impact the overall flavor and texture. Flour tortillas are soft and pliable, making them easy to wrap around your filling, while corn tortillas offer a slightly nuttier taste. Whole wheat tortillas provide a healthful option, packed with fiber. Regardless of your choice, tortillas serve as the perfect canvas for your delicious fillings.
Cooked Chicken
The protein in our wraps will come from cooked chicken, which is essential for a filling and satisfying meal. Grilled, shredded, or rotisserie chicken can all work well in this recipe. For optimal flavor, consider seasoning your chicken before cooking, or marinating it in a mix of spices to enhance its taste. The goal is to achieve tender, juicy chicken that complements the spiciness of the Hatch chilies.
Cheese Varieties
Cheese adds creaminess and richness to our wraps, with pepper jack and cream cheese being standout choices. Pepper jack, infused with spicy peppers, brings an additional kick to the dish, while cream cheese offers a smooth, creamy texture that balances the heat. The combination of these cheeses creates a delightful mouthfeel, making each bite a flavorful experience.
Greek Yogurt vs. Sour Cream
For a creamy dressing, Greek yogurt is an excellent substitute for sour cream. Not only does it add a tangy flavor, but it also brings added health benefits, including probiotics and a higher protein content. If you prefer sour cream, that works too, but opting for Greek yogurt can make your snack wraps a bit healthier without sacrificing taste.
Seasoning
To elevate the flavors of your filling, seasoning is key. Garlic powder and cumin are two essential spices that enhance the overall taste of the dish. Garlic powder adds depth and warmth, while cumin introduces an earthy, slightly smoky flavor that pairs beautifully with the chilies. A pinch of salt and pepper can also help to balance the flavors.
Optional Ingredients
To add freshness and texture to your Hatch Chili Chicken Snack Wraps, consider incorporating optional ingredients such as lettuce and cilantro. Crisp lettuce provides a refreshing crunch, while cilantro adds a burst of herbal flavor that complements the spiciness of the chilies. These additions can transform your wraps from good to exceptional.
Step-by-Step Preparation
Preparing the Filling
Now that we have our ingredients lined up, let’s get started on preparing the filling for our Hatch Chili Chicken Snack Wraps. Follow these detailed instructions to ensure an optimal flavor and texture.
1. Cook the Chicken: If you haven’t already prepared your chicken, season it with salt, pepper, garlic powder, and cumin. Grill, bake, or sauté until cooked through. Once done, allow it to cool slightly before shredding or chopping into bite-sized pieces.
2. Mix in the Cheese: In a large mixing bowl, combine the shredded chicken with cream cheese and finely chopped pepper jack cheese. The heat from the chicken will help soften the cream cheese, making it easier to mix and creating a creamy base for your filling.
3. Add the Hatch Chilies: Chop your fresh or canned Hatch chilies (drained if canned) and add them to the chicken and cheese mixture. The amount you add can be adjusted based on your heat preference. Mix thoroughly to ensure the chilies are evenly distributed throughout the filling.
4. Stir in the Yogurt: Add a generous dollop of Greek yogurt to the mixture. This will enhance the creaminess while adding a tangy flavor. Stir until all ingredients are well combined.
5. Adjust Seasoning: Taste your filling and add more seasoning if necessary. A little extra garlic powder, cumin, or salt can make a significant difference in flavor.
6. Incorporate Optional Ingredients: If you’re using lettuce and cilantro, chop them finely and fold them into the mixture. This step adds freshness and texture, making your wraps even more enjoyable.
With the filling prepared, you’re now ready to assemble your Hatch Chili Chicken Snack Wraps. The next steps will guide you through wrapping and serving these delicious snacks, perfect for any occasion.
Stay tuned for the continuation of this recipe where we’ll cover assembling the wraps and any additional tips to make your snack wraps a hit!
Warming the Tortillas
Warming your tortillas is an essential step in making delicious Hatch Chili Chicken Snack Wraps. When tortillas are heated, they become more pliable, reducing the chances of tearing during assembly. This simple technique enhances the overall texture of your wraps, allowing for a better eating experience.
Techniques to Avoid Tearing
To warm your tortillas without tearing them, you can use one of the following methods:
1. Stovetop Method: Heat a dry skillet over medium heat. Place a tortilla in the skillet for about 15-30 seconds on each side, just until it becomes warm and slightly pliable. Avoid overheating, as this can cause the tortillas to become crispy and brittle.
2. Microwave Method: Wrap a stack of tortillas in a damp paper towel and place them in the microwave. Heat them for 30 seconds to 1 minute, checking to ensure they are warm but not too hot. The moisture from the towel helps keep them soft.
3. Oven Method: Preheat your oven to 350°F (175°C). Wrap a stack of tortillas in aluminum foil and place them in the oven for about 10-15 minutes. This method is ideal if you’re preparing multiple wraps at once, as it warms the tortillas evenly.
Assembling the Wraps
With your tortillas warmed, it’s time to assemble your Hatch Chili Chicken Snack Wraps. Proper layering of ingredients is crucial for ensuring that every bite is flavorful and satisfying.
Best Practices for Layering Ingredients
1. Start with a Base: Begin by spreading a generous layer of Greek yogurt or your favorite sauce across the center of the tortilla. This not only adds moisture but also helps to hold the other ingredients in place.
2. Add Protein: Next, place a portion of the shredded chicken mixed with Hatch chilies on top of the yogurt. The protein is the star of the dish, so be sure to distribute it evenly.
3. Layer in Freshness: Add a handful of fresh vegetables, such as shredded lettuce, diced tomatoes, and sliced avocado. This step not only adds color but also contributes to a refreshing crunch.
4. Sprinkle with Cheese: Finish the layering with a sprinkle of shredded cheese, which will melt slightly when the wrap is toasted, providing a creamy texture that complements the other ingredients.
Creative Ways to Add Crunch and Freshness
For an added crunch, consider including:
– Chopped Nuts: Crushed pistachios or walnuts can add an unexpected texture that enhances the wrap’s overall appeal.
– Fresh Herbs: Chopped cilantro or parsley can elevate the flavor profile and add a burst of freshness.
– Pickled Vegetables: Slices of pickled jalapeños or carrots can introduce an exciting tanginess that balances the wrap’s richness.
Wrapping Techniques
Now that your ingredients are layered beautifully, it’s time to wrap your snack. A well-wrapped tortilla ensures that none of the tasty fillings spill out while you enjoy your meal.
How to Ensure a Tight and Secure Wrap
1. Fold the Sides: Start by folding the left and right sides of the tortilla towards the center, covering the filling. This action helps to contain the ingredients as you continue wrapping.
2. Roll Towards You: With the sides folded, begin rolling the tortilla from the bottom (the side closest to you) towards the top. Apply gentle pressure to ensure a tight roll, but be careful not to squeeze too hard, as this may cause the tortilla to tear.
3. Seal the Wrap: If possible, place the seam side down on a plate. If you want to ensure the wrap stays closed, you can use a toothpick to secure it temporarily, removing it before serving.
Visual Cues for Proper Wrapping
A properly wrapped tortilla should be snug but not overly tight. Look for the following indicators to ensure success:
– The ends should be closed, preventing any fillings from escaping.
– The wrap should hold its shape when lifted, indicating that it is secure.
– If you see any filling peeking out, it might need to be wrapped tighter.
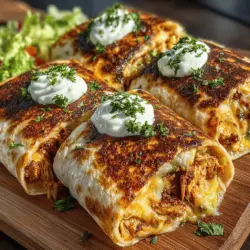
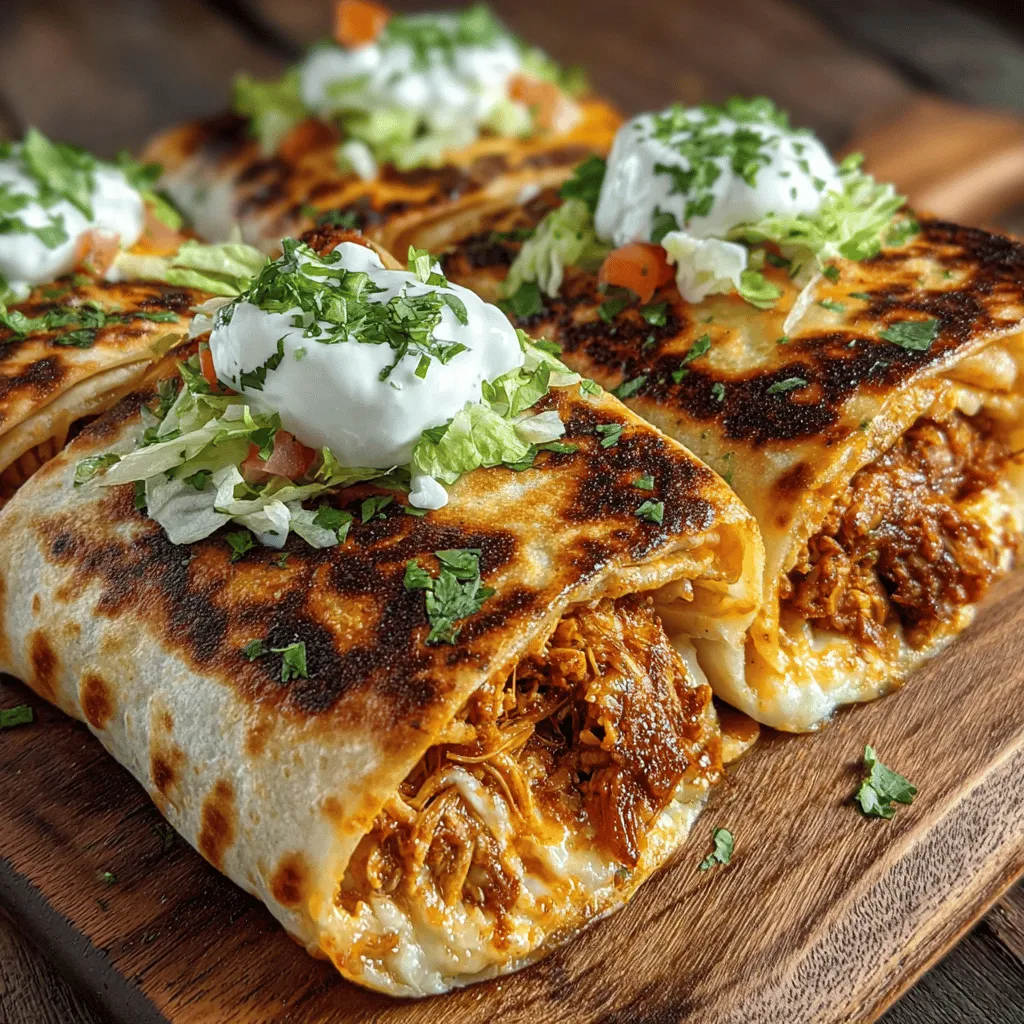
Toasting the Wraps (Optional)
Toasting your Hatch Chili Chicken Snack Wraps can elevate the flavors and add a delightful crunch to the exterior, enhancing your overall dining experience.
Benefits of Toasting: Texture and Flavor Enhancement
Toasting the wraps offers several advantages:
– Crispiness: A toasted wrap provides a satisfying crunch that contrasts beautifully with the tender chicken and fresh vegetables.
– Flavor Development: The heat from toasting can caramelize the ingredients slightly, enhancing their flavors and creating a more robust taste profile.
Recommended Cooking Times and Methods
1. Stovetop: Heat a skillet over medium heat. Place the wrapped tortilla seam-side down in the skillet. Cook for 2-3 minutes on each side until golden brown and crispy.
2. Oven: Preheat your oven to 400°F (200°C). Place the wrapped tortillas on a baking sheet and bake for about 10 minutes, flipping halfway through. This method is great for making multiple wraps at once.
3. Panini Press: If you have a panini press, this is a great way to toast your wraps evenly. Place the wrapped tortilla in the press and cook for 3-4 minutes, or until golden brown.
Serving Suggestions
Presentation matters when serving your Hatch Chili Chicken Snack Wraps. Here are some ideas to make your meal inviting and delicious.
Presentation Ideas for Serving the Wraps
– Cut in Half: Slice each wrap diagonally to reveal the vibrant filling inside. This method not only looks appealing but also makes them easier to handle.
– Serve on a Platter: Arrange the wraps on a colorful platter, garnished with fresh herbs or lime wedges for a pop of color.
– Dipping Sauce: Serve with a small bowl of salsa, guacamole, or a creamy ranch dip alongside the wraps for added flavor.
Suggested Sides that Complement the Wrap
Pair your wraps with side dishes that enhance their taste. Consider:
– Fresh Salad: A simple mixed greens salad with a light vinaigrette can balance the richness of the wraps.
– Chips and Salsa: Tortilla chips served with homemade salsa provide a crunchy accompaniment that mirrors the wrap’s flavors.
– Pickled Jalapeños: These add a spicy kick that pairs perfectly with the mild flavors of the wrap.
Pairing Ideas for Beverages that Go Well with Spicy Flavors
To complement the heat of the Hatch chilies, consider serving your wraps with:
– Iced Tea: A classic choice, iced tea can be sweetened or flavored to balance the spiciness.
– Lemonade: The tartness of lemonade refreshes the palate and contrasts beautifully with the spicy flavors.
– Craft Beer: A light lager or a hoppy IPA can provide a refreshing complement to your meal.
Nutritional Information
Understanding the nutritional profile of your Hatch Chili Chicken Snack Wraps can help you enjoy them guilt-free. Here’s an estimated breakdown per serving:
– Calories: Approximately 300-350 calories
– Protein: 25g (from chicken and Greek yogurt)
– Fats: 10g (healthy fats from the avocado and cheese)
– Carbohydrates: 30g (from tortillas and vegetables)
Health Benefits of Key Ingredients
– Chicken: A great source of lean protein, supporting muscle health and satiety.
– Greek Yogurt: Packed with probiotics that promote gut health, Greek yogurt adds creaminess and tang.
– Hatch Chilies: These peppers are rich in vitamins A and C, boosting your immune system and adding flavor.
– Fresh Vegetables: Ingredients like lettuce and tomatoes boost fiber intake, contributing to overall health.
Conclusion
Hatch Chili Chicken Snack Wraps are not only easy to prepare but also bursting with flavors that can be enjoyed at any time of day. The combination of tender chicken, spicy Hatch chilies, and fresh vegetables wrapped in a warm tortilla makes for a satisfying meal that can be customized to your liking.
Encourage your creativity in the kitchen by experimenting with different ingredients and flavor combinations. Whether you’re cooking for yourself or sharing with loved ones, these wraps are a perfect way to bring people together. Embrace the joy of cooking, and let your culinary adventures begin with these delicious wraps!