Decadent Sweet Chocolate Date Truffles: A Deliciously Healthy Indulgence
In recent years, there has been a significant shift in the way people approach snacking. With the growing awareness of health and wellness, many are seeking out options that not only satisfy their cravings but also provide nutritional benefits. This trend has led to the rise of healthy snacks that are both delicious and guilt-free. Among these delightful options, decadent sweet chocolate date truffles stand out as a perfect blend of indulgence and healthiness.
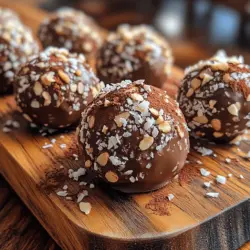
These truffles are crafted primarily from natural ingredients, making them an appealing choice for anyone looking to enjoy a treat without compromising their dietary goals. Made with Medjool dates, raw almonds, unsweetened cocoa powder, and a few other wholesome ingredients, these truffles are rich in flavor while also offering a variety of health benefits. The combination of sweet and rich chocolate with the chewy texture of dates creates a satisfying dessert that feels indulgent while being nutritious.
One of the most attractive aspects of this recipe is its simplicity. With minimal ingredients and straightforward preparation steps, you can whip up a batch of these truffles in no time. This ease of preparation makes it an excellent choice for both novice cooks and seasoned chefs alike. Plus, there’s an unparalleled satisfaction that comes from creating your own homemade treats, knowing exactly what goes into them.
The Benefits of Choosing Whole Food Ingredients
The star of our truffle recipe is undoubtedly the Medjool date. Often referred to as nature’s candy, these dates are not just a sweet treat; they are also a superfood packed with essential nutrients. Medjool dates are rich in dietary fiber, which is crucial for digestive health, and they contain natural sugars that provide a quick source of energy. This makes them an ideal ingredient for a snack that keeps you feeling energized and satisfied.
In addition to their fiber content, Medjool dates are also a great source of vitamins and minerals. They contain potassium, magnesium, and vitamin B6, all of which contribute to overall health and well-being. The combination of these nutrients makes Medjool dates an excellent choice for anyone looking to enhance their diet with whole foods.
Next up in our ingredient lineup is raw almonds, which play a vital role in the texture and flavor of our chocolate date truffles. Almonds are known for their heart-healthy fats, high protein content, and vitamin E, an antioxidant that helps protect your cells from oxidative stress. Compared to other nuts, almonds are particularly rich in fiber and have a lower carbohydrate content, making them a favorable option for those watching their carb intake.
Another key ingredient in our truffle recipe is unsweetened cocoa powder. This ingredient not only brings the rich chocolate flavor that makes these truffles so decadent but also offers numerous health benefits. Cocoa powder is loaded with antioxidants, particularly flavonoids, which have been shown to improve heart health and enhance mood. Incorporating unsweetened cocoa powder into your snacks can help satisfy your chocolate cravings while providing a nutrient boost.
Lastly, we include coconut flour in our truffle mixture. This unique ingredient adds a wonderful texture while also offering health benefits. Coconut flour is gluten-free and high in fiber, making it a great choice for those with dietary restrictions. It also lends a slight sweetness to the truffles without the need for additional sugars, allowing you to enjoy a treat that is both tasty and wholesome.
Step-by-Step Guide to Making Chocolate Date Truffles
Now that we’ve covered the benefits of our wholesome ingredients, let’s dive into the preparation of these delicious chocolate date truffles. The process is straightforward, making it easy for anyone to follow along.
Preparing the Dates
The first step in making these decadent truffles is preparing the Medjool dates. Choosing high-quality dates is essential for achieving the best flavor and texture. When selecting dates, opt for plump, moist Medjool varieties, as they are sweeter and have a softer texture compared to other types.
To prepare the dates, you will need to remove the pits. This can be done easily by slicing the dates lengthwise and removing the pit with your fingers. After pitting, place the dates in a food processor. This is where the magic begins. Processing the dates will create a sticky, cohesive mixture that serves as the base for your truffles.
For optimal texture, ensure that the dates are well-processed but not overdone. You want a smooth consistency without any large chunks remaining. If your dates are particularly dry, consider soaking them in warm water for about 10 minutes before processing. This will help achieve the desired consistency and make them easier to blend.
Mixing Ingredients
Once your dates are properly prepared, it’s time to mix in the other ingredients. Add the raw almonds, unsweetened cocoa powder, and coconut flour to the food processor along with the dates. Pulse the mixture until it comes together, forming a thick, dough-like consistency.
Achieving the right consistency is crucial for shaping your truffles. If the mixture feels too dry or crumbly, you can add a small amount of water or a splash of almond milk to help bind the ingredients together. Conversely, if the mixture seems too wet, incorporate a bit more coconut flour to absorb excess moisture.
Chilling the Mixture
After mixing, it’s important to chill the mixture before shaping it into truffles. Chilling allows the flavors to meld together and makes it easier to handle the mixture when forming the truffles. Place the bowl of truffle mixture in the refrigerator for about 30 minutes. This step is essential, as it helps the truffles hold their shape during the next stages of preparation.
Melting the Chocolate
While the mixture chills, you can prepare the chocolate coating. Choose high-quality dark chocolate for melting, as it will enhance the overall flavor of your truffles. You can melt the chocolate using a double boiler or in the microwave, stirring frequently to prevent scorching. Once the chocolate is melted and smooth, it will be ready for dipping your chilled truffles.
With these initial preparations complete, you are well on your way to creating a delicious batch of decadent sweet chocolate date truffles. The combination of wholesome ingredients and straightforward steps makes this recipe an excellent addition to your collection of healthy snacks. Stay tuned for the next part, where we will guide you through the final steps of shaping, coating, and enjoying these delightful treats.

Best Practices for Melting Chocolate Without Burning
Melting chocolate might seem straightforward, but it requires attention to detail to ensure a smooth, luscious result. To melt chocolate without burning it, consider the following techniques:
1. Use a Double Boiler: This method involves placing a heat-safe bowl over a pot of simmering water. The gentle heat will melt the chocolate evenly without direct contact with the flame.
2. Microwave Method: If you prefer the microwave, chop your chocolate into small, uniform pieces and place them in a microwave-safe bowl. Heat in 20-30 second intervals, stirring in between until completely melted.
3. Avoid Moisture: Ensure that any utensils, bowls, or containers used are completely dry. Even a small amount of water can cause chocolate to seize.
4. Low Heat: Whether using a double boiler or microwave, always melt chocolate on low heat. This helps prevent scorching and maintains a silky texture.
By following these practices, you’ll achieve perfectly melted chocolate, ready to coat your truffles.
Alternatives to Dark Chocolate for Different Dietary Needs
While dark chocolate is the star of this recipe, you can cater to various dietary requirements with these alternatives:
– Milk Chocolate: For those who prefer a sweeter flavor, milk chocolate can be used instead of dark chocolate. It pairs wonderfully with the natural sweetness of dates.
– White Chocolate: For a unique twist, consider using white chocolate. Although it lacks cocoa solids, its creamy texture and sweetness can balance the rich dates.
– Dairy-Free Chocolate: If you’re vegan or dairy-sensitive, look for dairy-free chocolate brands. These chocolates often use almond or coconut milk as a base and are just as rich and satisfying.
– Sugar-Free Options: For those watching their sugar intake, sugar-free chocolate is widely available. Ensure it contains no harmful sweeteners by checking ingredient labels.
By substituting the chocolate, you can make this recipe accessible to a wider audience without sacrificing flavor.
Forming the Truffles
Once your chocolate is melted and ready, it’s time to form the truffles. Follow these steps for a perfect truffle shape:
1. Chill the Date Mixture: Before forming the truffles, refrigerate the date mixture for about 30 minutes. This makes it easier to handle and shape.
2. Use a Cookie Scoop: For uniformity, use a small cookie scoop to portion the mixture. This will help you create evenly sized truffles.
3. Roll Between Your Hands: Once you have a scoop of the mixture, roll it in your palms to form a round ball. Warm hands help bind the mixture together.
4. Size Matters: Aim for about 1-inch balls for bite-sized treats. This size is ideal for guests to enjoy without overwhelming sweetness.
Techniques for Rolling Uniform Truffle Sizes
Consistency is key when it comes to truffle presentation. Here are some techniques to ensure uniform sizes:
– Use a Kitchen Scale: Weigh each portion of the mixture to maintain consistent sizing. Each truffle should weigh about 20-25 grams.
– Practice Makes Perfect: As you roll the truffles, try to keep the pressure constant. This will help shape them evenly without cracks.
– Chill Before Rolling: If your mixture becomes too sticky, chill it briefly before rolling. This can make the process smoother and results in neater truffles.
Suggestions for Storage During This Step
While shaping your truffles, consider how to store them to maintain their freshness:
– Use a Parchment-Lined Baking Sheet: As you roll each truffle, place it on a baking sheet lined with parchment paper. This prevents them from sticking and makes it easy to transfer to the fridge.
– Refrigerate Between Steps: If you’re working through a large batch, refrigerate the truffles periodically to keep them firm and easier to handle.
– Cover with Plastic Wrap: If you can’t coat the truffles immediately, cover them with plastic wrap to prevent them from drying out.
Coating with Chocolate
Coating your formed truffles with melted chocolate enhances their flavor and appearance. Here’s how to achieve a smooth, even coating:
1. Dip with a Fork: Using a fork or a dipping tool, carefully lower each truffle into the melted chocolate. Allow any excess chocolate to drip off.
2. Back to Parchment: Place the coated truffles back onto the parchment-lined baking sheet. This will prevent sticking and ensure a clean finish.
3. Chill to Set: After coating, refrigerate the truffles for about 30 minutes until the chocolate hardens.
Tips for Achieving a Smooth, Even Coating
To avoid common pitfalls during the coating process, follow these tips:
– Maintain Chocolate Temperature: Keep the chocolate warm while working, but not too hot. If it thickens, gently reheat it to regain smoothness.
– Avoid Overcrowding: Coat a few truffles at a time. If you crowd the bowl, it might be difficult to get an even coat.
– Use Quality Chocolate: The better the chocolate, the smoother the coating. Choose high-quality chocolate for a professional finish.
Common Mistakes to Avoid When Coating Truffles
To ensure your truffles look as good as they taste, steer clear of these mistakes:
– Not Letting the Truffles Chill: Skipping the chilling step can lead to misshapen truffles when dipped in chocolate.
– Using Cold Chocolate: If your melted chocolate is too cold, it may seize when it comes in contact with the warm truffles.
– Neglecting to Tap Off Excess: Failing to tap off excess chocolate can create a thick layer that may not set properly.
Adding Toppings
Toppings not only enhance the visual appeal of your chocolate date truffles but also add exciting flavor contrasts. Here are some creative ideas:
Creative Ideas for Toppings and Their Flavor Profiles
– Crushed Nuts: Almonds, pistachios, or hazelnuts add a delightful crunch and nutty flavor that complements the sweetness of the chocolate.
– Coconut Flakes: Unsweetened coconut flakes provide a tropical twist and pair beautifully with the chocolate and dates.
– Sea Salt: A sprinkle of flaky sea salt elevates the flavor, balancing sweetness with a touch of savory.
– Cacao Nibs: For chocolate lovers, cacao nibs provide an intense chocolate flavor and a slightly crunchy texture.
How to Pair Toppings with the Chocolate Date Base
When choosing toppings, consider their flavor profiles and how they will complement the rich chocolate date base:
– Nutty Bases: If you use almond butter in your date mixture, topping with chopped almonds or pecans will enhance the nutty flavor.
– Sweet Bases: If you prefer a sweeter mixture, opt for toppings like crushed candy canes or colorful sprinkles for a fun, festive touch.
– Herbal Infusions: For an unexpected twist, consider topping with dried herbs like lavender or rosemary, which can add a sophisticated flavor contrast.
Nutritional Information and Dietary Considerations
Understanding the nutritional profile of your chocolate date truffles can help you enjoy them guilt-free.
Breakdown of Calories and Macronutrients per Truffle
On average, each truffle contains approximately:
– Calories: 70-90 kcal
– Fat: 4-5g
– Carbohydrates: 10-12g
– Protein: 1g
These values may vary depending on the specific ingredients used, particularly the type of chocolate and any added toppings.
Analysis of the Recipe’s Suitability for Various Diets
This recipe is naturally:
– Vegan: Made with dates and dairy-free chocolate, it is suitable for a plant-based lifestyle.
– Gluten-Free: No wheat or gluten-containing ingredients are present, making it a safe choice for those with gluten sensitivities.
Discussion of Potential Allergens and Substitutions
– Nuts: If serving to guests with nut allergies, be cautious with nut-based toppings and consider using seeds (like pumpkin or sunflower) instead.
– Chocolate: Ensure the chocolate used is free from dairy and allergens if necessary.
– Sweeteners: If additional sweetness is needed, consider maple syrup or agave nectar for a vegan-friendly option.
Serving Suggestions and Pairings
These chocolate date truffles are versatile treats that can elevate any occasion. Here’s how to serve them:
Ideal Occasions for Serving Chocolate Date Truffles
– Parties and Gatherings: Serve them as a sweet treat on dessert platters; their elegant appearance makes them perfect for celebrations.
– After-Dinner Dessert: Pair them with coffee or tea for a delightful end to a meal.
– Energy Snack: These truffles can serve as a quick, nutritious snack that provides a natural energy boost.
Beverage Pairings That Complement the Rich Flavors
Consider these beverages to enhance your truffle experience:
– Coffee: A bold espresso or creamy latte pairs perfectly with the richness of the chocolate.
– Tea: Herbal teas, such as peppermint or chai, can provide a refreshing contrast to the sweet truffles.
– Plant-Based Milk: Almond or oat milk can add creaminess and complement the chocolate without overpowering it.
Storage and Shelf Life
Proper storage extends the shelf life of your chocolate date truffles, ensuring they remain delicious for longer.
Best Practices for Storing Remaining Truffles
– Refrigeration: Store truffles in an airtight container in the fridge. They will stay fresh for about 1-2 weeks.
– Layering: If stacking truffles, place parchment paper between layers to prevent them from sticking together.
Tips for Freezing Truffles for Long-Term Storage
– Freezing: For longer storage, freeze truffles in a single layer on a baking sheet before transferring them to a freezer-safe container. They can last up to 3 months frozen.
– Thawing: To enjoy, thaw in the refrigerator for a few hours before serving to maintain texture and flavor.
How to Tell if Truffles Have Gone Bad and When to Discard Them
Check for the following signs to ensure your truffles are still good to eat:
– Texture Changes: If the truffles become overly hard or develop a grainy texture, they may have spoiled.
– Off Smells: Any unpleasant or sour odors indicate that the truffles should be discarded.
– Mold Growth: If you see any signs of mold, it is time to throw them out.
Conclusion
These decadent sweet chocolate date truffles offer a delightful blend of flavors and health benefits that make them an irresistible treat. Enjoying the simplicity of this recipe is made even better by the knowledge that you’re creating a healthier indulgence at home.
Feel free to experiment with different toppings and chocolate varieties to make this recipe uniquely yours. The joy of creating these truffles lies in personalizing the experience and sharing your delicious results with friends and family. Dive into the world of homemade treats and relish in the satisfaction of crafting your own healthy confections!