
In the realm of quick and flavorful meals, Crunchy Caesar Chicken Tortilla Pockets stand out as a deliciously satisfying option that combines the best of both worlds: the classic Caesar salad and the convenience of a handheld wrap. This dish not only promises a burst of flavors with every bite, but it also offers an engaging mix of textures, from the crunchiness of the golden-breaded chicken to the crisp freshness of the vegetables. Whether you’re preparing lunch for a busy workday or a casual family dinner, these tortilla pockets are sure to impress with their vibrant taste and simple preparation.
The appeal of Crunchy Caesar Chicken Tortilla Pockets lies in their versatility. They can be served warm or cold, making them perfect for meal prep or an on-the-go snack. With succulent chicken marinated in a tangy buttermilk mixture and coated in crispy panko breadcrumbs, every bite delivers a satisfying crunch that pairs beautifully with the fresh Romaine lettuce, juicy cherry tomatoes, and creamy Caesar dressing. This recipe is not just a meal; it’s an experience that brings together wholesome ingredients and bold flavors, appealing to both adults and kids alike.
Understanding the Ingredients
To create the perfect Crunchy Caesar Chicken Tortilla Pockets, it’s essential to understand the key components of the recipe. Each ingredient plays a vital role in contributing to the overall flavor and texture, ensuring that every bite is nothing short of delightful.
Chicken Breasts
The foundation of this dish is boneless, skinless chicken breasts. Opting for boneless and skinless chicken not only makes the dish healthier by reducing the fat content but also allows for quicker cooking times. Chicken breasts are versatile and can absorb flavors well, making them an ideal choice for marinating. When cooked properly, they become juicy and tender, providing a satisfying protein source that complements the other ingredients in the tortilla pockets.
Buttermilk
Buttermilk is an essential ingredient in this recipe, serving as a marinade for the chicken. The acid in buttermilk helps to tenderize the meat while infusing it with flavor. The result is chicken that is not only moist but also rich in taste. Additionally, buttermilk contributes a subtle tang that enhances the overall flavor profile of the dish. Marinating the chicken in buttermilk for at least 30 minutes—though overnight is even better—allows the flavors to penetrate deeper, ensuring that each piece of chicken is bursting with taste.
Panko Breadcrumbs
When it comes to achieving that coveted crunch, panko breadcrumbs are the clear winner. Unlike traditional breadcrumbs, panko is made from crustless bread and has a coarser texture that creates a light and airy coating. This unique structure allows for maximum crispiness when fried or baked. Using panko breadcrumbs in the breading process elevates the texture of the chicken, giving it a satisfying crunch that contrasts beautifully with the creamy Caesar dressing and fresh vegetables.
Fresh Produce
Fresh produce is key to creating a well-rounded and nutritious meal. In this recipe, Romaine lettuce and cherry tomatoes are used to add a vibrant crunch and a burst of freshness. Romaine lettuce not only offers a crisp texture but also packs a nutritional punch, being rich in vitamins A and C. Cherry tomatoes add a juicy sweetness that balances the savory elements of the dish, making each bite refreshing and flavorful.
Caesar Dressing and Parmesan Cheese
No Caesar-inspired dish would be complete without the classic Caesar dressing and Parmesan cheese. The dressing, with its creamy consistency and bold flavors, ties together the ingredients and enhances the overall taste of the tortilla pockets. A sprinkle of freshly grated Parmesan adds a salty, nutty flavor that complements the chicken and vegetables, elevating the dish to new heights. Together, these elements create the quintessential Caesar salad experience, all wrapped up in a convenient tortilla pocket.
Marination Process
Marinating the chicken is a crucial step that should not be overlooked. The process of soaking the chicken in a buttermilk mixture not only infuses it with flavor but also helps to achieve a tender texture. The buttermilk, combined with your choice of spices (such as garlic powder, paprika, and black pepper), creates a flavorful marinade that enhances the chicken’s natural taste.
For optimal results, marinating times can vary based on your schedule. A quick 30-minute marinade will impart some flavor, but for the best texture and taste, consider marinating the chicken overnight. This extended time allows the buttermilk to fully penetrate the meat, resulting in extra juicy chicken that is packed with flavor.
Breading the Chicken
Once the chicken has marinated, it’s time to move on to the breading process. This step is essential for achieving that coveted crunch that defines the Crunchy Caesar Chicken Tortilla Pockets. The technique is straightforward but requires attention to detail for the best results.
1. Prepare Your Breading Station: Set up a three-step breading station with seasoned flour, the buttermilk marinade, and a plate of panko breadcrumbs. Make sure to season the flour with salt and pepper to add an extra layer of flavor.
2. Coat the Chicken: Start by dredging a piece of marinated chicken in the seasoned flour, ensuring an even coating. Shake off any excess flour before dipping the chicken back into the buttermilk marinade.
3. Press on the Panko: After the chicken is coated in buttermilk, transfer it to the plate of panko breadcrumbs. Press the breadcrumbs firmly onto the chicken, ensuring that they adhere well. This step is crucial for achieving that crunchy texture, so don’t be shy about applying some pressure.
4. Repeat for All Pieces: Continue this process for each piece of chicken, placing the breaded chicken on a baking sheet or plate as you go.
By taking the time to bread the chicken properly, you ensure that every bite of your tortilla pocket will be satisfyingly crispy.
Cooking the Chicken
With the chicken breaded and ready to go, it’s time to cook it to perfection. There are multiple methods you can choose from, depending on your cooking preferences and equipment.
1. Frying: For a deep, crispy texture, frying the chicken is the best option. Heat a generous amount of oil in a skillet over medium heat. Once the oil is hot, carefully add the breaded chicken pieces, making sure not to overcrowd the pan. Fry until golden brown on each side, about 4-5 minutes per side, depending on the thickness of the chicken. Use a meat thermometer to ensure the internal temperature reaches 165°F for safe consumption.
2. Baking: If you prefer a healthier option, baking is an excellent alternative. Preheat your oven to 400°F (200°C) and line a baking sheet with parchment paper. Arrange the breaded chicken pieces on the sheet, and lightly spray them with cooking oil to promote browning. Bake for 20-25 minutes or until the chicken is cooked through and the coating is crispy.
3. Air Frying: For those with an air fryer, this method delivers crispy results with less oil. Preheat your air fryer to 380°F (193°C) and arrange the breaded chicken in a single layer. Cook for about 12-15 minutes, flipping halfway through, until the chicken is golden and cooked through.
Regardless of the cooking method chosen, the goal is to achieve perfectly cooked chicken that is golden, crispy, and bursting with flavor, setting the stage for assembling your Crunchy Caesar Chicken Tortilla Pockets.
Cooking the Chicken to Perfection
Cooking chicken to the right temperature is crucial not only for achieving optimal flavor but also for ensuring food safety. The USDA recommends that chicken should be cooked to an internal temperature of 165°F (75°C). This temperature guarantees that harmful bacteria are killed, making your meal safe to eat.
To accurately check the temperature, use an instant-read meat thermometer. Insert the thermometer into the thickest part of the chicken breast, avoiding bone. In addition to temperature, there are visual cues you can look for to determine doneness. The chicken should achieve a golden-brown color on the outside, indicating a flavorful sear. The juices should run clear when you cut into it, and the meat should no longer be pink in the center.
Assembling the Tortilla Pockets
Once your chicken is cooked and resting, it’s time to assemble your Crunchy Caesar Chicken Tortilla Pockets. Follow these steps for a delicious and satisfying meal:
1. Prepare Your Ingredients: Gather your cooked chicken, fresh vegetables (such as romaine lettuce, tomatoes, and cucumbers), cheese (like Parmesan or mozzarella), and Caesar dressing. Have your tortillas ready as well.
2. Slice the Chicken: Once the chicken has rested for a few minutes, slice it into strips or bite-sized pieces. This will make it easier to layer within the tortilla pockets.
3. Layering Technique: Take a tortilla and lay it flat. Start with a base of Caesar dressing; this will act as a flavorful glue for the other ingredients. Then, add a layer of the sliced chicken, followed by a generous handful of chopped romaine lettuce.
4. Add Veggies and Cheese: Next, incorporate your vegetables—chop them finely to ensure they nestle well in the pockets. Sprinkle cheese on top for that added creaminess and flavor.
5. Final Dressing: Drizzle a little more Caesar dressing on top of the cheese for an extra burst of flavor.
6. Balance Your Ingredients: Ensure there is a good balance between the chicken, veggies, cheese, and dressing. This will create a harmonious bite and prevent any single flavor from overwhelming the others.
Wrapping and Toasting the Tortilla Pockets
Now that your tortilla pockets are filled, it’s time to wrap them securely to avoid spillage during eating. Here’s how to do it:
1. Folding Technique: Start by folding the sides of the tortilla inward, just enough to cover the filling. Then, take the bottom of the tortilla and fold it up over the filling. Finally, roll the tortilla tightly from the bottom to the top, ensuring all ingredients are enclosed.
2. Secure Your Pockets: If you’re concerned about them unrolling, you can use a toothpick to secure the pocket or wrap it in parchment paper.
3. Toasting Option: For an extra layer of crunch and warmth, consider toasting the wrapped tortilla pockets. Heat a skillet over medium heat, and place the pockets seam-side down. Cook for about 2-3 minutes on each side until golden brown and crispy. This step enhances the texture and adds a delightful crunch to your meal.
4. Benefits of Toasting: Toasting not only adds a crunchy finish but also warms up the fillings, melding the flavors together beautifully.
Serving Suggestions
The Crunchy Caesar Chicken Tortilla Pockets are incredibly versatile and can be served in various ways to suit any occasion:
– Simple Pairing: Serve your pockets with extra Caesar dressing on the side for dipping. This allows each person to customize their flavor experience.
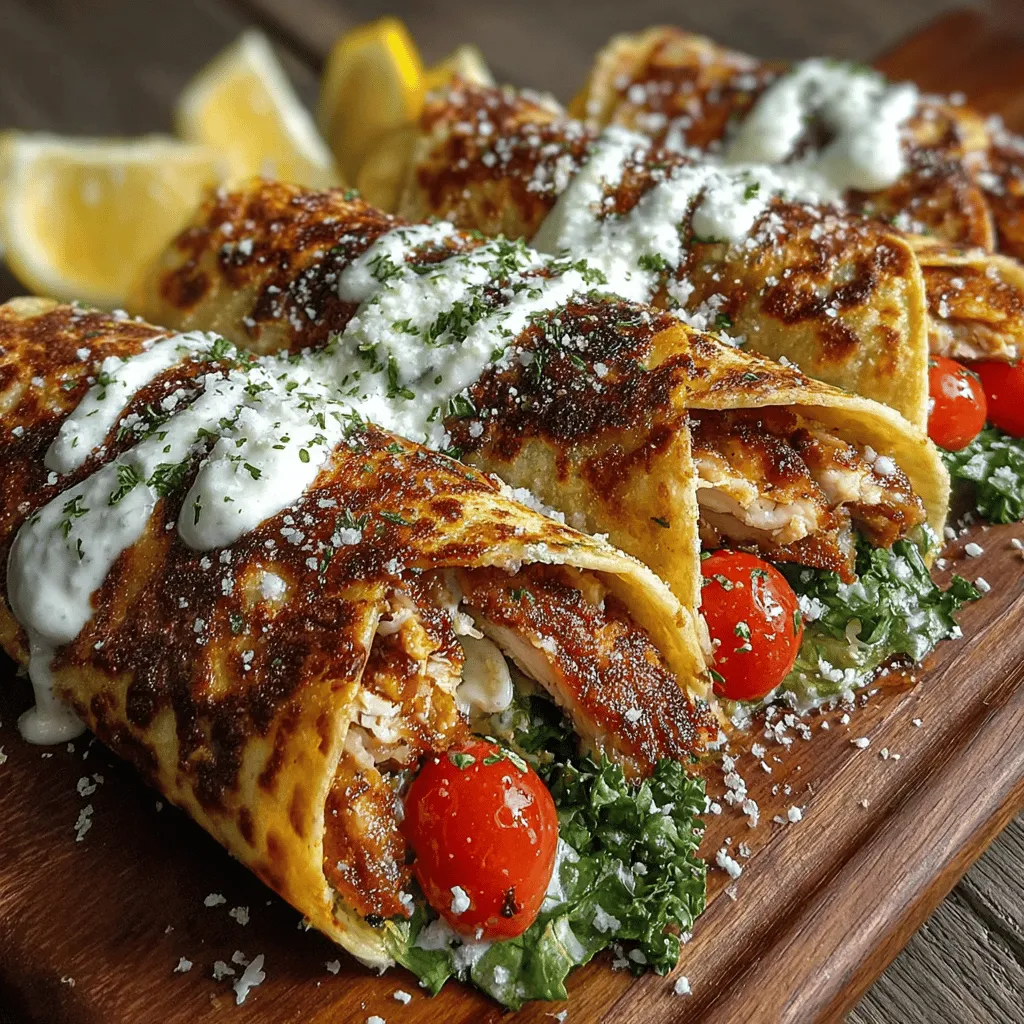
– Add a Zesty Touch: Lemon wedges are a perfect accompaniment, providing a refreshing squeeze of citrus that balances the richness of the dressing and cheese.
– Ideal for Any Meal: These pockets work well for lunch, dinner, or even as a party platter. Slice them into smaller pieces for appetizers or serve them whole for a satisfying meal.
– Pair with Sides: Consider serving with a side of fruit salad, chips, or a light soup to round out the meal.
Nutritional Information
Crunchy Caesar Chicken Tortilla Pockets not only offer a delightful flavor profile but are also packed with nutritional benefits:
– Protein-Packed: The chicken serves as an excellent source of lean protein, essential for muscle repair and overall health.
– Vitamins from Vegetables: Fresh vegetables like romaine lettuce, tomatoes, and cucumbers add vitamins A and C, as well as fiber, which is important for digestive health.
– Flavorful Additions: Cheese contributes calcium and enhances the overall taste. The Caesar dressing, while rich, can be made lighter using Greek yogurt or a homemade version to control ingredients.
When prepared thoughtfully, this dish can be a balanced option that satisfies your cravings while providing essential nutrients.
Conclusion
Crunchy Caesar Chicken Tortilla Pockets are a delightful blend of flavors and textures, making them a perfect meal for any time of day. With their combination of tender chicken, fresh vegetables, creamy cheese, and zesty dressing, these pockets are sure to please any palate.
This recipe is not only easy to make but also versatile, allowing for customization based on your preferences or dietary needs. Whether you’re preparing lunch for work, dinner for the family, or snacks for a gathering, these tortilla pockets are a fantastic choice.
We encourage you to try making this recipe at home and enjoy the delicious balance of taste and texture that Crunchy Caesar Chicken Tortilla Pockets provide. Your taste buds will thank you!
