Introduction
Buttery Garlic Herb Dinner Rolls are more than just a side dish; they are a culinary experience that brings warmth and comfort to any dining table. The aroma of freshly baked bread wafting through the kitchen can evoke cherished memories and create an inviting atmosphere for family and friends. These dinner rolls are soft, fluffy, and infused with the delightful flavors of garlic and herbs, making them a perfect addition to a variety of meals. Whether it’s a cozy family dinner, a festive holiday gathering, or a simple get-together with friends, these rolls are sure to impress and satisfy.
Homemade bread holds a special place in culinary traditions around the world. It is often associated with love, care, and the joy of sharing. The act of kneading dough and the anticipation of watching it rise is a ritual that connects us to our ancestors and their time-honored methods of bread-making. In today’s fast-paced world, making bread at home is not only a rewarding experience but also a way to enjoy the rich flavors and textures that store-bought options often lack.
The addition of garlic and herbs elevates these dinner rolls, creating a flavor profile that is both savory and aromatic. Garlic has long been celebrated for its health benefits, including its ability to enhance immune function and improve heart health. When paired with fragrant herbs like rosemary, thyme, and oregano, garlic becomes a powerhouse of flavor that can transform even the simplest of dishes. These rolls are not just a side; they are a highlight of any meal.
The Allure of Buttery Garlic Herb Dinner Rolls
Imagine pulling a tray of freshly baked dinner rolls from the oven, golden-brown and glistening with melted butter. The moment you break one open, you are greeted with a warm, pillowy interior that invites a slather of butter or a dip into warm soup. The first bite is a symphony of textures and flavors—the soft, airy bread gives way to the rich buttery goodness, while the garlic and herbs dance on your palate, leaving you craving more.
These rolls are incredibly versatile and can complement a wide array of dishes. Whether served alongside a hearty stew, a fresh salad, or as a base for your favorite sandwich, they elevate the overall dining experience. They are especially popular during holiday gatherings, where they can be enjoyed as a delightful accompaniment to the main course, or even as a snack on their own. Their appealing appearance and tantalizing aroma make them a show-stopping addition to any feast.
Understanding the Ingredients
To create the perfect Buttery Garlic Herb Dinner Rolls, it’s essential to understand the role each ingredient plays in the recipe. Here’s a closer look at the key components that come together to make these rolls irresistible.
All-Purpose Flour
All-purpose flour serves as the foundation of our dinner rolls, providing structure and texture. It contains a balanced amount of protein, which is crucial for gluten development—the protein network that gives bread its characteristic chewiness and elasticity. When combined with water and kneaded, the flour forms gluten strands that trap air bubbles produced by yeast, resulting in a light and fluffy texture. Using high-quality all-purpose flour ensures that your rolls will rise beautifully and have a satisfying mouthfeel.
Instant Yeast
Instant yeast is a game-changer in the world of bread-making. Unlike active dry yeast, which requires proofing in warm water before use, instant yeast can be mixed directly with dry ingredients, making the preparation process quicker and more efficient. It is highly effective in producing carbon dioxide, which causes the dough to rise and develop its airy texture. Using instant yeast means you can enjoy freshly baked dinner rolls in a fraction of the time, making it an ideal choice for busy home cooks.
Sugar and Salt
Sugar plays a vital role in enhancing the flavor of the rolls and providing nourishment for the yeast. During the fermentation process, yeast consumes sugar and produces carbon dioxide, which helps the dough rise. Additionally, sugar contributes to the browning of the rolls in the oven, giving them a beautiful golden hue.
Salt, on the other hand, is crucial for flavor enhancement. It helps to balance the sweetness of the sugar and enhances the overall taste of the bread. Moreover, salt strengthens gluten development, which is essential for the structure of the rolls. It’s important to measure both sugar and salt accurately to ensure that your rolls achieve the perfect flavor profile.
Warm Milk and Butter
The combination of warm milk and butter in the dough not only adds richness but also contributes to a tender crumb. Warm milk helps to activate the yeast more effectively, speeding up the fermentation process. The fats from the butter enrich the dough, resulting in a soft and fluffy texture that melts in your mouth.
It’s important to ensure that the milk is warm but not hot, as excessive heat can kill the yeast, preventing proper rising. Aim for a temperature of around 110°F (43°C) for optimal results. The melted butter should also be incorporated into the dough at a temperature that allows it to blend seamlessly without compromising the yeast.
Garlic Powder and Dried Herbs
Garlic powder and dried herbs are the stars of this recipe, infusing each roll with robust flavor. Garlic powder provides a concentrated garlic taste that permeates the dough, while dried herbs—such as Italian seasoning or a blend of oregano, thyme, and basil—add aromatic notes that complement the garlic beautifully. These ingredients work together to create a savory profile that makes each bite of the rolls a delight.
Using high-quality garlic powder and fresh dried herbs can significantly enhance the flavor of your rolls. If desired, you can also experiment with different herb combinations to find your favorite blend, ensuring that every batch is uniquely flavorful.
Fresh Parsley
Fresh parsley serves as both a garnish and a flavor enhancer in our garlic herb dinner rolls. Not only does it add a pop of color to the finished product, but it also brings a fresh, vibrant taste that brightens the overall flavor profile. Chopped parsley can be folded into the dough or sprinkled on top of the rolls before serving, providing an aromatic finish that elevates their appearance and taste.
Egg Wash
An egg wash is a mixture of beaten egg and water or milk that is brushed over the surface of the rolls before baking. This simple step adds a beautiful golden color and glossy sheen to the final product. The egg wash also helps to seal in moisture, ensuring that the rolls remain soft and tender. For a vegan alternative, you can use a mixture of plant-based milk and a bit of oil.
Step-by-Step Guide to Making Buttery Garlic Herb Dinner Rolls
Prep the Dough
To begin making your Buttery Garlic Herb Dinner Rolls, gather all your ingredients and equipment. You will need a large mixing bowl, measuring cups and spoons, a whisk, a wooden spoon or dough scraper, and a clean surface for kneading. Start by measuring out your all-purpose flour, sugar, salt, garlic powder, and dried herbs. In a separate bowl, combine the warm milk and melted butter, ensuring they are well mixed.
In the large mixing bowl, combine the dry ingredients: the flour, sugar, salt, garlic powder, and dried herbs. Whisk them together until evenly distributed. Next, create a well in the center of the dry mixture. This well will be where you add the wet ingredients.
Add Wet Ingredients
Pour the warm milk and melted butter mixture into the well you created in the dry ingredients. It’s essential that the liquid is at the right temperature—warm but not hot—to activate the yeast effectively. If you’re using instant yeast, add it directly to the dry ingredients during this step. If you prefer to use active dry yeast, you may want to proof it in a small amount of the warm milk first.
Using a wooden spoon or dough scraper, gently mix the ingredients together until a shaggy dough forms. The dough may seem sticky at first, but that’s perfectly normal. Once the flour is mostly incorporated, you can begin to knead the dough.
Knead the Dough
Turn the dough out onto a lightly floured surface. To knead, fold the dough over on itself and push it down with the heel of your hand. Rotate the dough a quarter turn and repeat this process. Kneading is essential for developing gluten, which gives the rolls their structure and chewiness.
Continue kneading for about 8-10 minutes, or until the dough becomes smooth and elastic. If the dough is too sticky, you can sprinkle a little more flour on the surface, but be cautious not to add too much, as it can lead to dry rolls. The goal is to achieve a soft, pliable dough that springs back when gently pressed.
As you knead, you’ll notice the dough becoming less sticky and more cohesive. Once you achieve this desired texture, shape the dough into a ball, and place it in a lightly greased bowl. Cover the bowl with a clean kitchen towel or plastic wrap to retain moisture and warmth as the dough rises.
Now your journey into the world of Buttery Garlic Herb Dinner Rolls has begun, and the anticipation of fresh, warm rolls is just around the corner. Stay tuned for the next steps, where we will delve into the exciting process of letting the dough rise, shaping the rolls, and baking them to perfection!
Techniques for Kneading by Hand vs. Using a Stand Mixer
When it comes to kneading dough for your buttery garlic herb dinner rolls, you have two primary methods at your disposal: kneading by hand or using a stand mixer. Both methods can yield delicious results, but they each have their unique advantages.
Kneading by Hand: This traditional method allows you to feel the dough’s texture as you work it. To knead by hand, turn the dough out onto a lightly floured surface. Push the dough away from you with the heel of your hand, fold it back over itself, and give it a quarter turn. Repeat this process for about 8-10 minutes until the dough is smooth and elastic. You’ll know you’ve done it right when the dough springs back after you poke it.
Using a Stand Mixer: If you have a stand mixer, this can significantly reduce the effort required. Fit your mixer with the dough hook attachment and mix on low speed for about 5-7 minutes. The dough should pull away from the sides of the bowl and become smooth. Using a mixer can save time and energy, especially if you’re making a larger batch.
Signs of Well-Kneaded Dough
Regardless of the method chosen, it’s crucial to recognize when your dough is sufficiently kneaded. Well-kneaded dough should be smooth, elastic, and slightly tacky to the touch but not sticky. A great test to determine if your dough is ready is the “windowpane test.” Take a small piece of dough and stretch it between your fingers. If it can stretch thin enough to allow light to pass through without tearing, it’s perfectly kneaded.
First Rise
After kneading, it’s time for the first rise, also known as bulk fermentation. This is a vital step where the dough begins to develop flavor and texture. Yeast ferments the sugars in the flour, producing carbon dioxide and alcohol, which helps the dough to rise.
Creating an Ideal Environment for Rising: To ensure optimal fermentation, place your dough in a warm, draft-free area. A temperature between 75°F to 80°F (24°C to 27°C) is ideal. If your kitchen is cool, you can create a warm environment by preheating your oven to the lowest setting for a few minutes, then turning it off and placing the covered dough inside. Alternatively, you can cover the bowl with a damp cloth to retain moisture.
Shape the Rolls
Once the dough has doubled in size, it’s time to shape your rolls. Gently punch down the dough to release excess gas and turn it out onto a floured surface. Divide the dough into equal portions, typically around 12-15 pieces, depending on your desired size.
Techniques for Dividing and Shaping: To shape the rolls, take a piece of dough and flatten it slightly. Fold the edges inward towards the center, creating a tight ball. Roll it gently between your palms to create a smooth surface. Place the rolls seam side down on a greased baking sheet or in a greased baking dish, ensuring they are spaced apart to allow for rising.
Prepare Garlic Herb Topping
While the rolls undergo their second rise, it’s time to prepare the delicious garlic herb topping that will elevate your dinner rolls. The topping is essential for flavor infusion, giving each roll a fragrant and savory finish.
Ingredients for the Topping: Combine melted butter, minced garlic, chopped fresh herbs (such as parsley, rosemary, and thyme), and a pinch of salt. This mixture will be brushed over the rolls just before baking, ensuring that every bite is bursting with flavor.
Second Rise
The second rise is crucial for achieving fluffy dinner rolls. This stage allows the shaped rolls to expand further as the yeast continues to ferment. Cover the rolls with a clean kitchen towel or plastic wrap and let them rise in a warm environment for about 30-45 minutes.
How This Step Contributes to the Final Texture: During this rise, the gluten structure relaxes, allowing the rolls to become light and airy. If the rolls don’t have enough time to rise, they may turn out dense and heavy, so be patient during this step.
Preheat and Bake
As the rolls finish their second rise, preheat your oven to 375°F (190°C). A properly preheated oven is essential for achieving the right texture and color in your rolls.
Importance of Oven Temperature and Timing: Baking at the correct temperature allows the rolls to rise quickly in the oven (oven spring) before they begin to set. This quick expansion helps create a light, fluffy interior while achieving a golden-brown exterior.
Bake the Rolls
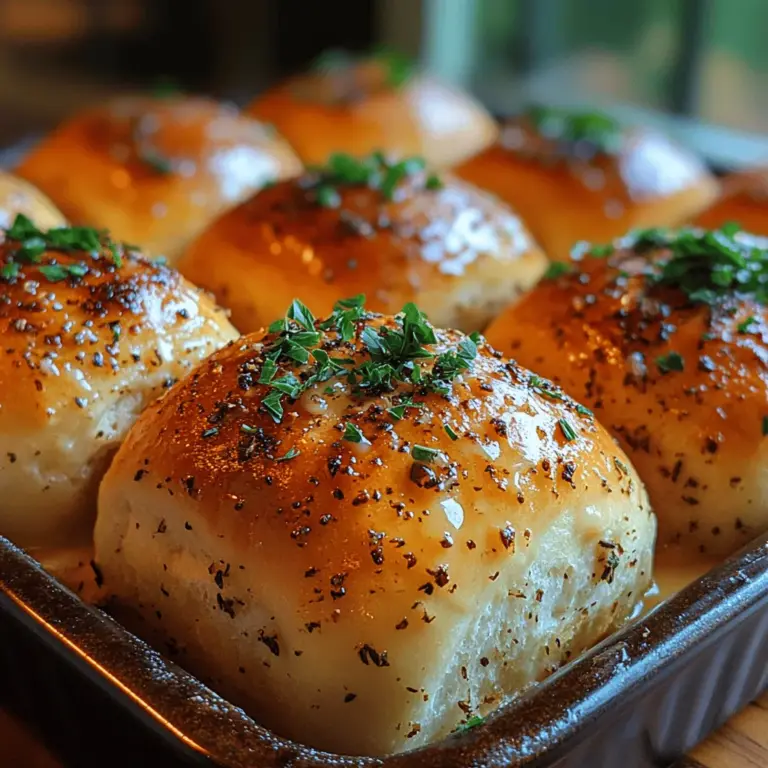
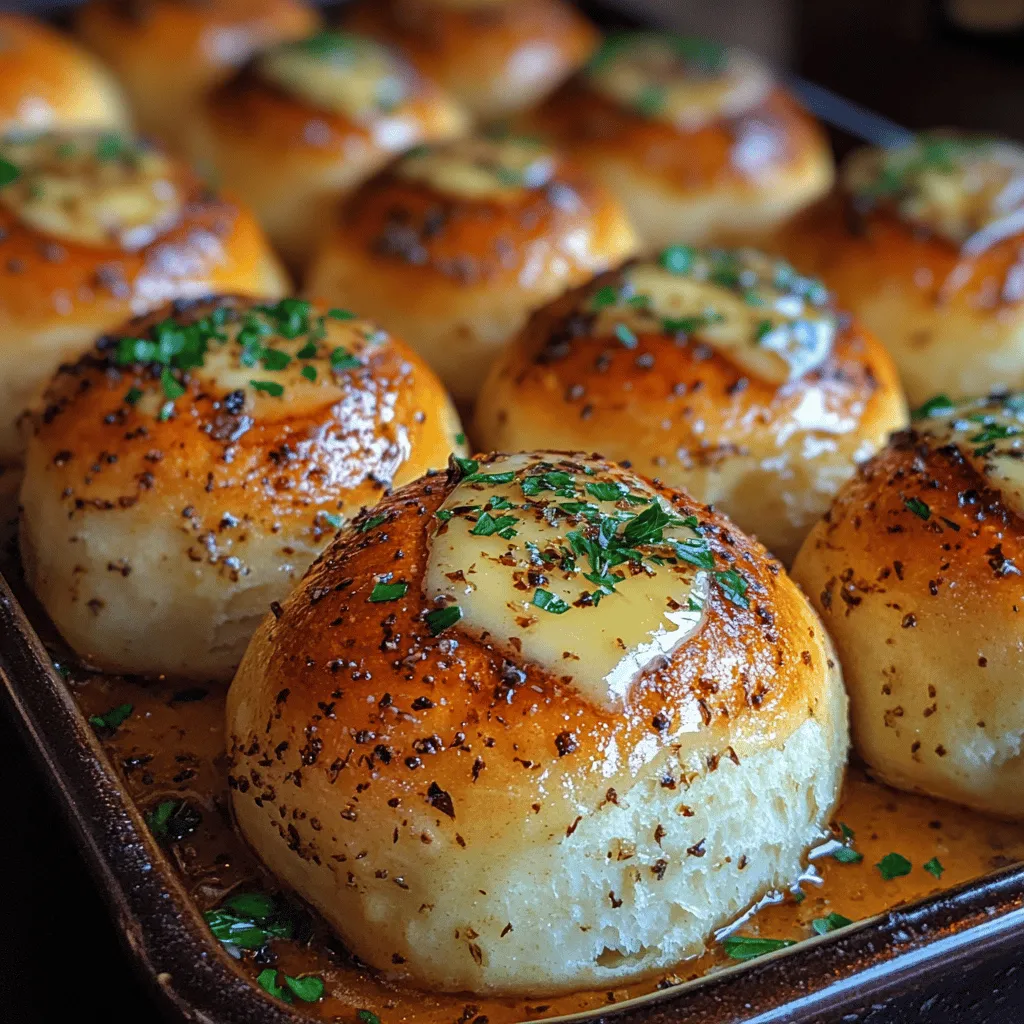
Once the oven is preheated, brush the rolls generously with the prepared garlic herb topping. Bake them for 15-20 minutes or until they are golden brown and sound hollow when tapped on the bottom.
Visual Cues for Determining Doneness: Look for a beautifully golden-brown color and a slightly crisp exterior. You can also check the internal temperature; it should reach around 190°F (88°C) for perfectly baked rolls.
Garnish and Serve
After baking, remove the rolls from the oven and let them cool slightly before serving. For an extra touch, brush them with additional melted butter and sprinkle with a pinch of sea salt or more fresh herbs.
How to Add Finishing Touches for Presentation and Flavor: To enhance the visual appeal, consider placing the rolls in a basket lined with a clean cloth. This keeps them warm and adds a rustic feel to your dining experience. The aroma of fresh rolls will surely entice everyone at the table.
The Science Behind the Recipe
Understanding the science behind your buttery garlic herb dinner rolls can enhance your baking skills.
The Role of Yeast Fermentation: Yeast is a living organism that ferments sugars in the dough, producing carbon dioxide gas and alcohol. This process not only helps the dough rise but also develops flavor. The longer the dough ferments, the more complex the flavor profile becomes.
How Kneading Develops Gluten: Kneading encourages the formation of gluten, a protein that gives bread its structure. As you knead, gluten strands form, creating a network that traps gas bubbles. This is what helps the dough rise and results in a chewy, satisfying texture.
Impact of Temperature on Yeast Activity and Dough Texture: Yeast is sensitive to temperature. Too cold, and it becomes sluggish; too hot, and it dies. Maintaining the right temperature during fermentation is essential for consistent results.
Serving Suggestions
Buttery garlic herb dinner rolls pair beautifully with a variety of dishes. Here are some serving suggestions to elevate your meal:
1. Soups: Serve your rolls alongside creamy soups like potato leek or tomato bisque for a comforting meal.
2. Salads: These rolls complement fresh salads, providing a satisfying contrast to crisp vegetables.
3. Standalone Appetizer: Enjoy them as a standalone appetizer with a dipping oil or herb-infused butter.
4. Creative Uses for Leftover Rolls: If you have any rolls left over, consider transforming them into croutons for salads or using them as sliders for your favorite fillings. They can also be sliced and toasted for breakfast sandwiches.
Health Benefits of Ingredients
Your homemade dinner rolls not only taste incredible but are also made from wholesome ingredients that offer health benefits:
– Nutritional Value of Whole Ingredients: The primary ingredients in your rolls—flour, yeast, butter, and herbs—are nutrient-rich. Whole wheat flour offers dietary fiber, which is beneficial for digestion, while the herbs add antioxidants.
– Benefits of Garlic and Herbs for Health and Wellness: Garlic is known for its immune-boosting properties and potential heart health benefits. Fresh herbs like parsley and rosemary can provide anti-inflammatory effects and enhance overall well-being.
Conclusion
These buttery garlic herb dinner rolls are a delightful addition to any meal, providing warmth, comfort, and flavor. The combination of techniques, from kneading to the perfect bake, ensures that your rolls turn out soft and delicious every time.
Baking these rolls is not just about the end product; it’s about enjoying the process, experimenting with flavors, and sharing the results with loved ones. So, roll up your sleeves, gather your ingredients, and embark on this delightful baking journey. You will undoubtedly find joy in the aroma of freshly baked bread filling your kitchen. Enjoy the experience, and watch as your friends and family delight in every warm bite!
