Introduction to No-Bake Cherry Cheesecake Cups
Delightful, creamy, and effortlessly elegant, no-bake cherry cheesecake cups are the perfect dessert for any occasion. Whether it’s a family gathering, a summer barbecue, or simply a sweet treat to enjoy at home, these individual servings of cheesecake promise indulgence without the hassle of baking. The charm of no-bake desserts lies in their simplicity; they often require minimal ingredients and time, making them accessible to both novice and seasoned bakers alike. This article will guide you through the process of creating these delicious desserts, highlighting their simplicity and the joy they bring to any table.
Understanding the Appeal of No-Bake Desserts
In recent years, no-bake desserts have soared in popularity, and for good reason. One of the most significant advantages is their convenience. With no need for an oven, these treats can be whipped up quickly, allowing you to spend more time enjoying your company rather than monitoring a baking timer. This time-saving benefit is particularly appealing during the warmer months when the thought of heating up the kitchen is less than enticing.
Moreover, no-bake desserts offer unparalleled versatility in flavor combinations. From classic chocolate mousse to innovative fruit-infused creations, the options are virtually limitless. Each recipe can be easily adapted to suit personal preferences or seasonal ingredients, ensuring that there’s always a delicious option at hand.
The allure of these desserts is especially palpable during summer gatherings. Picture a picnic or a backyard barbecue where the heat is high, and the last thing anyone wants is to be stuck in a hot kitchen. No-bake desserts, like our cherry cheesecake cups, provide a refreshing and satisfying end to any meal, requiring little more than a refrigerator to set.
Delving into the history of cheesecake reveals a fascinating evolution. Its origins can be traced back to ancient Greece, where it was served to athletes during the first Olympic Games. Over the centuries, cheesecake has transformed into various forms across different cultures, culminating in the rich, creamy versions we enjoy today. The rise of no-bake variations represents a modern twist on this classic dessert, appealing to a generation that values both flavor and convenience.
Ingredients Overview
Creating the perfect no-bake cherry cheesecake cups begins with a well-considered selection of ingredients. Each component plays a vital role in achieving a harmonious blend of flavors and textures that will leave a lasting impression on your palate.
Graham Cracker Crumbs: Serving as the classic base for any cheesecake, graham cracker crumbs provide a sweet, crunchy foundation. They offer a delightful contrast to the creamy filling and are essential for that traditional cheesecake experience.
Butter and Sugar: These ingredients enhance the flavor of the crust. The melted butter binds the crumbs together, creating a cohesive base, while the sugar adds a touch of sweetness that complements the natural flavors of the graham crackers.
Cream Cheese: As the star ingredient, cream cheese brings richness and creaminess to the cheesecake filling. It’s important to use full-fat cream cheese for the best texture and flavor, as it contributes to the smooth, velvety consistency that is characteristic of cheesecake.
Powdered Sugar: Adding sweetness and a fine texture, powdered sugar is preferred over granulated sugar in this recipe. Its smooth consistency allows it to dissolve easily into the cream cheese, ensuring a lump-free filling.
Vanilla Extract: A staple in many dessert recipes, vanilla extract adds depth of flavor, enhancing the overall taste of the cheesecake. It complements the cream cheese beautifully and balances the sweetness of the sugar.
Heavy Whipping Cream: This ingredient is crucial for achieving that light, airy texture that makes no-bake cheesecakes so enjoyable. When whipped, heavy cream incorporates air, giving the filling a fluffy quality that contrasts perfectly with the dense crust.
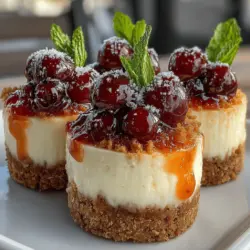
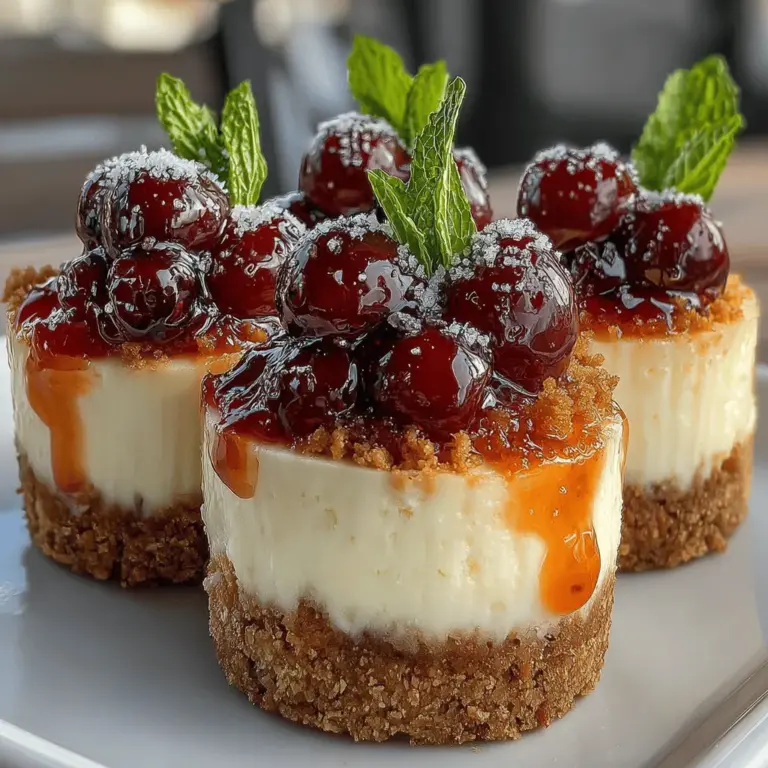
Cherry Pie Filling: The star topping, cherry pie filling, adds a burst of flavor and a beautiful pop of color to the cheesecake cups. Its sweet-tart balance complements the rich filling, making each bite a delightful experience.
Optional Garnishes: Fresh cherries and mint leaves can elevate the presentation of your cheesecake cups. They not only add a visual appeal but also provide a refreshing contrast to the richness of the cheesecake.
Step-by-Step Recipe Instructions
Now that we’ve covered the history and ingredients, let’s dive into the first step of creating your no-bake cherry cheesecake cups: preparing the base by crafting the graham cracker crust.
Preparing the Base: Crafting the Graham Cracker Crust
The first step in this delightful dessert is to prepare the graham cracker crust. Achieving the right consistency with the crumb mixture is vital for a sturdy base that holds up to the luscious cheesecake filling. Here’s how to get it just right:
1. Crush the Graham Crackers: Start by placing the graham crackers in a food processor. Pulse them until they turn into fine crumbs. If you don’t have a food processor, you can also place the crackers in a zip-top bag and crush them with a rolling pin. The goal is to achieve a uniform texture without any large chunks.
2. Combine with Butter and Sugar: In a mixing bowl, combine the graham cracker crumbs with melted butter and sugar. The typical ratio is about 1 and 1/2 cups of graham cracker crumbs to 1/2 cup of melted butter and 1/4 cup of sugar. Mix until the crumbs are evenly coated and the mixture resembles wet sand.
3. Press into Cups: Using a tablespoon or your fingers, divide the crumb mixture evenly among your serving cups or jars. Press the mixture firmly into the bottom of each cup to create a solid crust. Ensure that it is packed tightly to prevent it from crumbling when served.
4. Chill to Set: Once you’ve pressed the crust into the cups, place them in the refrigerator for about 15-20 minutes to allow the base to set. This chilling period helps the butter solidify, making the crust firmer and easier to handle when adding the cheesecake filling.
By following these steps, you’ll create a delicious and sturdy foundation for your no-bake cherry cheesecake cups. As you prepare the next components of this delightful dessert, you’ll appreciate the balance that the crust brings to the overall flavor profile.
Stay tuned for the continuation of this recipe, where we’ll explore creating the creamy cheesecake filling and the final assembly of these delectable cups.

Tips for Pressing the Crust Evenly into the Serving Cups
Creating a well-formed crust is crucial for the overall structure and enjoyment of your no-bake cherry cheesecake cups. Here are some helpful tips to ensure that your crust is evenly pressed into the serving cups:
1. Use the Right Tools: A flat-bottomed measuring cup or a small glass can be incredibly effective in pressing the crumbs down firmly. This tool helps distribute pressure evenly, preventing uneven spots in your crust.
2. Moisten the Crust: Make sure your melted butter is thoroughly mixed with the graham cracker crumbs. This combination should resemble wet sand and will help the crust hold together better once pressed into the cups.
3. Press Firmly but Gently: Apply consistent pressure while pressing down the mixture. You want to compact the crumbs tightly without crushing them. Aim for a nice even layer that covers the bottom of the cup and slightly up the sides.
4. Chill Before Filling: After pressing the crust into the cups, place them in the refrigerator for about 10-15 minutes. This allows the butter to firm up, which will help the crust hold its shape when you add the cheesecake filling.
Creating the Cheesecake Filling: The Heart of the Dessert
The cheesecake filling is the heart of your no-bake cherry cheesecake cups, and getting it right is essential for a delicious dessert.
Techniques for Beating Cream Cheese to Perfection
1. Soften the Cream Cheese: Make sure your cream cheese is at room temperature before you start. Cold cream cheese can lead to lumps in your filling. Leave it out for about 30-60 minutes prior to mixing.
2. Use a Mixer: For the best results, use a handheld or stand mixer to beat the cream cheese. Start on a low speed to break it up, and then gradually increase the speed. Beat until it’s smooth and creamy, ensuring that there are no lumps.
3. Add Sugar Gradually: Once the cream cheese is smooth, gradually add in granulated sugar while mixing. This helps to incorporate the sugar evenly into the cream cheese, resulting in a well-balanced sweetness.
Understanding the Folding Technique for Incorporating Whipped Cream
1. Whip the Cream: In a separate mixing bowl, whip heavy cream until stiff peaks form. This means that when you lift the beaters, the cream should hold its shape without collapsing.
2. Gently Fold: Once your whipped cream is ready, add a third of it to the cream cheese mixture. Using a rubber spatula, gently fold the whipped cream into the cream cheese. The key here is to be gentle to retain the airiness of the whipped cream, which gives the cheesecake its light texture.
3. Repeat: Gradually add the remaining whipped cream in two more additions, folding gently after each addition. This will ensure your cheesecake filling is light, fluffy, and perfectly sweet.
Layering the Cheesecake: Building Flavor and Texture
Layering is essential to create both visual appeal and a delightful mix of flavors in your no-bake cheesecake.
Strategies for Even Distribution of the Cheesecake Filling
1. Use a Spoon or Piping Bag: For even distribution of the filling, you can either use a spoon or a piping bag. If using a piping bag, cut off a small portion of the tip for better control while dispensing the filling into the cups.
2. Fill to the Top: Aim to fill each cup just to the rim, ensuring a generous portion of cheesecake filling. This will create a beautiful layered effect when you add the toppings later.
Tips for Ensuring a Clean Layer Separation Between Crust and Filling
1. Chill Between Layers: If you’re making multiple layers (like adding a fruit layer), allow each layer to set slightly before adding the next. This will prevent them from mixing and provide a clean separation.
2. Spread Evenly: When adding the filling, ensure that the base layer (the crust) is not disturbed. Gently spread the cheesecake filling over it without pressing down too hard.
Adding the Topping: Cherry Pie Filling and Its Benefits
Cherry pie filling is a classic topping that beautifully complements the creamy cheesecake. Here’s how to make the most of it.
Exploring the Balance of Flavors Between Cheesecake and Cherry Topping
1. Sweet vs. Tart: The sweetness of the cheesecake filling pairs perfectly with the tartness of the cherry pie filling, creating a delightful balance. Ensure that your cherry topping is not overly sweet, as this can overpower the cheesecake.
2. Layering Technique: Spoon the cherry pie filling gently on top of the cheesecake layer, allowing it to spread naturally. This gives a beautiful presentation and ensures that every bite has a bit of both flavors.
Suggestions for Variations in Toppings for Different Flavor Profiles
1. Fruit Alternatives: While cherry is a classic choice, consider using other fruits like blueberries, strawberries, or raspberries. Each fruit brings its unique flavor and can create a different dessert experience.
2. Chocolate or Caramel Drizzle: For a decadent twist, drizzle chocolate or caramel sauce over the top of the cherry filling. This adds richness and enhances the overall dessert experience.
Chilling Time: The Importance of Setting
Chilling is a vital step in developing the flavor and texture of your no-bake cherry cheesecake cups.
Discussing How Chilling Time Affects Flavor and Texture
1. Flavor Development: Chilling allows the flavors to meld together. The longer you chill, the better the cheesecake will taste, as the sweetness of the cream cheese and the tartness of the cherries will harmonize beautifully.
2. Texture Improvement: Chilling helps the filling to set properly, giving it a firmer but still creamy texture. Aim for at least 4 hours of chilling time, but overnight is even better for optimal results.
Insights into the Science Behind the Chilling Process
1. Setting the Gelatin: If you choose to use gelatin in your recipe for added firmness, chilling allows the gelatin to set properly, ensuring that the cheesecake holds its shape when served.
2. Cooling Effects on Dairy: Chilling helps to stabilize the dairy components, making them firmer and preventing them from separating when served.
Serving Suggestions and Presentation
The presentation of your no-bake cherry cheesecake cups can elevate the dessert to a whole new level.
Creative Ways to Serve No-Bake Cherry Cheesecake Cups
1. Variety of Vessels: Instead of standard cups, consider serving your cheesecake in mason jars, shot glasses, or elegant dessert dishes. Each vessel can create a different ambiance and make the dessert feel special.
2. Garnishing Ideas: Top each cheesecake cup with a sprinkle of crushed graham cracker, a dollop of whipped cream, or even a few fresh cherries for a pop of color and texture. A mint leaf can also add a touch of freshness.
3. Pairing Suggestions: Serve your cheesecake cups with a refreshing beverage like iced tea, sparkling water, or even coffee. The right drink can enhance the dessert experience and cater to your guests’ tastes.
Nutritional Information
Understanding the nutritional components of your no-bake cherry cheesecake cups can be beneficial, especially for those watching their intake.
Breakdown of Calories and Macronutrients
1. Calories: Each serving typically contains around 250-300 calories, depending on the specific ingredients used. This variation can be significant if you opt for lower-fat cream cheese or reduced-sugar options.
2. Macronutrients: The cheesecake provides a balance of carbohydrates from the crust, fats from the cream cheese and whipped cream, and proteins from the dairy.
Discussing the Potential for Healthier Ingredient Substitutions
1. Lower-Calorie Options: Substitute full-fat cream cheese with low-fat or Greek yogurt for a healthier twist. This can reduce calories while still maintaining a creamy texture.
2. Alternative Sweeteners: Consider using natural sweeteners like honey or agave nectar, which can provide sweetness with fewer calories compared to granulated sugar.
Conclusion: The Joy of No-Bake Cherry Cheesecake Cups
No-bake cherry cheesecake cups encapsulate the essence of a perfect dessert—delicious, easy to prepare, and visually stunning. This recipe allows anyone, regardless of baking skill, to impress guests and satisfy sweet cravings. With their creamy texture and delightful cherry topping, these cheesecake cups are sure to become a favorite in any dessert repertoire. Enjoy the simplicity and joy of this delightful treat, and let it bring sweetness to your next gathering.