Crispy Chicken Caesar Sandwich Melts Recipe
Introduction
The Crispy Chicken Caesar Sandwich Melts are a delightful fusion of classic flavors and modern convenience, perfect for any meal of the day. This dish combines the beloved elements of a traditional Caesar salad with the satisfying crunch of crispy chicken, all sandwiched between slices of toasted sourdough bread. Each bite offers a delectable contrast of textures—crispy, creamy, and fresh. Whether you’re looking for a hearty lunch option or a comforting dinner, these sandwich melts are sure to impress.
Chicken sandwiches hold a significant place in culinary culture around the world, celebrated for their versatility and ability to cater to a wide array of tastes. From gourmet restaurants to backyard barbecues, the chicken sandwich has evolved into countless variations, each offering a unique take on this classic dish. The Crispy Chicken Caesar Sandwich Melt stands out not only for its flavor but also for its ability to elevate a simple chicken sandwich into a gourmet experience.
Understanding the Ingredients
To create the perfect Crispy Chicken Caesar Sandwich Melts, it’s essential to understand the key ingredients that come together to make this dish truly exceptional.
– Boneless, Skinless Chicken Thighs: Opting for chicken thighs instead of breasts is a game-changer in this recipe. Thighs are known for their juiciness and robust flavor, making them ideal for frying. They remain tender and moist even after cooking, ensuring that every bite of the sandwich is filled with flavor.
– Buttermilk: This ingredient plays a critical role in marinating the chicken. The acidity of buttermilk helps to tenderize the meat, breaking down proteins and resulting in a softer texture. Additionally, the tangy flavor of buttermilk enhances the overall taste of the chicken, creating a delicious foundation for the dish.
– Spices: The use of garlic powder, onion powder, and paprika adds layers of flavor to the chicken. Garlic powder delivers a savory depth, while onion powder contributes a subtle sweetness. Paprika not only provides a hint of smokiness but also adds a beautiful color to the final product.
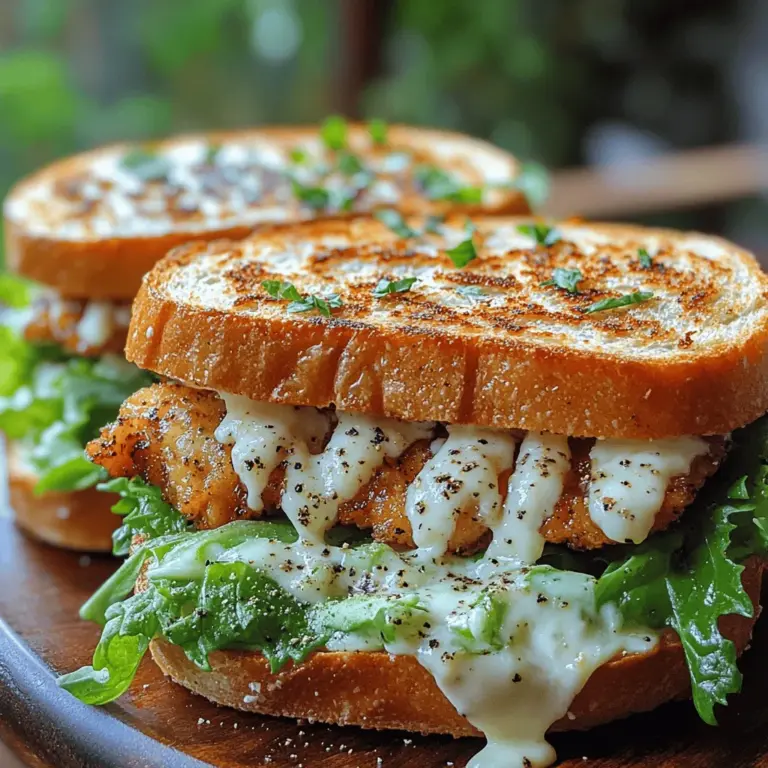
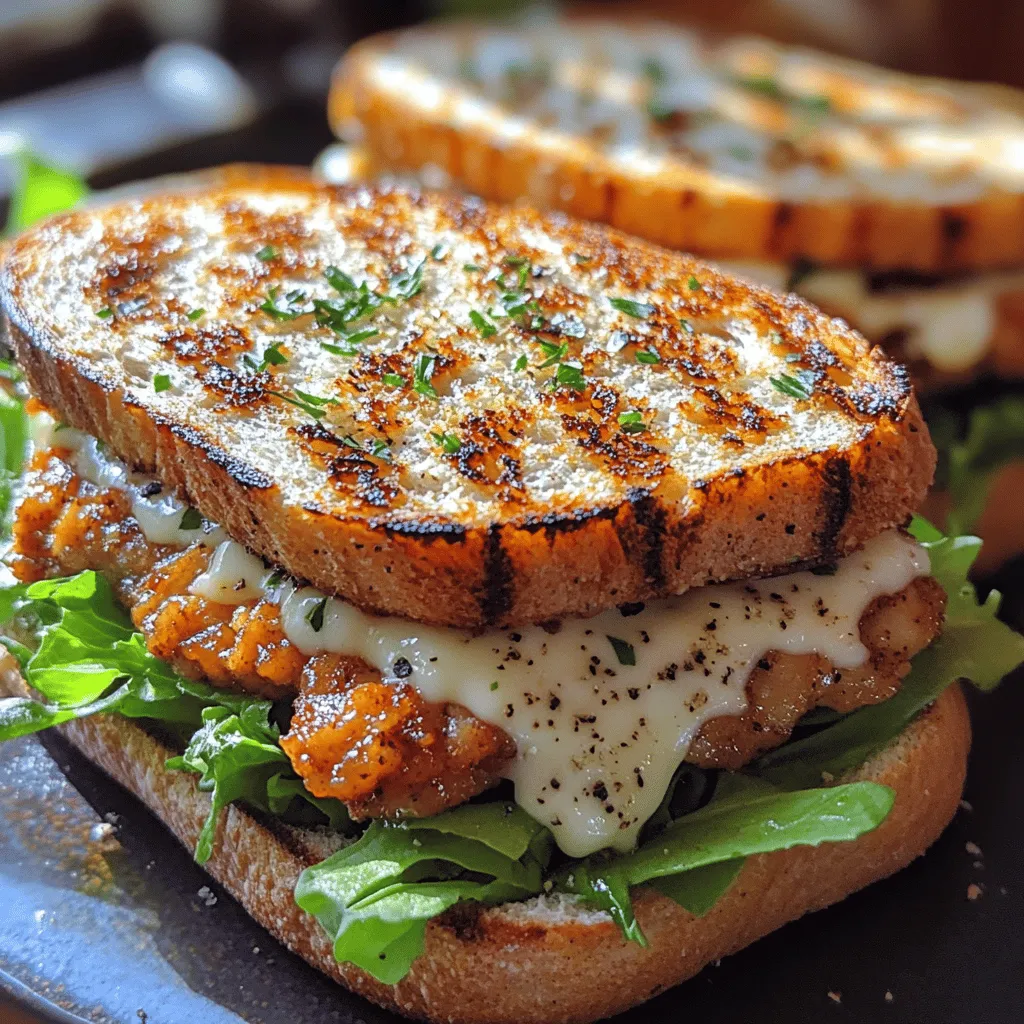
– Sourdough Bread: When it comes to bread for sandwich melts, sourdough is the ultimate choice. Its chewy texture and slightly tangy flavor complement the richness of the chicken and the creaminess of the dressing. Additionally, sourdough holds up well under heat, ensuring that the sandwich maintains its structure even when melted.
– Nutritional Benefits of the Main Ingredients: Each component of the Crispy Chicken Caesar Sandwich Melt brings its own nutritional advantages. Chicken is a fantastic source of protein, essential for muscle repair and overall health. Romaine lettuce adds a low-calorie crunch and a boost of vitamins A and K, while cheese not only enhances flavor but also provides calcium, vital for bone health.
Marinating the Chicken
Marination is a crucial step in developing the flavors of the Crispy Chicken Caesar Sandwich Melts. Not only does marinating enhance the taste, but it also ensures that the chicken remains moist during cooking.
Step-by-Step Guide to Marinating
1. Prepare the Marinade: Start by mixing together buttermilk, garlic powder, onion powder, paprika, salt, and pepper in a bowl. This combination will infuse the chicken with flavor while tenderizing it.
2. Add the Chicken: Place the boneless, skinless chicken thighs into the marinade, ensuring they are fully coated. For optimal flavor absorption, use a resealable plastic bag or a shallow dish.
3. Refrigerate: Seal the bag or cover the dish with plastic wrap and refrigerate. The marination time can vary; ideally, let the chicken marinate for at least 1 hour, but for a more intense flavor, marinating overnight is recommended.
4. Best Practices for Marinating Chicken: Always marinate chicken in the refrigerator to prevent bacteria growth. If you are short on time, even a 30-minute soak can make a difference, but longer marination allows the flavors to penetrate deeply.
5. Impact of Marination Time on Flavor: The longer the chicken sits in the marinade, the more flavorful it becomes. However, avoid marinating for more than 24 hours, as the texture may begin to break down too much, resulting in a mushy product.
Preparing the Coating
Once the chicken has marinated and is ready to cook, the next step is to prepare the coating that will give it that irresistible crispy exterior.
– Explanation of the Breading Process: The breading process involves three essential steps: dredging the marinated chicken in seasoned flour, dipping it in an egg wash, and finally coating it in breadcrumbs. This triple-layered approach ensures that the chicken has a crunchy texture that contrasts beautifully with the tender meat inside.
– Differences Between Seasoned Flour and Regular Flour: While regular flour can be used for breading, seasoned flour is highly recommended for this recipe. Seasoned flour is simply flour that has been mixed with various spices, like salt, pepper, and garlic powder. This not only adds flavor but also enhances the overall taste profile of the crispy coating.
By starting with the right ingredients and taking the time to marinate the chicken properly, you set the stage for a delicious and satisfying meal. The Crispy Chicken Caesar Sandwich Melts are not just a meal; they are an experience that brings together comfort food and gourmet flavors in one delightful package. As you move forward with the preparation, you’ll discover just how easy it is to create a dish that is both indulgent and satisfying. Stay tuned for the next steps in crafting this culinary masterpiece.
Tips for Achieving the Perfect Crunch
Creating the ultimate Crispy Chicken Caesar Sandwich Melt begins with perfecting the crunch of the chicken. Here are some essential tips to help you achieve that crispy crust that everyone will love:
– Double-Dip for Extra Crunch: For an extra crunchy texture, consider double-dipping your chicken in the egg wash and breadcrumbs. This means after your chicken is coated in the breadcrumbs, dip it back into the egg wash once more and then coat it again in breadcrumbs. This technique creates a thicker crust that holds up beautifully when fried.
– Use Panko Breadcrumbs: Opting for panko breadcrumbs instead of regular breadcrumbs can significantly enhance the crunchiness of your chicken. Panko is lighter and airier, leading to a crispier finish when fried.
– Let it Rest: After coating your chicken, let it rest for about 10-15 minutes before frying. This helps the coating adhere better during cooking, resulting in a crunchier texture.
Cooking the Chicken
Detailed Instructions for Frying
1. Prepare the Chicken: Start by seasoning your chicken breasts with salt, pepper, and any other desired spices. This step infuses flavor right into the meat.
2. Set Up the Breading Station: Create a breading station with three plates: one for flour, one for beaten eggs, and one for breadcrumbs. Dredge each chicken breast in flour first, shaking off any excess. Then, dip it into the egg wash, allowing any excess to drip off, before finally coating it in breadcrumbs.
3. Heat the Oil: In a large skillet, heat about 1/2 inch of vegetable oil over medium-high heat. It’s crucial to monitor the oil temperature; ideally, it should be around 350°F (175°C). Use a thermometer for accuracy, or drop a small piece of bread into the oil—if it sizzles and bubbles, the oil is ready.
Importance of Oil Temperature
Maintaining the right oil temperature is essential for achieving the perfect crispy chicken. If the oil is too hot, the crust may burn before the chicken is cooked through. Conversely, if it’s too cool, the chicken will absorb more oil and become greasy instead of crispy.
Cooking Time and Tips for Ensuring Doneness
Cook the chicken for about 5-7 minutes on each side, depending on the thickness of the breasts. The goal is to reach an internal temperature of 165°F (74°C) for safe consumption. To ensure even cooking, consider using a meat thermometer, which provides an accurate reading and helps avoid undercooking or overcooking.
Discussing Safety Measures
Always prioritize food safety by ensuring that your chicken reaches the recommended internal temperature. Using a thermometer is the most effective way to confirm doneness. Remember to clean any surfaces or utensils that come into contact with raw chicken to avoid cross-contamination.
Alternative Cooking Methods
For those looking for a healthier option, you can also bake or air fry the chicken:
– Baking: Preheat your oven to 400°F (200°C). Place the breaded chicken on a baking sheet lined with parchment paper and bake for 20-25 minutes, flipping halfway through, until golden brown and cooked through.
– Air Frying: Preheat your air fryer to 375°F (190°C). Arrange the breaded chicken in a single layer and air fry for about 12-15 minutes, flipping halfway through, until crispy and cooked through.
Assembling the Sandwiches
Step-by-Step Guide to Assembling
Once your chicken is perfectly cooked, it’s time to assemble your Crispy Chicken Caesar Sandwich Melts. Follow these steps for a delicious result:
1. Choose Your Bread: Start with your choice of bread. A hearty sourdough or ciabatta works best to hold up against the fillings.
2. Spread the Dressing: Generously spread Caesar dressing on one side of each slice of bread. This adds flavor and moisture to the sandwich.
3. Add the Chicken: Place the fried chicken breast on top of the dressing-covered side.
4. Layer the Lettuce: Add a handful of fresh romaine lettuce on top of the chicken for a crunchy contrast.
5. Sprinkle with Cheese: Choose a cheese that melts well, such as provolone, mozzarella, or even a sharp cheddar. Distribute the cheese evenly over the lettuce.
Importance of Cheese Choice for Melting Capabilities
Selecting the right cheese is crucial for achieving that gooey, melty texture we all crave in a sandwich. Provolone and mozzarella are excellent choices as they melt beautifully, while cheddar adds a rich flavor that complements the Caesar dressing.
Tips for Evenly Distributing Ingredients
To ensure that each bite of your sandwich is flavorful, pay attention to the distribution of ingredients. Ensure the chicken is centered and that the lettuce and cheese are spread evenly, avoiding any overpowering flavors and allowing for a balanced taste in every bite.
Melting the Cheese
Importance of Broiling for Achieving That Perfect Melt
To melt the cheese to perfection, preheat your broiler. Once your sandwiches are assembled, place them on a baking sheet and position them under the broiler for about 2-3 minutes. Watch closely—this method allows the cheese to melt and bubble beautifully while crisping the bread.
Timing Tips to Avoid Burning
Broiling can happen quickly, so keep a close eye on your sandwiches to prevent burning. Pull them out when the cheese is bubbly and slightly golden. If you notice the bread starting to brown too quickly, you can lower the rack or turn off the broiler and let the residual heat finish melting the cheese.
How to Know When the Sandwich is Ready
The sandwiches are ready when the cheese is melted, the bread is golden brown, and everything is heated through. You can also check the internal temperature of the chicken again if you feel it’s necessary.
Serving Suggestions
Presentation Ideas for a Visually Appealing Dish
To make your Crispy Chicken Caesar Sandwich Melts even more appealing, consider serving them with a side of Caesar salad or crispy fries. You can plate the sandwiches neatly, garnish with fresh parsley or additional parmesan, and drizzle some extra Caesar dressing around for a pop of color.
Suggested Side Dishes that Pair Well with the Sandwich
Complement your sandwiches with sides such as:
– Sweet Potato Fries: Their natural sweetness contrasts nicely with the salty, savory flavors of the sandwich.
– Coleslaw: A light and tangy coleslaw adds a refreshing crunch.
– Chips: Classic potato chips or homemade tortilla chips serve as a crunchy side that’s easy to prepare.
Discussing the Versatility of the Sandwich
One of the best things about Crispy Chicken Caesar Sandwich Melts is their versatility. You can easily customize the recipe to suit various dietary needs or preferences. Consider swapping regular chicken for grilled tofu or tempeh for a vegetarian option, or using gluten-free bread for a gluten-free meal. You can also experiment with different dressings or add toppings like bacon for an extra kick.
Conclusion
In summary, Crispy Chicken Caesar Sandwich Melts offer a delightful combination of flavors and textures that are sure to satisfy your cravings. The crispy chicken, creamy Caesar dressing, and melty cheese create a comforting meal perfect for any occasion. Whether you’re hosting a gathering or enjoying a cozy night in, this recipe is sure to impress your family and friends.
We encourage you to try this recipe at home for a warm, satisfying meal that celebrates the joy of cooking and sharing. Homemade meals bring loved ones together, and there’s nothing quite like enjoying a delicious sandwich straight from your kitchen. So gather your ingredients, follow the steps, and indulge in the crispy, cheesy goodness of these delightful sandwiches!
