Introduction to Cheesy Delight Muffin Cups
In the vast world of comfort food, few dishes evoke the same nostalgic appeal as macaroni and cheese. This classic comfort dish, with its creamy texture and cheesy flavor, has won hearts and taste buds alike for generations. Yet, when you take this beloved staple and transform it into bite-sized muffin cups, you create something truly special: Cheesy Delight Muffin Cups. These miniature versions of the traditional dish not only elevate the classic recipe but also introduce a fun and convenient way to enjoy it. Perfect for gatherings, meal prep, or a cozy family dinner, these muffin cups are a guaranteed crowd-pleaser.
The beauty of Cheesy Delight Muffin Cups lies in their versatility. They can be served as an appetizer, a side dish, or even as a main course paired with a fresh salad. The recipe is straightforward, making it accessible for cooks of all skill levels. Whether you are looking for a quick weeknight meal or a dish to impress guests at a party, these muffin cups are the way to go. Throughout this article, you will find detailed guidance on making these delicious morsels, including a breakdown of ingredients, preparation methods, and tips for personalizing your cheesy creations.
Understanding the Ingredients
To create the perfect Cheesy Delight Muffin Cups, it is essential to understand the core ingredients that come together to make this dish a standout. Each component plays a crucial role in building flavor, texture, and overall satisfaction.
– Elbow Macaroni: As the foundation of the dish, elbow macaroni provides the necessary texture and heartiness. Its small, curved shape allows it to hold onto the creamy cheese sauce, ensuring that each bite is filled with cheesy goodness. While elbow macaroni is traditional, feel free to experiment with other pasta shapes to suit your preferences.
– Cheeses: The cheese selection is perhaps the most critical aspect of this recipe. A blend of sharp cheddar, mozzarella, and Parmesan creates a rich and flavorful profile. Sharp cheddar offers a robust flavor that pairs beautifully with the creaminess of mozzarella, while Parmesan adds a delightful nuttiness that rounds out the taste. This combination not only enhances the flavor but also contributes to a gooey, melty texture that is irresistible.
– Seasonings: To elevate the cheese sauce, a blend of seasonings such as garlic powder, onion powder, paprika, and black pepper is essential. These ingredients add depth and complexity to the flavor profile, ensuring that the muffin cups are far from bland. The right balance of seasoning can make a significant difference in transforming a simple dish into something extraordinary.
– Eggs: Eggs play a vital role in binding the muffin cups together. They help maintain the structure of the cups and ensure that they hold their shape once baked. This is particularly important in a dish that relies on pasta and cheese, which can easily become too loose without the cohesion that eggs provide.
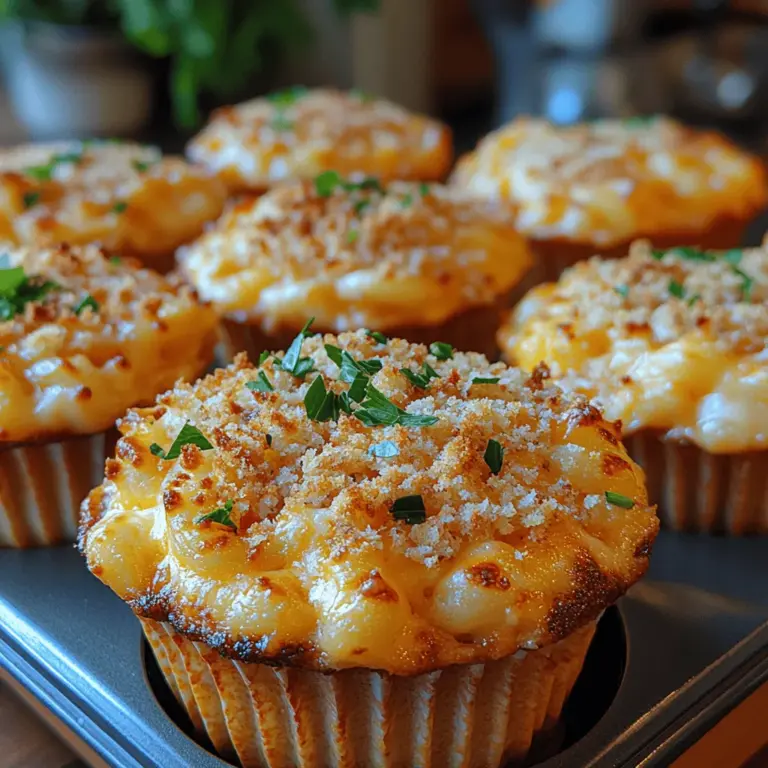
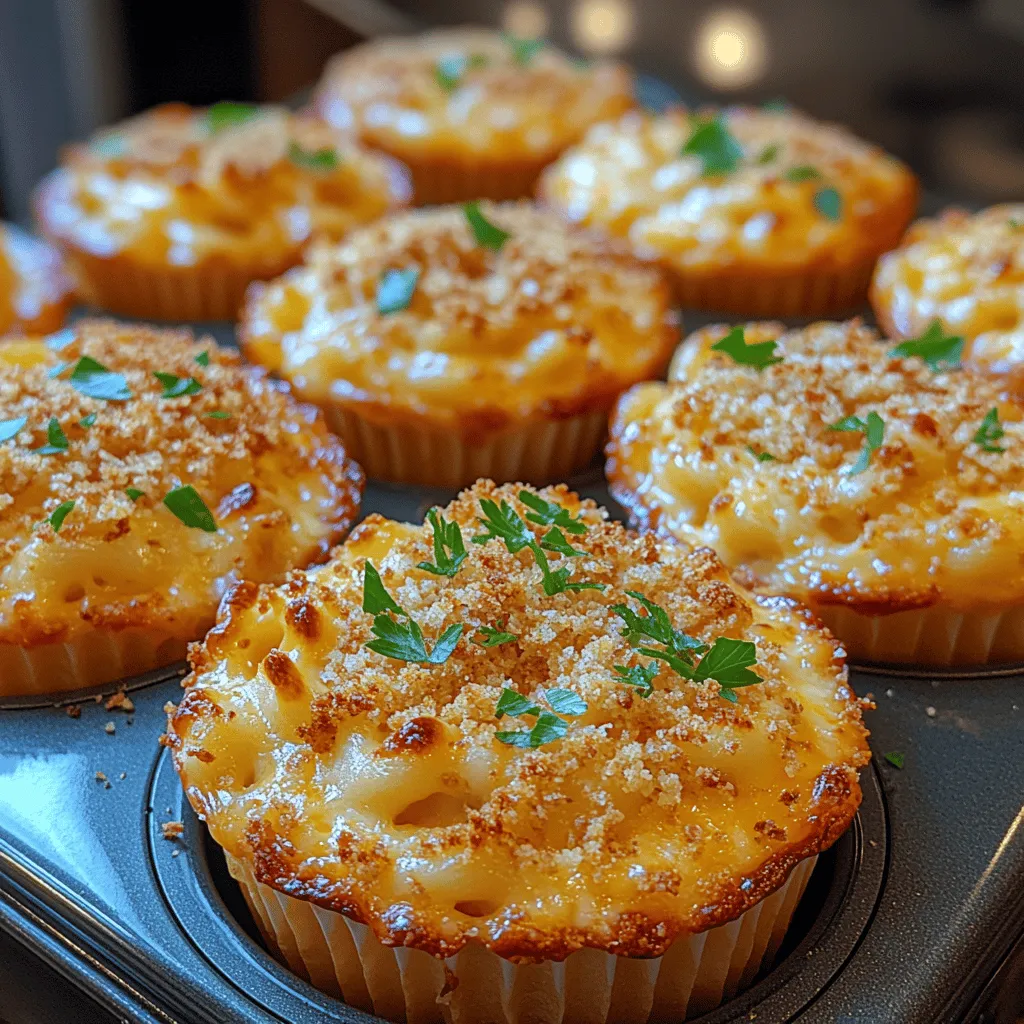
– Optional Toppings: For those looking to add an extra layer of texture and flavor, optional toppings such as breadcrumbs and fresh herbs can be included. Breadcrumbs can provide a satisfying crunch on top of the muffin cups, while a sprinkle of fresh herbs like parsley or chives can add a pop of color and freshness.
The Importance of Preparation
Successful cooking always begins with thorough preparation. For Cheesy Delight Muffin Cups, taking the time to prepare properly will ensure that your muffin cups come out perfectly baked and delicious.
– Preheating the Oven: One of the most critical steps in baking is preheating the oven. This is not just a suggestion; it’s essential for achieving even cooking. A hot oven allows the muffin cups to rise properly and develop that perfect golden top. Make sure to preheat your oven to the temperature specified in the recipe before you start mixing your ingredients.
– Preparing the Muffin Tin: The choice of muffin tin can significantly impact the outcome of your muffin cups. Non-stick muffin tins are often the best option for easy removal, but if you are using a standard muffin tin, be sure to grease the cups thoroughly to prevent sticking. Alternatively, using paper liners can save you the hassle of cleaning up afterward.
– Cooking the Pasta: Cooking the elbow macaroni to the right level of doneness is crucial. Aim for al dente pasta, which means it should be cooked just enough to maintain a slight bite. Overcooking the pasta can lead to mushy muffin cups, so pay close attention to the cooking time, usually around 6-8 minutes, depending on the brand. After cooking, drain the pasta and set it aside to cool slightly before incorporating it into the cheese mixture.
Crafting the Cheese Sauce
Creating the perfect cheese sauce is the heart of this recipe. A smooth and creamy sauce will bind the pasta together and ensure that every bite is flavorful and satisfying.
– Creating a Roux: The foundation for a creamy cheese sauce is a roux, which consists of equal parts flour and fat (usually butter). Start by melting butter in a saucepan over medium heat and then whisking in the flour. Cook this mixture for a couple of minutes until it turns a light golden color, which will help eliminate the raw flour taste. This step is crucial for achieving a lump-free sauce, so be sure to whisk continuously until the roux is well combined and cooked.
– Incorporating the Cheeses: Once your roux is ready, gradually add milk while whisking to create a smooth base. After the mixture thickens, it’s time to incorporate the cheeses. Add the sharp cheddar, mozzarella, and Parmesan in small handfuls, allowing each addition to melt completely before adding the next. This method helps prevent clumping and ensures a velvety cheese sauce that will coat the pasta beautifully.
– Flavor Balance: The blend of cheeses not only contributes to the creamy texture but also creates a harmonious flavor balance. The sharpness of cheddar, the meltiness of mozzarella, and the nuttiness of Parmesan combine to elevate the overall taste of the muffin cups. Adjust the quantities based on your preferences—more cheddar for a sharper flavor or more mozzarella for added creaminess.
Combining Ingredients for Muffin Cups
Once your cheese sauce is ready and your pasta is cooked, it’s time to bring everything together to create your Cheesy Delight Muffin Cups.
– Mixing Pasta and Cheese Sauce: To achieve a uniform mixture, combine the cooked elbow macaroni with the creamy cheese sauce. Use a spatula to gently fold the pasta into the sauce, ensuring that every piece of macaroni is evenly coated. This step is crucial for flavor distribution, as you want the cheese to embrace every bite of pasta.
– Importance of Cooling: Before adding eggs to the mixture, allow it to cool slightly. Adding eggs to a hot mixture can cook them prematurely, resulting in a scrambled texture rather than a smooth consistency. Once the mixture is warm but not hot, you can proceed to the next step.
– Adding the Eggs: When incorporating the eggs, use a gentle folding technique rather than vigorous mixing. This helps maintain a light texture in the final product. The goal is to integrate the eggs without overworking the mixture, which can lead to denser muffin cups. Gently fold the eggs into the pasta and cheese mixture until just combined, ensuring that everything is well incorporated without losing airiness.
This sets the stage for the final steps in creating your Cheesy Delight Muffin Cups. With the ingredients prepared and combined, you are on your way to baking up a batch of these delightful bites that are sure to impress anyone who has the pleasure of tasting them. Stay tuned for the next part, where we will delve into the baking process, finishing touches, and some delicious variations to customize your muffin cups further.
How Eggs Contribute to Structure
Eggs play a crucial role in the preparation of Cheesy Delight Muffin Cups. They act as a binding agent that helps to stabilize the muffin’s structure, providing both moisture and richness. When eggs are mixed into the batter, they coagulate during baking, which contributes to the overall firmness of the muffin cups. This results in a light yet sturdy texture that holds the filling beautifully without collapsing, ensuring your muffin cups maintain their shape and are easy to serve.
Filling the Muffin Tin
Packing Techniques
When it comes to filling the muffin tin, even distribution is key to achieving the perfect shape and texture. Here are some best practices to consider:
1. Use a Consistent Amount: Aim for uniformity by filling each muffin cup with an equal amount of batter. This ensures that all muffin cups bake evenly and have the same texture.
2. Gentle Tapping: After filling the cups, gently tap the muffin tin on the counter. This helps to settle the batter and eliminate any air bubbles, leading to a more consistent bake.
3. Leave Space: Don’t overfill the cups. Leave a little space at the top of each muffin cup to allow for rising during baking. Generally, filling them about two-thirds full is ideal.
Using a Cookie Scoop
One of the best tools for filling muffin tins is a cookie scoop. This handy kitchen gadget comes with several benefits:
– Precise Portioning: A cookie scoop allows you to measure out the batter accurately, ensuring that each muffin cup is filled consistently. This eliminates the guesswork and helps maintain uniformity throughout your batch.
– Ease of Use: A cookie scoop minimizes mess, making the filling process much more straightforward. You can easily transfer the batter without spilling or overfilling.
Baking the Muffin Cups
Baking Time and Temperature
Getting the baking time and temperature right is crucial for achieving the perfect Cheesy Delight Muffin Cups. Here are some essential tips:
– Preheat Your Oven: Always preheat your oven to the recommended temperature before placing the muffin tin inside. This helps create an ideal environment for rising and browning.
– Baking Time: Typically, Cheesy Delight Muffin Cups will bake for about 15 to 20 minutes at 350°F (175°C). However, ovens can vary, so it’s essential to start checking for doneness around the 15-minute mark.
Signs of Doneness
Knowing when your muffin cups are ready is vital. Look for these signs:
– Golden Brown Top: The tops should be a beautiful golden brown color when fully baked.
– Spring Back: Gently press the top of a muffin cup with your finger; it should spring back, indicating that it is cooked through.
– Toothpick Test: Insert a toothpick into the center of a muffin cup. If it comes out clean or with a few crumbs attached, your muffin cups are done.
Cooling and Removal
Best Practices for Cooling
After baking, it’s important to let your muffin cups cool properly. Here’s how:
– Cooling Rack: Transfer the muffin tin to a wire cooling rack to allow air to circulate around the muffin cups. This helps prevent sogginess, ensuring they maintain their delightful texture.
– Cooling Time: Allow the muffin cups to cool for about 5-10 minutes in the tin before attempting to remove them. This cooling period helps them set further.
Tips for Removing from the Tin
To avoid breakage during removal, follow these tips:
– Loosen the Edges: Use a small, flexible spatula or butter knife to gently run around the edges of each muffin cup. This creates a gap between the muffin and the tin, making it easier to remove.
– Invert the Tin: Once loosened, carefully invert the muffin tin over a plate or cooling rack. Lightly tap the bottom to release the muffin cups.
Garnishing and Serving Suggestions
Optional Garnishes
To elevate the presentation and flavor, consider adding some garnishes:
– Fresh Herbs: Chopped fresh herbs like chives, parsley, or basil can enhance both the taste and appearance of your muffin cups. Sprinkle them on top just before serving for a burst of color and flavor.
Serving Suggestions
For a complete meal or snack, pair your Cheesy Delight Muffin Cups with:
– Dips: Serve with a side of marinara sauce, ranch dressing, or a zesty salsa for dipping.
– Salads: A fresh garden salad can complement the richness of the muffin cups, balancing the meal.
Variations and Customization Ideas
Incorporating Different Cheeses
Experimenting with different cheeses can lead to exciting flavor combinations. Here are some options to consider:
– Gouda: Offers a creamy texture and a rich, smoky flavor.
– Monterey Jack: Adds a mild flavor with a bit of creaminess, perfect for those who prefer a subtler taste.
– Vegan Alternatives: For a dairy-free option, try using vegan cheese shreds or nutritional yeast for a cheesy flavor without the dairy.
Vegetarian Additions
To enhance the nutritional value and flavor profile of your muffin cups, consider incorporating vegetables:
– Peas: Sweet green peas add a pop of color and sweetness.
– Spinach: Fresh or sautéed spinach adds a touch of earthiness and vibrant green color.
– Bell Peppers: Diced bell peppers provide crunch and a hint of sweetness.
Spicy Twists
If you enjoy a little heat, consider adding:
– Jalapeños: Finely chopped jalapeños can give your muffin cups a spicy kick.
– Hot Sauce: Drizzling a bit of your favorite hot sauce into the batter can elevate the flavor and add some zing.
Storing and Reheating Instructions
Proper Storage Techniques
To keep your Cheesy Delight Muffin Cups fresh:
– Refrigeration: Store cooled muffin cups in an airtight container in the refrigerator for up to 4-5 days.
– Freezing: For longer storage, freeze the muffin cups in a single layer on a baking sheet until solid. Then, transfer them to a freezer-safe bag or container, where they can last for up to 3 months.
Reheating Tips
When it comes time to enjoy your muffin cups again, reheating them properly is essential:
– Oven Method: Preheat your oven to 350°F (175°C). Place the muffin cups on a baking sheet and heat for about 10-15 minutes until warmed through.
– Microwave Method: For a quicker option, you can use the microwave. Place the muffin cup on a microwave-safe plate and heat for 20-30 seconds, checking to avoid overheating.
Conclusion: Enjoying Your Cheesy Delight Muffin Cups
Cheesy Delight Muffin Cups offer a unique take on a beloved classic, combining comfort and convenience in every bite. Whether served as a snack, party appetizer, or part of a meal, they are sure to be a hit with both kids and adults alike. With the detailed preparation and variations outlined in this guide, you can create these delightful treats that are not only delicious but also customizable to suit your taste. Embrace the joy of cooking with this recipe, and enjoy the satisfaction of serving a dish that brings smiles and satisfaction to the table.
