Introduction
In a world where healthy eating is increasingly prioritized, finding dishes that are both nutritious and flavorful can be a challenge. Enter the Crispy Chickpea Greek Salad. This vibrant salad beautifully combines the rich flavors of Mediterranean cuisine with a focus on wholesome ingredients, creating a satisfying meal that can be enjoyed any time of the year. The marriage of fresh vegetables, protein-packed chickpeas, and the tangy goodness of feta cheese makes this salad not only visually appealing but also a powerhouse of nutrients.
The Crispy Chickpea Greek Salad offers a delightful crunch, thanks to the roasted chickpeas, while the array of colorful vegetables brings freshness to every bite. This dish is more than just a salad; it embodies a lifestyle choice that prioritizes health without sacrificing flavor. Whether you’re looking for a light lunch, a side dish for dinner, or a nutritious option for meal prep, this salad checks all the boxes.
As we delve into this article, we will explore the core ingredients that make the Crispy Chickpea Greek Salad a must-try, discuss its health benefits, and provide a step-by-step guide to creating this culinary delight in your own kitchen.
Understanding the Ingredients
Exploring the Core Ingredients of the Salad
Chickpeas: The Nutritional Powerhouse
At the heart of the Crispy Chickpea Greek Salad are the chickpeas, often referred to as garbanzo beans. These legumes are not only a staple in Mediterranean diets but also a nutritional powerhouse. Rich in protein and fiber, chickpeas contribute to muscle health and digestive well-being. Their versatility allows them to absorb flavors beautifully, making them an excellent base for various seasonings and spices. When roasted to crispy perfection, they add a satisfying crunch that enhances the overall texture of the salad.
Mixed Greens: A Blend of Flavor and Nutrition
The base of the salad typically consists of mixed greens, which can include arugula, spinach, romaine, and kale. These leafy greens are low in calories but high in vitamins and minerals, such as vitamin A, vitamin C, and iron. They also provide a wealth of antioxidants, which play a crucial role in fighting free radicals in the body. By incorporating a variety of greens, you not only elevate the flavor profile of the salad but also boost its nutritional value.
Fresh Vegetables: Adding Crunch and Color
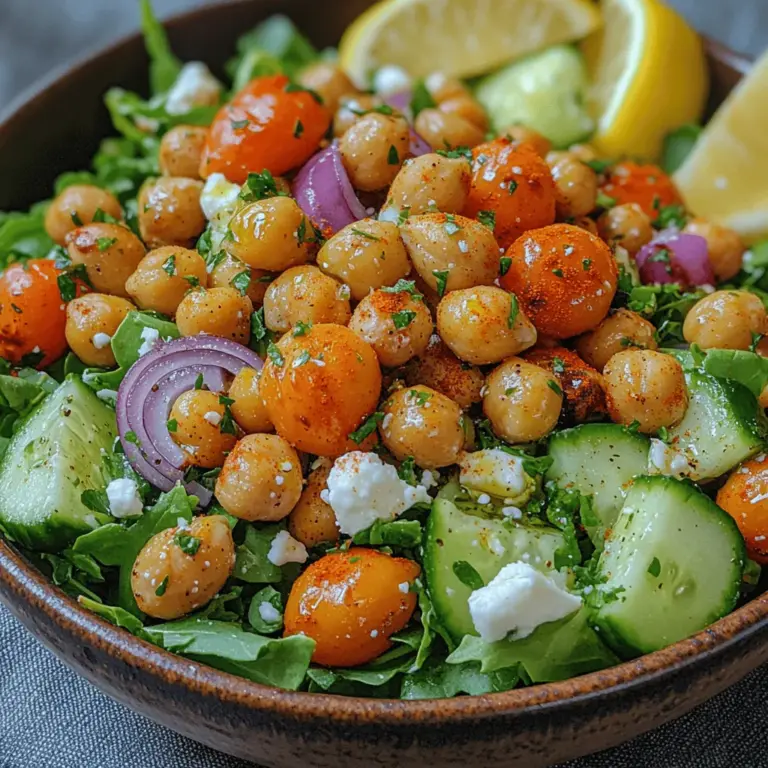
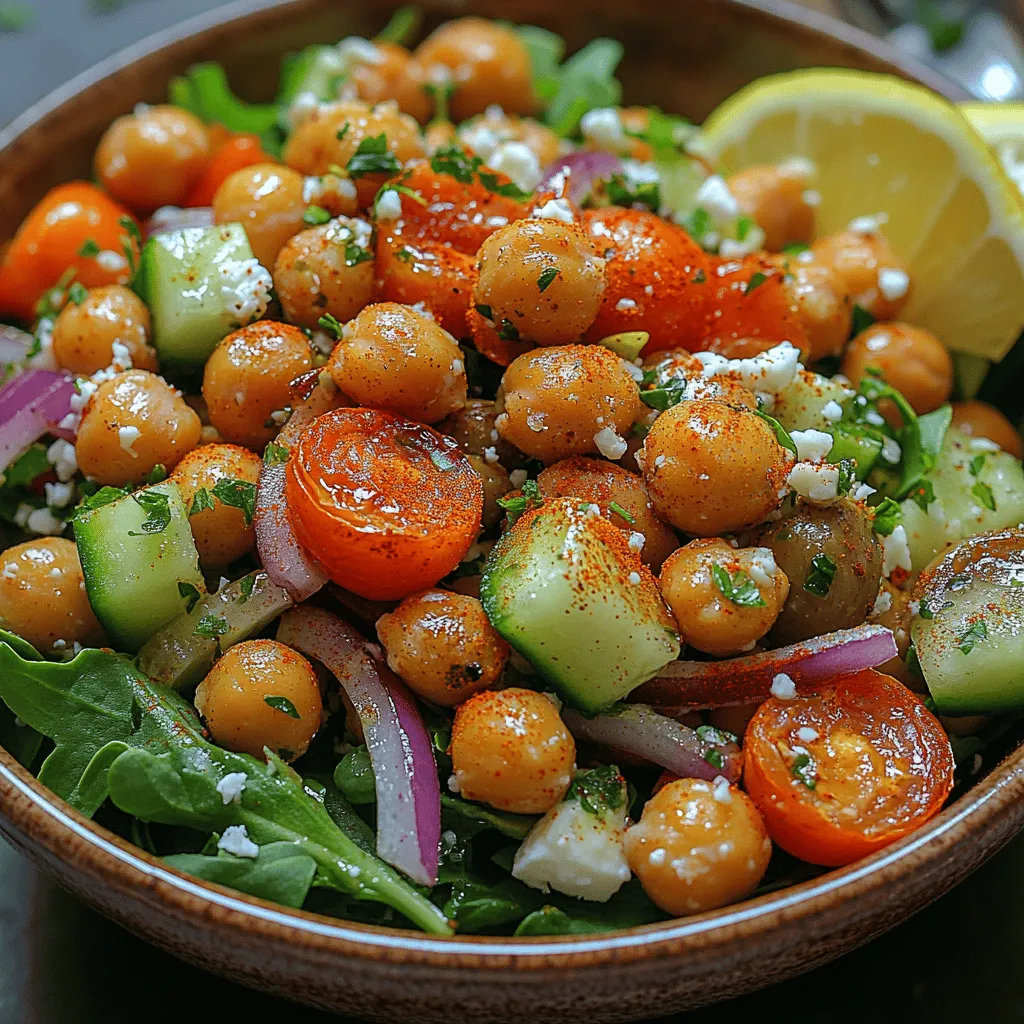
A rainbow of fresh vegetables is what makes the Crispy Chickpea Greek Salad truly shine. Common additions include cucumbers, tomatoes, bell peppers, and red onions. Each vegetable brings its unique flavor and texture to the mix. For instance, cucumbers add a refreshing crunch, while tomatoes contribute juiciness and sweetness. Bell peppers can introduce a hint of sweetness or a touch of bitterness, depending on the variety, and red onions offer a sharp bite that balances the other ingredients. Together, these vegetables create a visually appealing dish that is as delicious as it is nutritious.
Feta Cheese: A Creamy and Tangy Delight
No Greek salad would be complete without feta cheese, which adds a creamy texture and tangy flavor. Feta is a traditional Greek cheese made from sheep’s milk or a combination of sheep and goat’s milk. Its crumbly consistency makes it easy to sprinkle over the salad, providing a burst of flavor in every bite. Beyond its taste, feta is also a good source of calcium and protein, making it a valuable addition to your meal.
Kalamata Olives: A Mediterranean Staple
Kalamata olives are another essential ingredient in the Crispy Chickpea Greek Salad. These dark purple, almond-shaped olives are known for their rich, fruity flavor and firm texture. They are a key component of Mediterranean cuisine, offering healthy monounsaturated fats and antioxidants. Adding kalamata olives to the salad not only enhances the flavor but also provides a salty contrast that complements the sweetness of the vegetables and the creaminess of the feta cheese.
Olive Oil: The Heart-Healthy Fat
Extra virgin olive oil is the go-to dressing for the Crispy Chickpea Greek Salad. Renowned for its heart-healthy benefits, olive oil is rich in monounsaturated fats and contains antioxidants that can help reduce inflammation. Drizzling quality olive oil over the salad not only enhances the flavors of the ingredients but also adds a smooth texture that ties the dish together. It’s essential to choose high-quality olive oil, as it can significantly impact the overall taste of your salad.
Spices and Seasonings: Elevating the Flavor Profile
To elevate the flavor profile of the Crispy Chickpea Greek Salad, a variety of spices and seasonings can be employed. Common options include oregano, garlic powder, paprika, and a touch of salt and pepper. These seasonings can be mixed into the chickpeas before roasting, allowing them to infuse the legumes with flavor. A squeeze of lemon juice can also be added for a zesty kick, brightening up the overall taste and enhancing the freshness of the salad.
Step-by-Step Guide to Making Crispy Chickpea Greek Salad
Preparing the Chickpeas for Crispiness
To achieve the perfect crispy texture for the chickpeas, careful preparation is key. Start by preheating your oven to 400°F (200°C). This temperature is optimal for roasting the chickpeas, allowing them to develop a delightful crunch without burning.
Once your oven is preheated, it’s time to prepare the chickpeas. If you’re using canned chickpeas, drain and rinse them thoroughly under cold water. This step is crucial, as it removes excess sodium and any canning liquid that may affect the flavor. After rinsing, spread the chickpeas on a clean kitchen towel or paper towels and pat them dry. Removing moisture is essential for achieving crispiness, as excess water can lead to steaming rather than roasting.
Next, transfer the dried chickpeas to a baking sheet lined with parchment paper. This not only prevents sticking but also facilitates easy cleanup. Drizzle the chickpeas with olive oil and sprinkle your chosen spices—such as garlic powder, smoked paprika, and oregano—over them. Toss the chickpeas gently to ensure they are evenly coated with oil and spices. This step not only enhances their flavor but also helps them crisp up beautifully in the oven.
With the chickpeas seasoned and ready, spread them out in a single layer on the baking sheet. Avoid overcrowding, as this can hinder their ability to roast evenly. Place the baking sheet in the preheated oven and roast the chickpeas for about 20 to 30 minutes, shaking the pan halfway through to ensure even cooking. Keep a close eye on them towards the end of the cooking time, as they can go from perfectly crispy to overdone quite quickly.
As the chickpeas roast, the aroma of spices will fill your kitchen, setting the stage for the delicious salad to come. Once they are golden brown and crispy, remove them from the oven and allow them to cool slightly before adding them to your salad. This initial preparation of the chickpeas sets the foundation for the Crispy Chickpea Greek Salad, ensuring that every bite is packed with flavor and crunch.
Stay tuned for the next part of the article, where we will explore the health benefits of this delightful dish and guide you through assembling the salad for a meal that is as nourishing as it is delicious.
Roasting Techniques: Achieving the Ideal Crisp
To create the perfect crispy chickpeas, start by rinsing and draining your canned chickpeas thoroughly. After that, pat them dry with a clean towel to remove excess moisture. This step is crucial; any leftover moisture can prevent the chickpeas from achieving that satisfying crunch.
Next, preheat your oven to 400°F (200°C). Spread the chickpeas out on a baking sheet in a single layer, making sure they are not overcrowded. This allows the hot air to circulate evenly, promoting a uniform crispness. Drizzle with olive oil, and season with salt, pepper, and any additional spices you prefer, such as paprika or cumin for an extra flavor boost.
Roast the chickpeas in the oven for about 20-30 minutes, shaking the pan halfway through to ensure they cook evenly. Keep an eye on them during the last few minutes to prevent burning. When they’re golden brown and crunchy, remove them from the oven and let them cool slightly before incorporating them into your salad.
Building the Salad Base
Combining Greens and Vegetables: Balancing Textures and Flavors
A Greek salad is known for its fresh ingredients and vibrant colors. Begin by selecting a mix of greens as your base. Spinach offers a tender texture, while romaine provides a satisfying crunch. You can also incorporate arugula for a peppery kick.
Chop your greens and add them to a large salad bowl. Next, introduce a variety of vegetables that not only enhance the flavor but also add color and nutrients. Diced cucumbers provide a refreshing crunch, while sweet cherry tomatoes burst with juiciness. Red onion adds a sharp bite, and bell peppers contribute sweetness and crunch. Aim for a mix that balances soft and crunchy textures, ensuring each bite is delightful.
The Importance of Tossing: Ensuring Even Distribution
Once all your base ingredients are in the bowl, it’s vital to toss them together gently but thoroughly. This step ensures that each component is evenly distributed, allowing the flavors to meld beautifully. Use salad tongs or two large forks to lift and mix the ingredients instead of stirring, which can bruise delicate greens.
Tossing also allows the salt and seasonings to coat the vegetables evenly, enhancing the overall flavor profile of the salad.
Incorporating the Chickpeas
Timing is Key: Adding Chickpeas at the Right Moment
After your salad base is ready, it’s time to incorporate the crispy chickpeas. Timing is crucial here; add them just before serving to maintain their texture. If added too early, the moisture from the other ingredients can cause the chickpeas to lose their crunch.
Gently fold the roasted chickpeas into the salad, ensuring they are evenly distributed without crushing them. Their crispy texture will provide a delightful contrast to the tender greens and juicy vegetables.
Layering Flavors: The Role of Feta and Parsley
No Greek salad is complete without feta cheese, which adds creaminess and a tangy flavor that complements the chickpeas and vegetables perfectly. Crumble fresh feta over the top of the salad, allowing it to mix with the other ingredients as you toss.
Chopped fresh parsley brings a burst of freshness and color. Sprinkle a generous amount over the salad, mixing it in to elevate the overall flavor profile. The combination of feta and parsley not only enhances taste but also contributes to the salad’s visual appeal.
Dressing and Serving the Salad
Choosing the Right Olive Oil: Enhancing Flavor
For the dressing, high-quality olive oil is essential. Opt for extra virgin olive oil for its robust flavor and health benefits. Drizzle it over the salad just before serving. The richness of the oil elevates the dish, providing a luscious mouthfeel that ties all the flavors together.
The Perfect Squeeze of Lemon: Brightening the Dish
Next, add a squeeze of fresh lemon juice. The acidity from the lemon brightens the salad, balancing the richness of the feta and the creaminess of the olive oil. Start with half a lemon and adjust to your taste; some may prefer a more pronounced citrus note.
Presentation Tips: Making Your Salad Visually Appealing
Presentation plays a crucial role in enhancing your salad experience. Serve the salad in a large bowl or on individual plates. For an appealing look, layer the ingredients rather than mixing them completely. Place the greens at the bottom, then layer the vegetables, followed by the chickpeas, and top it off with feta and parsley. This method creates a colorful and inviting dish that is sure to impress.
Serving Suggestions and Pairings
Best Accompaniments for Your Salad
This Crispy Chickpea Greek Salad is versatile and pairs well with various dishes. It can be served as a light lunch or as a side dish for a more substantial meal. Consider serving it alongside grilled chicken or fish for a complete protein-packed meal.
For a vegetarian option, pair it with falafel or grilled halloumi cheese to complement the flavors of the salad. The combination of textures and flavors will satisfy both vegetarians and meat-eaters alike.
Ideal Side Dishes to Complement the Salad
When serving this salad, consider offering a selection of side dishes that enhance the Mediterranean theme. Warm pita bread with hummus or tzatziki makes for a delightful addition. A side of roasted vegetables or a classic tabbouleh salad can further enhance the dining experience, creating a well-rounded meal.
Beverage Pairings: What to Drink with Your Meal
In terms of beverages, a crisp white wine such as Sauvignon Blanc or a light rosé complements the flavors of the salad beautifully. For non-alcoholic options, consider sparkling water with a slice of lemon or a refreshing mint tea. These choices will cleanse the palate and enhance the overall enjoyment of the meal.
Perfect Occasions for Serving this Salad
This Crispy Chickpea Greek Salad is perfect for various occasions. Its fresh flavors make it an ideal dish for summer gatherings, picnics, or potlucks. Serve it at barbecues or outdoor parties where guests can enjoy a light yet satisfying option. It’s also a fantastic choice for meal prep, making it easy to enjoy healthy lunches throughout the week.
Storage and Meal Prep Tips
Maximizing Freshness and Flavor
To keep your salad fresh, store any leftovers in an airtight container in the refrigerator. However, be mindful that the chickpeas may lose their crispness when stored with the salad. For best results, store the chickpeas separately and add them just before serving.
How to Store Leftover Salad
If you have leftover salad, it’s best to consume it within 2-3 days for the best quality. If the greens start to wilt or the chickpeas lose their crunch, consider repurposing the salad by blending it into a smoothie or using it as a filling for wraps.
Meal Prep Strategies: Making Ahead for Busy Weekdays
For meal prep, you can chop your vegetables and prepare the chickpeas in advance. Store each component separately in the fridge, and combine them when you’re ready to eat. This method allows you to maintain the freshness of the ingredients while enjoying a nutritious meal on busy days.
Reheating vs. Eating Cold: Best Practices
This salad is best enjoyed cold. For those who prefer a warm dish, consider warming the chickpeas separately in the oven or a skillet before adding them to the salad. This will maintain their texture and flavor while still providing a delightful crunch against the cold vegetables.
Conclusion
The Crispy Chickpea Greek Salad is more than just a meal; it’s a celebration of fresh ingredients and vibrant flavors that can easily become a staple in your culinary repertoire. This salad not only serves as a refreshing dish for warm days but also provides essential nutrients and a satisfying crunch that appeals to both your taste buds and your health goals.
Whether enjoyed on its own or as a side, this recipe is sure to impress and nourish, making it a delightful addition to any meal. With its versatility, you can easily adapt it to suit different occasions, ensuring that it finds a place in your kitchen time and time again. Embrace the flavors of the Mediterranean with this delicious salad, and enjoy the health benefits it brings to your table.
