Introduction
Donut holes are more than just a delightful treat; they are a nostalgic bite that can transport you back to childhood mornings filled with the aroma of fresh pastries. These small but flavorful confections are usually enjoyed with coffee, served at breakfast, or simply enjoyed as an afternoon snack. Among the various flavors that tantalize our taste buds, sweet maple glazed donut holes stand out for their rich, warm sweetness, evoking the essence of cozy autumn mornings.
Homemade donut holes are not only a joy to make but also provide a wonderful opportunity to bring family and friends together. Whether you’re hosting a brunch, celebrating a special occasion, or simply indulging in a weekend treat, these sweet maple glazed donut holes are sure to please. In this article, we will explore the recipe in detail, discuss the necessary ingredients, and guide you through the step-by-step process of creating these irresistible bites.
The Origins of Donut Holes
The origins of donut holes can be traced back to the early 19th century, with variations appearing in various cultures around the world. Traditionally, donuts were made in circular shapes with a hole in the center to ensure even cooking. However, as bakers began to experiment, the concept of donut holes emerged, offering a bite-sized alternative that quickly gained popularity.
The allure of donut holes lies not only in their size but also in their versatility. They can be made from various doughs and flavors, allowing for endless creativity in the kitchen. The addition of maple glaze to the mix elevates these donut holes, infusing them with a rich sweetness that perfectly complements the dough’s light texture.
Key Ingredients for Sweet Maple Glazed Donut Holes
To create the perfect sweet maple glazed donut holes, it’s essential to gather quality ingredients that will yield the best results. Here’s what you’ll need:
1. Flour: All-purpose flour serves as the base for the dough. It provides structure while ensuring a light and airy texture.
2. Sugar: Granulated sugar sweetens the dough and enhances the overall flavor of the donut holes.
3. Baking Powder: This leavening agent helps the donut holes rise, making them fluffy and soft.
4. Salt: A pinch of salt balances the sweetness and enhances the flavors of the other ingredients.
5. Milk: Whole milk or buttermilk adds moisture and richness to the dough, contributing to a tender texture.
6. Eggs: Eggs are crucial for binding the ingredients together and adding richness to the flavor.
7. Butter: Melted unsalted butter infuses the dough with a delicious buttery taste, making the donut holes richer.
8. Maple Syrup: The star ingredient in the glaze, pure maple syrup, adds a unique sweetness and flavor that is synonymous with comfort.
9. Powdered Sugar: This is used to create the glaze, providing a smooth and sweet finish to the donut holes.
10. Vanilla Extract: A splash of vanilla enhances the overall flavor of the glaze, making it even more delicious.
Fresh vs. Store-Bought Ingredients
When making donut holes, using fresh ingredients can significantly impact the final flavor and texture. While store-bought options for some ingredients may be convenient, opting for fresh, high-quality items often yields superior results. For instance, using fresh eggs and real maple syrup can elevate your donut holes to new heights, making them taste more indulgent and satisfying.
Preparing the Dough for Donut Holes
Step 1: Mixing the Dry Ingredients
Begin by sifting together the flour, sugar, baking powder, and salt in a large mixing bowl. Sifting not only helps to combine these dry ingredients but also aerates the flour, which is essential for achieving a light and fluffy texture in your donut holes.
Step 2: Combining the Wet Ingredients
In a separate bowl, whisk together the milk, eggs, and melted butter until well combined. This mixture should be smooth and creamy, ensuring that the wet ingredients are fully integrated before they are added to the dry ingredients.
Step 3: Mixing the Dough
Once your dry and wet ingredients are prepared, it’s time to combine them. Pour the wet mixture into the dry ingredients, gently folding them together until just combined. Be cautious not to overmix, as this can result in dense donut holes. The goal is to create a soft, slightly sticky dough.
Step 4: Shaping the Dough
Using your hands, take small portions of the dough and roll them into balls about 1 inch in diameter. This will ensure that your donut holes are uniform in size, allowing for even cooking. Place the rolled dough onto a parchment-lined baking sheet, ensuring they are spaced apart to allow for rising.
Step 5: Frying the Donut Holes
Heat vegetable oil in a deep fryer or a heavy-bottomed pot to around 350°F (175°C). Carefully drop a few donut holes into the hot oil, making sure not to overcrowd the pot. Fry them for about 2-3 minutes on each side or until they turn golden brown. Use a slotted spoon to transfer the donut holes to a wire rack or paper towel-lined plate to drain excess oil.
Step 6: Preparing the Maple Glaze
While the donut holes cool, it’s time to prepare the maple glaze. In a mixing bowl, combine powdered sugar and maple syrup, stirring until smooth. Adjust the consistency by adding a little more syrup if needed, aiming for a pourable glaze that coats the back of a spoon.
Step 7: Glazing the Donut Holes
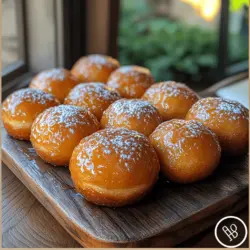
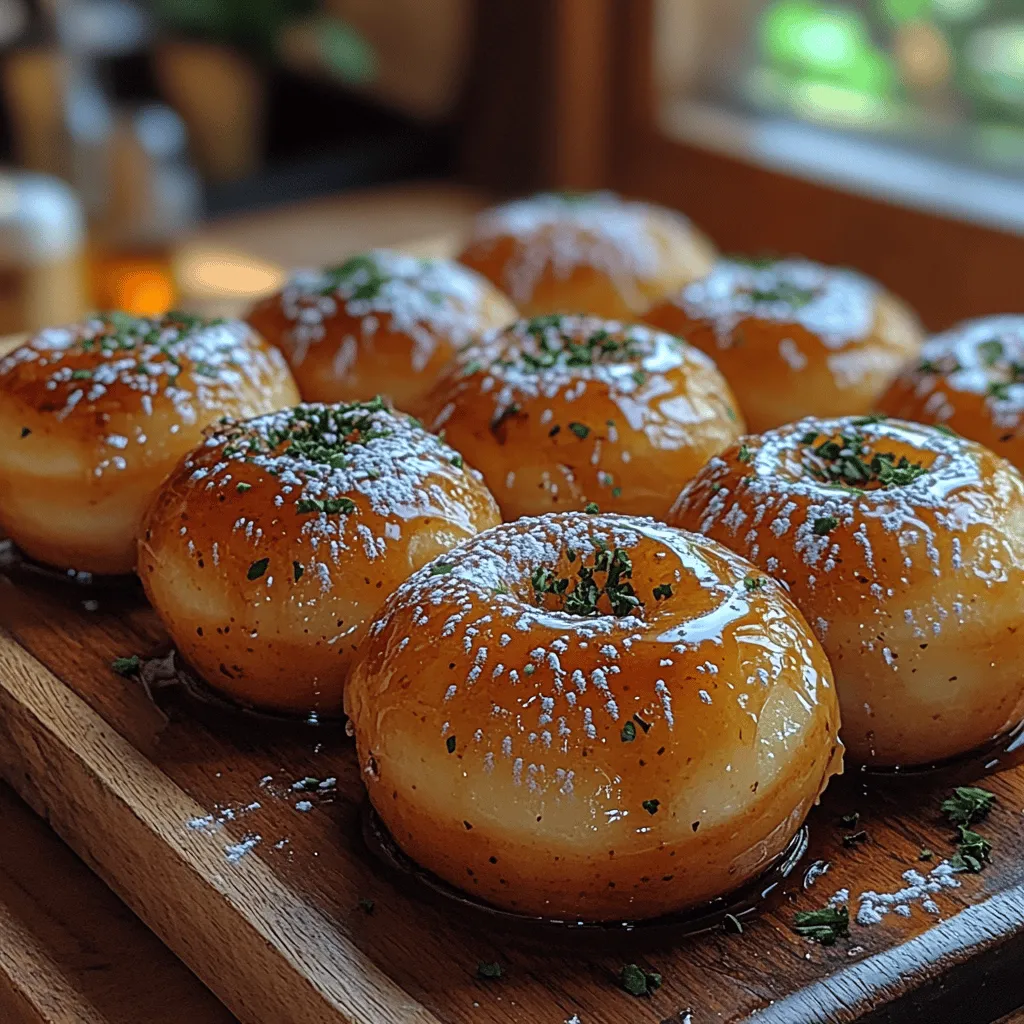
Once the donut holes have cooled slightly, dip each one into the maple glaze, ensuring they are fully coated. Allow any excess glaze to drip off before placing them back on the wire rack. This will create a beautiful, shiny finish that enhances both the appearance and flavor of the donut holes.
Step 8: Serving Suggestions
Serve the sweet maple glazed donut holes warm or at room temperature. They make for an excellent addition to any brunch spread or can be enjoyed as a sweet snack throughout the day. Consider pairing them with coffee or tea for a delightful afternoon treat, or simply savor them on their own.
In the following sections, we will delve deeper into tips for perfecting your homemade donut holes, explore variations to the classic recipe, and answer some common questions about making these sweet treats. Stay tuned for more delicious insights into the world of sweet maple glazed donut holes!
Layering the Lasagna
To create a perfect lasagna, proper layering is crucial for achieving the ideal texture and flavor. The layering technique allows the flavors to meld together while ensuring that each bite delivers a balanced mix of ingredients. Here’s a step-by-step guide to assembling your lasagna:
1. Start with the Meat Sauce: Begin by spreading a thin layer of your prepared meat sauce at the bottom of a 9×13 inch baking dish. This prevents the pasta from sticking and adds moisture to the bottom layer.
2. Add the Pasta: Place your cooked pasta sheets over the sauce, ensuring they don’t overlap too much. If you’re using fresh pasta, it will cook down more than dried, so a little overlap is acceptable.
3. Layer the Cheese Mixture: Next, spoon a portion of your ricotta cheese mixture over the pasta. Spread it evenly to ensure every bite has that creamy texture. You can also sprinkle a bit of grated Parmesan for added flavor.
4. Repeat the Layers: Continue to layer in this order: meat sauce, pasta, cheese mixture, and sprinkle mozzarella cheese. Repeat until you reach the top of the dish, finishing with a layer of meat sauce and a generous topping of mozzarella and Parmesan cheese.
5. Achieving Balance: Pay attention to the balance of ingredients. Each layer should have a similar amount of sauce, pasta, and cheese to avoid a dry or overly soggy dish. This balance is key to a lasagna that holds together when served.
Baking the Lasagna
Once your lasagna is layered and ready, it’s time to bake it to perfection. Here’s how to do it:
1. Preheat the Oven: Preheat your oven to 375°F (190°C). This temperature allows the lasagna to cook evenly without burning the top.
2. Covering vs. Uncovering: For the first 30 minutes of baking, cover the lasagna with aluminum foil to prevent it from browning too quickly. After this initial period, remove the foil to allow the cheese to get bubbly and golden brown.
3. Baking Time: Bake the lasagna for a total of about 45-60 minutes. It’s done when the cheese is melted and the sauce is bubbling around the edges. You can test for doneness by inserting a knife into the center; it should slide in easily with no resistance.
4. Letting It Rest: Once out of the oven, let the lasagna rest for at least 15-20 minutes before slicing. This resting period allows the layers to set, making it easier to cut and serve without falling apart.
Serving Suggestions
Lasagna is a hearty dish that can be complemented with various sides and drinks. Here are some ideal accompaniments and serving ideas:
1. Salads: A crisp green salad with a tangy vinaigrette pairs beautifully with lasagna. Consider a simple arugula salad or a classic Caesar salad to balance the richness of the dish.
2. Bread: Serve with warm garlic bread or a loaf of crusty Italian bread to soak up any extra sauce. Breadsticks can also be a delightful addition.
3. Wine Pairing: A robust red wine, such as Chianti or Cabernet Sauvignon, enhances the flavors of the lasagna. For white wine lovers, a full-bodied Chardonnay can also complement the dish nicely.
4. Creative Plating: When it comes to presentation, slice the lasagna into squares and serve on a plate with a sprinkle of fresh basil or parsley on top for color. A drizzle of balsamic glaze can also elevate the dish visually.
5. Storing Leftovers: If you have any leftovers, allow the lasagna to cool completely before storing. Cover it tightly with plastic wrap or foil and keep it in the refrigerator for up to 3-4 days. You can also freeze individual portions for up to three months; just ensure it’s well-wrapped to prevent freezer burn.
Classic Lasagna Variations
Lasagna is a versatile dish that can be adapted to suit various dietary preferences and tastes. Here are some classic variations you can try:
1. Vegetarian Lasagna: Replace the meat sauce with a mixture of sautéed vegetables like zucchini, mushrooms, and spinach. You can also add layers of pesto for additional flavor and richness.
2. Lasagna with Seafood: For a seafood twist, use a combination of shrimp, crab, and scallops. A white sauce like béchamel can replace the traditional meat sauce to complement the seafood’s delicate flavors.
3. Gluten-Free Lasagna: Use gluten-free pasta sheets or even thinly sliced zucchini as a noodle substitute. Ensure all other ingredients, including sauces and cheeses, are gluten-free as well for a delicious gluten-free lasagna.
4. International Twists: Get creative by adding international flavors. For a Mexican-inspired lasagna, use layers of tortillas, refried beans, salsa, and cheese. For a Greek twist, try layers of feta, spinach, and olives.
Nutritional Information
Understanding the nutritional breakdown can help you make informed choices about your lasagna. Here’s a rough estimate for a serving of traditional meat lasagna:
– Calories: Approximately 350-450 calories per serving
– Fats: 15-20 grams
– Proteins: 20-25 grams
– Carbohydrates: 30-40 grams
To make lasagna healthier, consider using lean ground turkey or chicken instead of beef, incorporating more vegetables, and opting for low-fat cheese options. Whole wheat pasta can also provide additional fiber, making your meal more nutritious without sacrificing flavor.
Conclusion
Making and sharing homemade lasagna is a joyful experience that brings families and friends together. Whether you stick to the classic recipe or explore different variations, the process of layering and baking this beloved dish is a labor of love. Each bite reflects the care and creativity put into it, making it an ideal comfort food.
We encourage you to experiment with various ingredients and techniques to find your perfect lasagna. The beauty of this dish lies in its adaptability, allowing you to personalize it to your taste while still maintaining that comforting essence. As you gather around the table, remember that comfort food has a unique ability to create lasting memories and connections with those you love. Enjoy your culinary journey and the delicious meals that follow!