Introduction: The Allure of Homemade Tropical Pineapple Fried Rice
Tropical Pineapple Fried Rice is a delightful dish that transports your taste buds to sunny shores with every bite. This vibrant recipe combines the sweetness of fresh pineapple with savory, stir-fried rice, creating a harmonious blend of flavors that is both comforting and exotic. In today’s fast-paced world, making a homemade version not only brings the family together but also guarantees a meal that is both healthy and packed with flavor.
One of the key appeals of preparing Tropical Pineapple Fried Rice at home is the satisfaction that comes from crafting a dish that is both colorful and nutritious. Unlike many takeout options, this recipe relies on fresh, wholesome ingredients that ensure a burst of flavor in every mouthful. Using ripe pineapple, crisp vegetables, and perfectly cooked rice, you can customize this dish to suit your tastes while enjoying the process of cooking.
Understanding the Components of Tropical Pineapple Fried Rice
At its core, Tropical Pineapple Fried Rice is a fusion dish that blends traditional fried rice techniques with tropical ingredients. The foundation of this dish typically consists of steamed rice—preferably day-old rice for the best texture—and a variety of vegetables. The star of the show, however, is undoubtedly the pineapple, which adds a tropical sweetness that perfectly balances the savory components.
Traditional Ingredients
The traditional components of this dish include:
– Rice: Day-old jasmine or basmati rice is ideal due to its fluffy texture and ability to absorb flavors without becoming mushy.
– Pineapple: Fresh pineapple is preferred, offering a juicier and more vibrant flavor compared to canned pineapple.
– Vegetables: Common additions include bell peppers, peas, carrots, and green onions, providing a colorful and nutritious base.
– Proteins: Options such as shrimp, chicken, or tofu can be added to enhance the dish and cater to different dietary preferences.
– Sauces and Spices: A combination of soy sauce, oyster sauce, and sesame oil adds depth and umami to the fried rice, while fresh herbs like cilantro or basil can brighten the dish.
Variations Around the World
Fried rice is a beloved staple in many cultures, each with unique twists. In Thailand, for example, pineapple fried rice (Khao Pad Sapparot) often includes curry powder and cashews, giving it a distinct flavor profile. In contrast, Chinese variations may lean towards soy sauce and vegetables, creating a different culinary experience. This versatility allows home cooks to experiment and adapt the recipe according to their preferences.
The Significance of Layering Flavors
One of the most important aspects of making Tropical Pineapple Fried Rice is the layering of flavors. Each ingredient contributes to the overall taste, and the method of cooking can enhance these flavors significantly. Starting with aromatics such as garlic and onion, then adding proteins and vegetables, allows the flavors to meld together beautifully. The final touch—adding the pineapple and sauces—ensures that the dish is balanced and vibrant.
Essential Ingredients for Tropical Pineapple Fried Rice
To create the perfect Tropical Pineapple Fried Rice, it is crucial to select high-quality ingredients that will enhance the overall flavor and texture of the dish. Below are the essential ingredients you will need:
Rice: Fresh vs. Day-Old
Choosing the right type of rice is vital for achieving the perfect texture. While freshly cooked rice can work, day-old rice is preferred. This is because the grains have had time to firm up in the refrigerator, which helps prevent them from clumping together during frying. Jasmine rice is a popular choice for its fragrant aroma and fluffy texture, while basmati rice can also be used for a nuttier flavor.
Choosing the Right Pineapple
Fresh pineapple is a must for this recipe, as it provides a juicy sweetness that canned pineapple simply cannot replicate. When selecting a pineapple, look for one that is fragrant, with a slight give when pressed. The color should be vibrant, indicating ripeness. Cut the pineapple into bite-sized chunks to ensure even distribution throughout the dish.
Vegetables: Fresh is Best
The choice of vegetables is essential in adding both nutrition and texture to the fried rice. Peas, diced bell peppers, and shredded carrots are common choices that bring color and crunch. It’s important to use fresh vegetables for the best flavor and nutritional value. If you have favorites or seasonal veggies on hand, feel free to incorporate those as well.
Proteins: Versatility in Options
Whether you prefer meat, seafood, or plant-based proteins, there are numerous options for adding protein to your fried rice. Shrimp is a popular choice for its quick cooking time and flavor, while chicken or pork adds heartiness. For a vegetarian or vegan option, tofu or tempeh can be marinated and stir-fried to enhance their flavor before being added to the rice.
The Importance of Fresh Herbs and Spices
Fresh herbs like cilantro and green onions add a burst of freshness to Tropical Pineapple Fried Rice. They not only enhance the flavor but also provide a beautiful garnish that makes the dish visually appealing. Additionally, spices such as black pepper and a touch of chili flakes can be added for a kick of heat, balancing the sweetness of the pineapple.
Preparing the Ingredients for Tropical Pineapple Fried Rice
Before diving into the cooking process, it is crucial to prepare all your ingredients. This ensures a smooth cooking experience and allows you to focus on creating the perfect stir-fry. Here’s how to get started:
Step 1: Cook the Rice
If you don’t have leftover rice, cook your jasmine or basmati rice according to package instructions. Once cooked, spread the rice out on a baking sheet to cool and let it sit in the refrigerator for at least an hour, or overnight if possible. This will help to firm up the grains, making them less likely to stick together during frying.
Step 2: Chop the Vegetables and Prepare the Pineapple
While the rice is cooling, wash and chop your vegetables. Dice the bell peppers, shred the carrots, and chop the green onions. For the pineapple, remove the skin and core, then chop it into bite-sized pieces. Make sure to set aside a few chunks for garnishing the finished dish.
Step 3: Prepare Your Protein
If you are using shrimp, chicken, or tofu, make sure it is cut into bite-sized pieces. For shrimp, you can season them lightly with salt and pepper or marinate them in a bit of soy sauce for added flavor. If using tofu, drain and press it to remove excess moisture before cutting it into cubes and marinating.
Step 4: Gather Your Sauces and Spices
Prepare your sauces by measuring out soy sauce, oyster sauce, and sesame oil. Having these ready to go will streamline the cooking process. Additionally, set out any spices you plan to use, such as chili flakes or cracked black pepper.
Cooking Tropical Pineapple Fried Rice
Now that all your ingredients are prepped, it’s time to bring them together in a delicious stir-fry. Here’s a step-by-step guide on how to cook Tropical Pineapple Fried Rice perfectly.
Step 1: Heat Your Pan
Start by heating a large wok or skillet over medium-high heat. Once the pan is hot, add a tablespoon of oil—vegetable, coconut, or sesame oil works well. Allow the oil to heat until it shimmers, ensuring that it is hot enough to sear the ingredients.
Step 2: Sauté Aromatics
Add minced garlic and chopped onion to the hot oil, sautéing them until fragrant and translucent. This step is crucial, as it forms the aromatic base of the dish, enhancing the overall flavor.
Step 3: Cook the Proteins
Next, add your protein of choice to the pan. If using shrimp, they will cook quickly, turning pink and opaque in just a few minutes. Chicken or tofu may take a little longer, so make sure to cook them thoroughly. Stir-fry until they are cooked through and slightly caramelized.
Step 4: Add Vegetables
Once your protein is cooked, toss in the chopped vegetables. Stir-fry for a few minutes until they are tender yet still crisp, ensuring they retain their vibrant colors and nutrients.
Step 5: Incorporate the Rice and Pineapple
Add the cooled, day-old rice to the pan, breaking up any clumps as you mix it with the vegetables and protein. Gently fold in the pineapple chunks, allowing their juices to mingle with the rice.
Step 6: Season the Dish
Pour in the soy sauce and oyster sauce, stirring to evenly coat the rice and ingredients. Adjust the seasoning to taste, adding more soy sauce or a squeeze of lime juice for acidity if desired. Finally, sprinkle in fresh herbs and spices to enhance the flavor further.
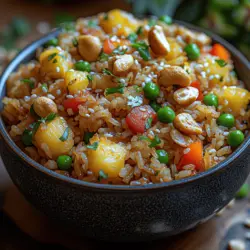
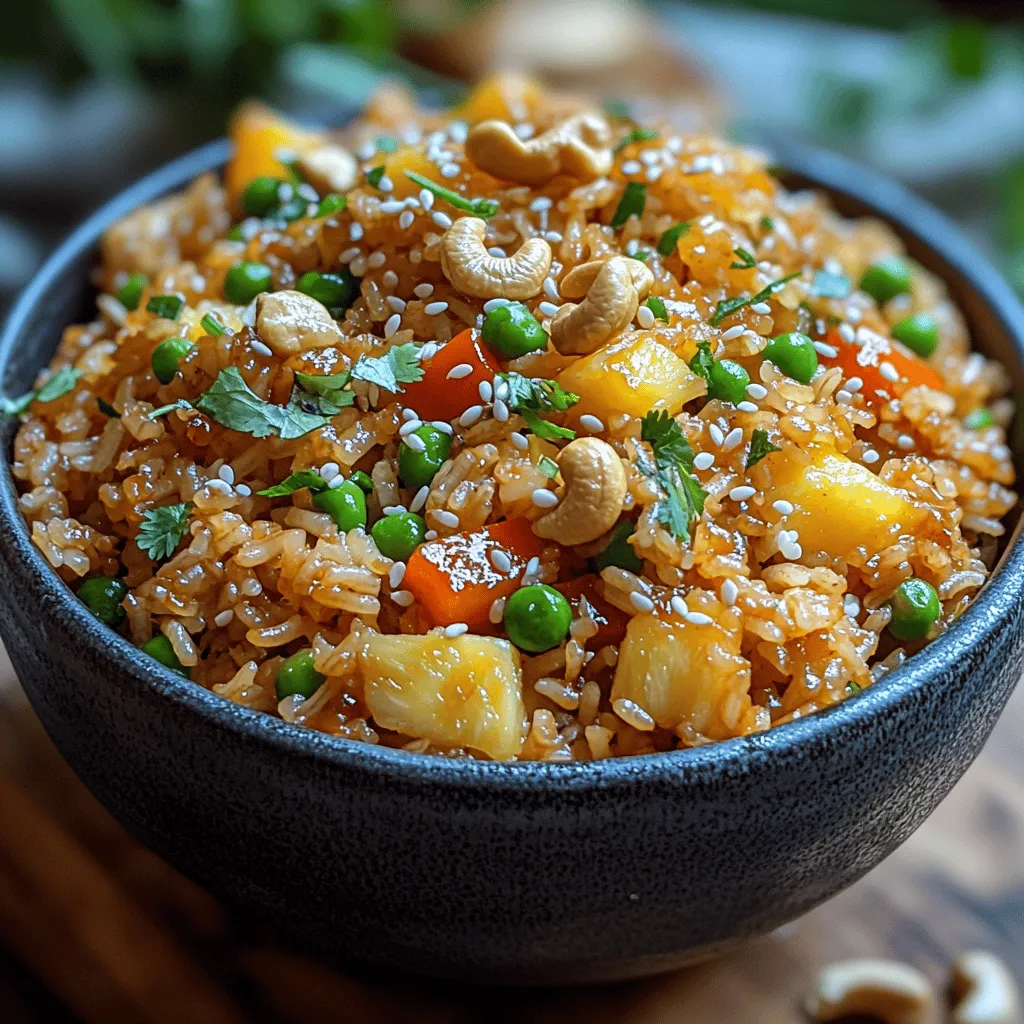
Step 7: Serve and Enjoy
Once everything is heated through and well combined, it’s time to serve your Tropical Pineapple Fried Rice. Garnish with additional pineapple, green onions, or fresh herbs for an added touch.
By following these steps, you can create a dish that is not only visually appealing but also bursting with flavor and freshness. Tropical Pineapple Fried Rice is perfect for a weeknight dinner or as a side dish at gatherings, allowing you to share the taste of the tropics with friends and family.
Layering Your Lasagna
The art of layering is crucial when it comes to making a perfect lasagna. It’s not just about piling ingredients haphazardly; it’s about creating a harmonious blend of flavors and textures that come together beautifully. Start by spreading a thin layer of sauce at the bottom of your baking dish. This not only prevents the pasta from sticking but also adds moisture to the overall dish.
Next, lay down the first layer of uncooked lasagna noodles. Ensure they are evenly spaced and slightly overlapping, allowing for expansion during baking. Follow this with a generous spread of sauce, making sure to cover all the noodles. Add a layer of ricotta cheese mixed with herbs for creaminess and flavor, then sprinkle a layer of mozzarella cheese for that melty goodness. Repeat this process, building layers until you reach the top of your baking dish.
How to Avoid a Soggy Lasagna
One common pitfall in lasagna-making is ending up with a soggy result. To prevent this, consider the moisture content of your ingredients. If using vegetables like zucchini or spinach, be sure to sauté them beforehand to release excess water. Additionally, avoid over-saturating your noodles with sauce. You want enough moisture for cooking but not so much that it turns your layers into a soupy mess. Using a combination of cheeses that melt well, like mozzarella and provolone, can also help maintain structure.
Creative Layering Techniques for a Gourmet Touch
If you’re looking to elevate your lasagna, consider incorporating gourmet touches. Start by experimenting with your cheeses: try mixing in ricotta with goat cheese or adding a layer of béchamel sauce for added richness. You could also introduce layers of different proteins such as sautéed mushrooms or roasted bell peppers for a flavorful twist. For a fresh element, consider adding a layer of pesto or sun-dried tomatoes. These small modifications can transform your basic lasagna into a gourmet masterpiece.
Baking the Lasagna
Now that your lasagna is beautifully layered, it’s time to bake it to perfection. Preheat your oven to 375°F (190°C). This temperature is ideal for ensuring that your lasagna cooks evenly without burning the top. Bake the lasagna uncovered for about 45 minutes, allowing the cheeses to melt and the edges to bubble. If you prefer a crispier top, you can broil it for an additional 2-3 minutes towards the end of the baking time.
How to Check for Doneness
To check if your lasagna is done, insert a knife into the center—if it slides in easily and the cheese is bubbly and golden, you’re good to go. Another indicator of doneness is the sauce bubbling around the sides of the dish. If it’s still watery or the noodles appear firm, give it a bit more time in the oven.
Tips for Achieving a Golden and Bubbly Top
For that perfect golden crust, consider covering your lasagna with foil for the first part of the baking process. This traps moisture and allows the lasagna to cook through without drying out. Remove the foil during the last 15 minutes of baking to achieve that desirable bubbly, golden top. A sprinkle of grated Parmesan cheese right before broiling can also enhance the color and flavor of your lasagna.
Letting It Rest: The Key to Perfect Slices
Once your lasagna is out of the oven, patience is key. Allow it to rest for at least 15-20 minutes before slicing. This resting period is essential as it allows the layers to set, making it easier to cut neat slices. If you serve it immediately, the layers may slide apart, resulting in a messy presentation. As the lasagna cools, the cheese solidifies slightly, enhancing the texture and making each slice hold its shape.
Why Resting Lasagna is Essential for Serving
Resting allows the flavors to meld together, as the moisture redistributes throughout the layers. The resting time also prevents the dish from being too hot to eat, allowing your guests to enjoy it at the ideal temperature. This small but significant step can dramatically enhance the overall eating experience.
Serving Suggestions for Your Homemade Lasagna
When it comes to serving your lasagna, the sides you choose can complement the dish beautifully. A simple arugula salad dressed with lemon vinaigrette adds a refreshing counterpoint to the richness of the lasagna. Garlic bread or a charcuterie board can also be delightful additions, offering different textures and flavors to your meal.
Wine Pairings That Complement the Dish
When it comes to wine, a medium-bodied red like Chianti or Sangiovese pairs wonderfully with lasagna, as the acidity balances the richness of the cheese and sauce. If you prefer white wine, a Pinot Grigio or a light Chardonnay can also work well, offering a crisp contrast to the hearty layers of pasta.
Creative Serving Ideas for Gatherings
For gatherings, consider serving individual lasagna portions baked in ramekins or small cast-iron skillets. This not only adds a personal touch but also makes for easy serving. You can garnish each portion with fresh basil or a drizzle of balsamic reduction for an elegant finish. Alternatively, a lasagna bar where guests can add their toppings before baking can be a fun and interactive dining experience.
Storing and Reheating Leftover Lasagna
Leftover lasagna can be just as delightful as the first serving if stored and reheated correctly. Allow any leftover lasagna to cool completely before transferring it to an airtight container. If you plan to eat it within a few days, it can be stored in the refrigerator. For longer storage, consider freezing it in individual portions. Be sure to wrap it tightly in plastic wrap and then foil to prevent freezer burn.
Best Practices for Storing Lasagna
When storing lasagna, it’s essential to label and date your containers so you can keep track of freshness. To maximize the quality of your leftovers, try to consume them within three to four days if refrigerated or within three months if frozen.
How to Reheat Without Losing Quality
To reheat, preheat your oven to 350°F (175°C). Place the lasagna in a baking dish, cover it with foil, and heat for about 20-25 minutes, or until heated through. If you want to reheat individual portions in the microwave, be sure to cover them with a microwave-safe lid or microwave-safe wrap to retain moisture. Heat in short intervals, checking frequently to avoid overcooking.
Exploring Variations of Lasagna
One of the joys of making lasagna is the ability to customize it according to dietary preferences and tastes. If you’re looking for vegetarian options, consider layers of roasted vegetables, like eggplant, zucchini, and bell peppers. For a vegan twist, replace ricotta with a mixture of blended tofu, nutritional yeast, and herbs.
Regional Variations: Spinach Lasagna, Seafood Lasagna, and More
Lasagna is a versatile dish with many regional variations. Spinach lasagna is a popular choice, often incorporating ricotta and mozzarella alongside layers of fresh spinach. Seafood lasagna, featuring shrimp, scallops, and a white sauce, offers a luxurious alternative. For those avoiding gluten, many brands now offer gluten-free lasagna noodles made from rice or quinoa, allowing everyone to enjoy this beloved dish.
Conclusion: Embracing the Joy of Cooking Lasagna
Creating a homemade lasagna is more than just a cooking task; it’s an experience filled with creativity and love. As you layer each ingredient and watch it transform in the oven, you embrace the joy of cooking. This dish is perfect for family gatherings, special occasions, or even a cozy night in.
As you explore and innovate with your lasagna recipes, remember that the best dishes often come from personal touches and adaptations. Whether you stick to tradition or venture into new territory with flavors, the satisfaction of sharing a homemade dish with loved ones is unmatched. So gather your ingredients, roll up your sleeves, and embark on your lasagna-making journey—your kitchen awaits!