Introduction
There’s something uniquely comforting about the smell of freshly baked bread wafting through the home. The warmth, the aroma, and the anticipation of pulling a golden-brown loaf from the oven create a sense of coziness that few things can replicate. Among the myriad of bread recipes out there, Garlic Herb Bliss Rolls stand out as an exceptional choice for any meal or occasion. Whether you’re serving them alongside a hearty stew, at a festive gathering, or simply enjoying them with a spread of butter, these rolls are bound to elevate your dining experience.
What sets Garlic Herb Bliss Rolls apart is their irresistible combination of aromatic herbs and rich garlic flavor. Imagine biting into a soft, fluffy roll that bursts with the essence of fresh herbs like rosemary, thyme, and parsley, perfectly complemented by the robust taste of garlic. This delightful pairing not only tantalizes the taste buds but also enhances the overall aesthetic of your meal, making these rolls a feast for both the eyes and palate.
The Allure of Homemade Bread
Baking bread at home is an age-old tradition that transcends cultures and generations. The joy of kneading dough, watching it rise, and shaping it into beautiful rolls can be immensely satisfying. There is a tactile pleasure in working with your hands, a connection to the ingredients that isn’t often found in store-bought options. The act of baking becomes a ritual, a meditative process that can bring peace to a busy day and a sense of accomplishment when the final product is enjoyed.
In addition to the emotional benefits, homemade bread often boasts a nutritional edge over its commercial counterparts. By making your own rolls, you have complete control over the ingredients. You can opt for high-quality flour, fresh herbs, and avoid preservatives or artificial additives that are commonly found in store-bought breads. This not only allows for healthier options but also means you can customize flavors and textures to your liking.
Moreover, bread-making traditions are deeply rooted in cultures worldwide, often signifying hospitality, love, and community. From the crusty baguettes of France to the soft naan of India, each culture has its unique take on this staple food, and Garlic Herb Bliss Rolls are a beautiful addition to this rich tapestry. They embody the spirit of togetherness and warmth, making them a wonderful choice for family gatherings or special occasions.
Ingredients Breakdown
To create the perfect Garlic Herb Bliss Rolls, it’s important to understand the key ingredients that contribute to their delightful texture and flavor. Here’s a detailed breakdown of each essential component:
All-Purpose Flour
All-purpose flour is the backbone of these rolls, providing the necessary structure and texture. Its moderate protein content allows for a soft and tender crumb while still giving the bread enough strength to rise beautifully. When measuring flour, it’s vital to spoon it into your measuring cup and level it off with a knife to avoid packing it down, which can lead to dense rolls.
Instant Yeast
For this recipe, instant yeast is preferred due to its convenience and reliability. Unlike active dry yeast, instant yeast doesn’t require proofing in warm water before use; it can be mixed directly with dry ingredients. This speeds up the bread-making process significantly, making it ideal for home bakers looking to whip up rolls in a timely manner. Instant yeast also provides a consistent rise, ensuring that your Garlic Herb Bliss Rolls turn out light and fluffy.
Granulated Sugar
Granulated sugar plays a dual role in this recipe. Firstly, it acts as food for the yeast during fermentation, helping to create carbon dioxide and contributing to a good rise. Secondly, it enhances the flavor of the rolls, providing a subtle sweetness that balances the savory notes of garlic and herbs. While it may seem like a small addition, sugar is crucial for achieving the perfect flavor profile.
Whole Milk
Whole milk adds moisture, richness, and tenderness to the rolls. The fat content in whole milk helps create a softer texture and improves the overall flavor. If you don’t have whole milk on hand, you can substitute it with 2% milk or even a plant-based milk alternative, though the texture may vary slightly.
Unsalted Butter
Butter is another key ingredient that contributes to the flavor and texture of Garlic Herb Bliss Rolls. Using unsalted butter allows for better control over the salt content in the recipe, enabling you to season it to your taste. Melting the butter before mixing it into the dough ensures that it incorporates evenly, resulting in a rich, buttery flavor throughout each roll.
Fresh Herbs and Garlic
The stars of this recipe are undeniably the fresh herbs and garlic. Herbs such as rosemary, thyme, and parsley infuse the dough with vibrant flavors, while fresh garlic adds a robust punch that elevates the rolls to new heights. Using fresh ingredients is essential for achieving the best flavor, and feel free to customize the herbs based on your preferences or what you have available.
Seasonings
Salt and black pepper are necessary for enhancing the overall taste of the rolls. Salt is not only important for flavor but also helps strengthen the gluten structure in the dough, contributing to the rolls’ chewy texture. A pinch of freshly cracked black pepper can add a subtle warmth and complexity that rounds out the flavors beautifully.
Optional Toppings
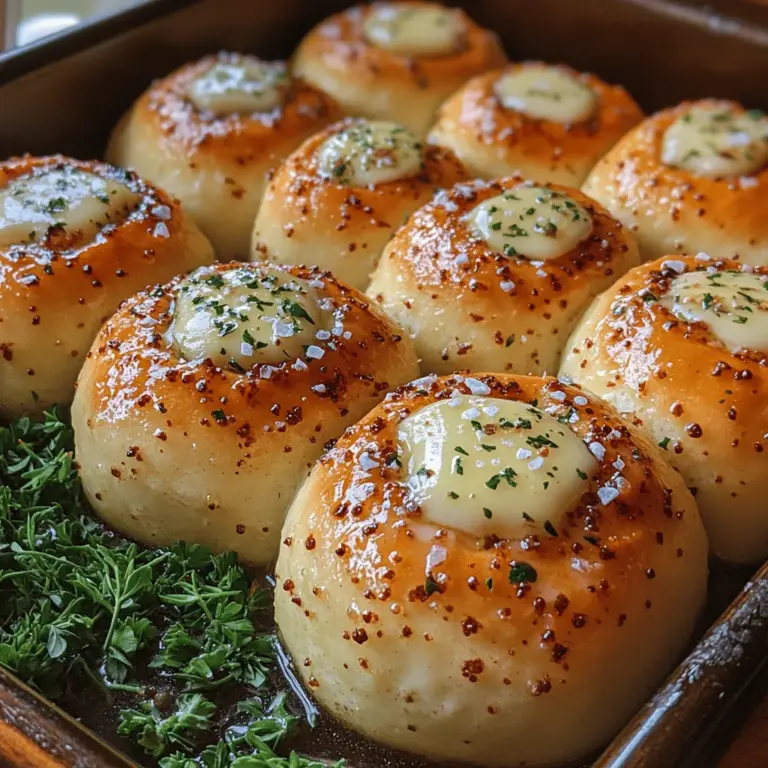
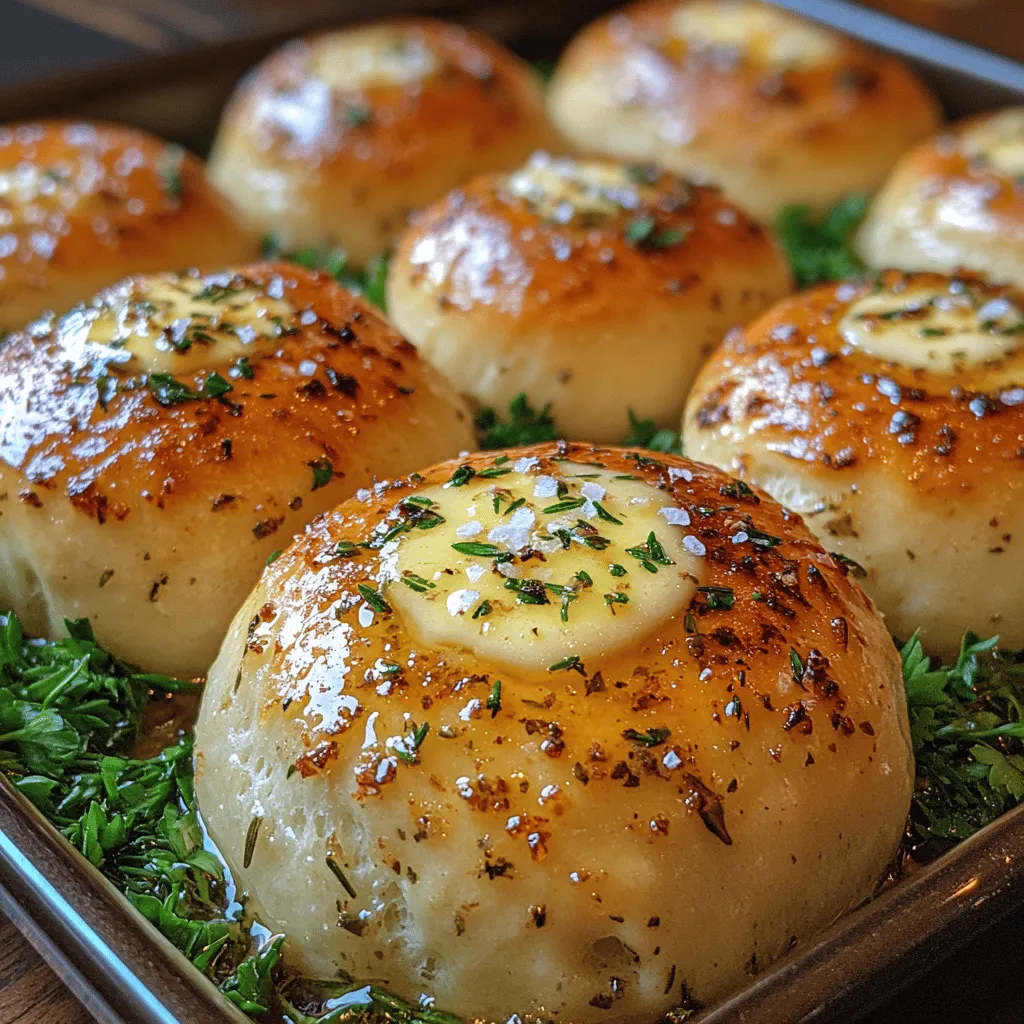
For an added touch of elegance and flavor, consider sprinkling some flaky sea salt on top of your rolls before baking. This not only enhances the taste but also provides a delightful contrast to the soft texture of the rolls. Additionally, you can experiment with other toppings, such as a sprinkle of cheese or a drizzle of garlic-infused oil, to make these rolls even more irresistible.
Step-by-Step Instructions
Now that you have a clear understanding of the ingredients, it’s time to dive into the step-by-step process of making Garlic Herb Bliss Rolls. Follow these instructions carefully to ensure your rolls turn out perfectly fluffy and flavorful.
Activating the Yeast
The first step in making your Garlic Herb Bliss Rolls is to activate the yeast. Although instant yeast doesn’t require proofing, it’s still a good practice to check its viability. In a small bowl, combine warm milk (around 110°F or 43°C) with a teaspoon of granulated sugar. Sprinkle the instant yeast on top and let it sit for about 5-10 minutes. If the mixture becomes foamy and bubbly, you know your yeast is active and ready to go. If not, you may need to start over with new yeast.
Mixing the Dry Ingredients
In a large mixing bowl, whisk together the all-purpose flour, remaining sugar, salt, and black pepper until well combined. This ensures that the yeast, sugar, and salt are evenly distributed throughout the flour, which is crucial for an even rise and flavor in your rolls.
Combining Wet and Dry Ingredients
Once your yeast is activated, pour the mixture into the bowl with the dry ingredients, along with the melted unsalted butter and the minced garlic. Using a wooden spoon or a spatula, mix the ingredients together until a shaggy dough forms. At this stage, you can also add the chopped fresh herbs, folding them into the dough until evenly incorporated.
Kneading the Dough
Transfer the shaggy dough onto a lightly floured surface and begin kneading it by hand. Knead the dough for about 8-10 minutes, until it becomes smooth and elastic. If the dough is sticky, sprinkle a little more flour as needed, but be cautious not to add too much, as it can make the rolls dense. Kneading is an essential step that develops the gluten structure, giving your rolls that desirable fluffy texture.
First Rise
Once kneaded, place the dough in a greased bowl, covering it with a clean kitchen towel or plastic wrap. Allow the dough to rise in a warm, draft-free area for about 1 to 1.5 hours or until it has doubled in size. This first rise is crucial for developing flavor and texture, so be patient and let the dough work its magic.
As you wait for the dough to rise, you can prepare your baking sheet by lining it with parchment paper or greasing it lightly. This will prevent the rolls from sticking and make for easier cleanup.
At this point, the kitchen will start to fill with the delightful aroma of garlic and herbs, making the anticipation of the finished rolls even more exciting.
—
Stay tuned for the next part, where we’ll continue with shaping the rolls, the second rise, and the final baking steps to achieve the perfect Garlic Herb Bliss Rolls. This journey is just beginning, and the end result will surely be worth the wait.
Mixing the Dough: Techniques for Achieving the Perfect Consistency
To create the perfect Garlic Herb Bliss Rolls, the first step is mixing your dough. This process is crucial because it sets the foundation for the texture and structure of your rolls. Begin by combining your dry ingredients—flour, yeast, and salt—in a large mixing bowl. It’s important to distribute the yeast evenly, as this ensures consistent rising throughout the dough.
Next, create a well in the center of the dry ingredients and add your wet ingredients: warm water, melted butter, and minced garlic. For optimal yeast activation, ensure that your water is warm but not hot; a temperature between 100°F and 110°F is ideal. Too hot can kill the yeast, while too cold will slow its activation.
Use a wooden spoon or a dough whisk to incorporate the flour into the wet mixture. Mix until a shaggy dough forms. The dough might seem a bit sticky at this stage, but resist the urge to add excessive flour. The moisture content is vital for achieving a soft and tender roll.
Kneading: Explanation of How Kneading Develops Gluten and Elasticity
Once your dough has come together, it’s time to knead. Kneading is a critical step in developing gluten, which provides the structure and chewiness in your rolls. Turn the dough out onto a lightly floured surface. Using the heel of your hand, push the dough away from you, then fold it back over itself. Rotate the dough a quarter turn and repeat this process.
Continue kneading for about 8-10 minutes. You’ll know the dough is ready when it’s smooth and elastic. A good test is the “windowpane test”—take a small piece of dough and stretch it gently. If it can stretch thin enough to let light through without tearing, you’ve developed enough gluten.
First Rise: The Science Behind Fermentation and Dough Doubling
After kneading, it’s time for the first rise, also known as fermentation. Place your kneaded dough in a lightly greased bowl and cover it with a clean kitchen towel or plastic wrap. This step is essential as it allows the yeast to ferment and produce carbon dioxide, causing the dough to rise and develop flavor.
Let it rise in a warm, draft-free environment until it has doubled in size, which typically takes about 1 to 2 hours. The ideal temperature for fermentation is around 75°F to 80°F. If your kitchen is cool, you can create a warm environment by placing the bowl in an oven preheated to 200°F for just a few minutes, then turning it off.
Shaping the Rolls: Tips on Achieving Uniformity and Aesthetics
Once your dough has doubled in size, it’s time to shape the rolls. Gently punch down the dough to release excess gas and turn it out onto a floured surface. Divide the dough into equal portions—typically, you should aim for about 12 pieces for standard-sized rolls.
To shape each portion into a roll, flatten the piece slightly and fold the edges into the center, creating a tight ball. Flip the dough over so the seam side is down, and gently roll it on the surface to create a smooth top. This technique not only enhances the appearance of your rolls but also helps maintain their shape during the second rise.
Second Rise: Importance of This Step for Lightness in the Rolls
After shaping, place the rolls on a baking sheet lined with parchment paper, ensuring they are spaced apart to allow for expansion. Cover them loosely with a kitchen towel and let them rise again for about 30-45 minutes. This second rise is critical for creating light and fluffy rolls. During this time, the yeast continues to work, producing more gas and causing the rolls to puff up.
While waiting, preheat your oven to 375°F (190°C). This ensures that your rolls will start baking immediately after the second rise, contributing to a better texture.
Baking Process: What to Look for in Terms of Color and Aroma
Now, it’s time to bake your Garlic Herb Bliss Rolls! Place the baking sheet in the preheated oven and bake for 15-20 minutes or until the rolls are golden brown. The aroma that fills your kitchen will be nothing short of delightful. Keep a close eye on them in the last few minutes; they can quickly go from golden to overly brown.
As a general rule, your rolls are done when they sound hollow when tapped on the bottom. If you have a kitchen thermometer, the internal temperature should reach around 190°F (88°C) for perfectly baked rolls.
Cooling and Serving: Best Practices for Enjoying Fresh Rolls
Once baked, remove the rolls from the oven and let them cool on a wire rack for at least 10 minutes. This cooling period allows the rolls to set, making them easier to handle and slice. While they are best served fresh, you can brush them with melted garlic herb butter for an extra flavor boost before serving.
These rolls are incredibly versatile and can be enjoyed warm with a pat of butter, served alongside soups and salads, or used as a base for mini sandwiches or sliders.
Tips for Perfecting Garlic Herb Bliss Rolls
Discussing Variations: Incorporating Different Herbs or Cheeses for Flavor Twists
While the original Garlic Herb Bliss Rolls are undeniably delicious, feel free to get creative with variations. Consider adding fresh herbs like rosemary, thyme, or oregano for different flavor profiles. You can also incorporate cheese into the dough—shredded parmesan, mozzarella, or even a bit of blue cheese can elevate your rolls to new heights.
Addressing Common Issues: Troubleshooting Sticky Dough or Dense Rolls
Occasionally, you may encounter issues while making your rolls. If your dough is too sticky, it’s usually a sign that it needs more flour. Add flour a tablespoon at a time until you achieve the desired consistency. Conversely, if your rolls turn out denser than expected, it may be due to over-kneading or insufficient rising. Always ensure your dough is allowed to rise fully, and don’t rush the kneading process.
Storage Advice: Best Practices for Keeping Rolls Fresh and Reheating Options
To keep your Garlic Herb Bliss Rolls fresh, store them in an airtight container at room temperature for up to 2 days. If you want to keep them for longer, freeze the rolls in a freezer-safe bag for up to 3 months. To reheat frozen rolls, allow them to thaw in the refrigerator overnight, then warm them in a preheated oven at 350°F (175°C) for about 10 minutes.
Serving Suggestions
Pairing Garlic Herb Bliss Rolls with Various Dishes
These rolls are perfect for a variety of meals. They pair beautifully with hearty soups, like creamy tomato basil or minestrone, providing a satisfying complement to the flavors. They also make an excellent accompaniment to stews or salads, adding a touch of warmth to your meal.
Ideal for Holiday Meals or Family Gatherings
Garlic Herb Bliss Rolls are an excellent addition to holiday meals or family gatherings. Their inviting aroma and soft texture make them a crowd favorite. Guests will appreciate the effort you put into them, and they will disappear quickly from the table.
Creative Uses: Mini Sandwiches or Sliders
Beyond serving them as a side, these rolls can be transformed into mini sandwiches or sliders. Fill them with roasted vegetables, pulled pork, or turkey and cranberry sauce for a delightful twist. They also make great lunchbox additions for kids, ensuring they enjoy a delicious and wholesome meal.
Nutritional Information
When it comes to nutrition, Garlic Herb Bliss Rolls provide a comforting yet indulgent treat. Each roll contains approximately 150 calories, with 5 grams of fat, 3 grams of protein, and 25 grams of carbohydrates. While not the lowest in calories, they can be made healthier by substituting part of the all-purpose flour with whole wheat flour, which adds more fiber and nutrients.
Conclusion
Creating Garlic Herb Bliss Rolls at home is not just a culinary task; it is a rewarding experience that brings joy and satisfaction to both the baker and those who enjoy the final product. The process of mixing, kneading, and shaping dough allows for a connection to the age-old tradition of bread-making, offering a sense of accomplishment.
We encourage you to explore the world of baking as a fulfilling adventure. There’s something uniquely comforting about sharing homemade bread with loved ones, a gesture that speaks volumes of care and warmth. So gather your ingredients, roll up your sleeves, and enjoy the delightful journey of making Garlic Herb Bliss Rolls—your kitchen will thank you for the delicious aroma, and your family will cherish the moments spent together around the dinner table.
