Crispy Golden Chicken Tenders Recipe
Introduction
Chicken tenders have earned their place as a beloved staple in households across the globe. Whether you’re dining out at a family-friendly restaurant, enjoying a casual picnic, or serving a quick weeknight dinner, chicken tenders are a go-to choice for people of all ages. Their appeal lies not just in their tender meat but also in their delightful crispy texture and rich flavor, which can transform a simple meal into something extraordinary.
The hallmark of a great chicken tender is its crispiness, which complements the juicy interior perfectly. This recipe for Crispy Golden Chicken Tenders elevates the traditional fare by incorporating a marination step that infuses the chicken with flavor and a seasoned coating that guarantees crunch with every bite. In this article, we’ll delve into the allure of chicken tenders, understand the key ingredients that contribute to their deliciousness, and guide you through the initial steps of creating your own batch of crispy perfection.
The Allure of Crispy Golden Chicken Tenders
Chicken tenders hold a special place in the hearts of many, and for good reason. They are universally loved by children and adults alike, serving as a fantastic introduction to chicken for picky eaters and a nostalgic comfort food for adults. Their versatility knows no bounds—cooked and enjoyed in various styles worldwide, they can be found in everything from classic American diners to gourmet bistros.
In American cuisine, crispy chicken tenders are often associated with family meals, backyard barbecues, and casual gatherings. They embody the essence of comfort food, providing warmth and satisfaction in every bite. The ability to pair them with a variety of dipping sauces—from classic honey mustard to zesty buffalo sauce—further enhances their appeal, allowing for customization based on personal taste preferences. Moreover, chicken tenders can be easily incorporated into salads, wraps, or served alongside a fresh vegetable medley, making them a versatile choice for any meal.
Understanding the Ingredients
To create the perfect Crispy Golden Chicken Tenders, it’s essential to understand the role of each ingredient in the recipe. Here’s a breakdown of the key components that contribute to the flavor, texture, and overall success of this dish.
– Chicken Breast: The foundation of any chicken tender recipe is, of course, the meat itself. Chicken breast is the preferred choice due to its lean nature and versatility. It cooks quickly and absorbs flavors well, making it an ideal candidate for marination. Additionally, chicken breast is a great source of protein, making it a healthy option for families.
– Buttermilk: One of the secrets to achieving tender, flavorful chicken tenders is the use of buttermilk in the marination process. The acidity in buttermilk helps to break down the proteins in the chicken, resulting in a softer texture. Moreover, it enhances the overall flavor, providing a subtle tang that pairs beautifully with the spices in the coating.
– Flour and Spices: The coating is critical to creating that coveted crispy texture. A combination of all-purpose flour and a mix of spices works together to create a flavorful crust that seals in moisture while frying. Common spices include paprika, garlic powder, and onion powder, which impart a depth of flavor that elevates the chicken tenders from ordinary to extraordinary.
– Hot Sauce: While optional, adding a splash of hot sauce to the buttermilk marinade can bring an extra layer of flavor to the chicken. This addition allows for a bit of heat without overpowering the dish, giving it a delightful kick that complements the crispy exterior.
– Ingredient Substitutions: For those with dietary restrictions or preferences, there are several substitutions that can be made. For a gluten-free version, you can replace all-purpose flour with gluten-free flour or almond flour. Additionally, plant-based alternatives such as chickpea flour or tofu can be used for a vegetarian or vegan option, maintaining the essence of the crispy texture.
Step-by-Step Guide to Making Crispy Chicken Tenders
Now that we have a solid understanding of the ingredients, let’s dive into the step-by-step guide to preparing your Crispy Golden Chicken Tenders. The key to achieving that perfect crunch starts with proper marination.
Marinating the Chicken
1. Prepare the Chicken: Start by cutting boneless, skinless chicken breasts into evenly sized strips, about 1 to 1.5 inches wide. This ensures that they cook uniformly.
2. Make the Marinade: In a large bowl, combine buttermilk with your choice of hot sauce (if using). Add a pinch of salt and pepper to enhance the flavor. Whisk together until well combined.
3. Marinate: Place the chicken strips into the buttermilk mixture, ensuring they are fully submerged. Cover the bowl with plastic wrap and refrigerate for at least 1 hour, or ideally overnight. This step is crucial for infusing the chicken with moisture and flavor, resulting in tender tenders.
4. Prepare the Coating: While the chicken is marinating, set up a dredging station. In a shallow dish, combine all-purpose flour with your selected spices—such as paprika, garlic powder, onion powder, salt, and pepper. Mix well to ensure even distribution of spices.
5. Dredge the Chicken: Once the marination time is complete, remove the chicken from the fridge. Allow any excess buttermilk to drip off before dredging each piece in the flour mixture. Ensure that each strip is thoroughly coated, pressing gently to help the coating adhere. Shake off any excess flour and set aside on a wire rack.
By following these initial steps, you are well on your way to crafting your very own Crispy Golden Chicken Tenders. The next phase will focus on frying techniques and additional tips to ensure that your chicken tenders turn out perfectly crispy and golden brown. Stay tuned for the continuation of this delicious journey!
Preparing the Coating: Importance of Seasoning and Texture
The coating on chicken tenders is crucial for achieving that signature crispy texture and flavor. Start by mixing your dry ingredients, which typically include flour, breadcrumbs, and various seasonings. A good balance is essential—too much of one spice can overpower the others, while too little will leave your tenders bland.
For the perfect coating, consider adding salt, pepper, garlic powder, onion powder, and paprika. These ingredients not only enhance the flavor but also create a beautiful golden crust when fried.
Once your dry mix is ready, you can add a touch of cornstarch to the flour mixture for extra crunch. The cornstarch absorbs moisture and helps the coating crisp up beautifully during frying.
Visual Cues for Each Step
As you prepare your coating, keep an eye on the texture. You want your flour and breadcrumb mixture to be well-combined but not overly clumpy. The consistency should be fine and uniform, ensuring even coverage on each chicken tender.
Oil Temperature: Before you start frying, it’s vital to know when the oil is ready. Heat your oil in a deep skillet or fryer until it reaches about 350°F (175°C). A simple way to test the oil is to drop a small piece of bread into the oil. If it sizzles and browns in about 60 seconds, your oil is ready for frying.
Frying Techniques for Perfectly Crispy Chicken Tenders
Explanation of the Frying Process and Its Importance
Frying chicken tenders is an art that requires attention to detail. The frying process not only cooks the chicken but also creates that irresistible crispy exterior. The key is to submerge the tenders in hot oil, which seals the coating and keeps the chicken juicy inside.
Tips for Maintaining Oil Temperature for Optimal Frying
Maintaining the right oil temperature throughout the frying process is crucial. If the temperature drops too low, the tenders will absorb more oil and become greasy. Conversely, if the oil is too hot, the coating may burn before the chicken is fully cooked.
Here are some tips to help you maintain optimal oil temperature:
– Use a Thermometer: An instant-read thermometer is your best friend. Check the oil temperature frequently to ensure it stays around 350°F (175°C).
– Work in Batches: Avoid overcrowding the pan, as it can significantly lower the oil temperature. Fry only a few tenders at a time, giving each piece enough space to cook evenly.
– Adjust the Heat: If you notice the temperature dropping, increase the heat slightly until the oil reaches the desired level again.
How to Avoid Common Frying Mistakes
– Overcrowding the Pan: As mentioned earlier, adding too many tenders at once can lower the oil temperature, resulting in soggy, greasy chicken. Stick to frying in small batches for the best results.
– Skipping the Drying Step: After coating your chicken, let them sit for about 10 minutes before frying. This allows the coating to adhere better and prevents it from falling off during cooking.
– Not Draining Properly: Once the tenders are cooked to a golden brown (about 4-5 minutes per side), remove them from the oil and place them on a wire rack or paper towels to drain excess oil. This will help keep them crispy.
Serving Suggestions and Pairings
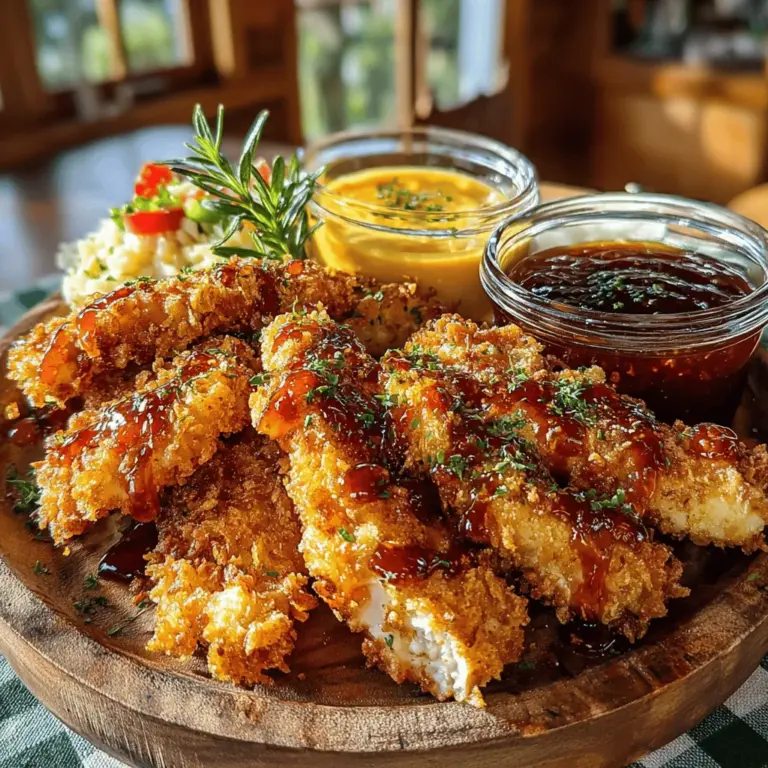
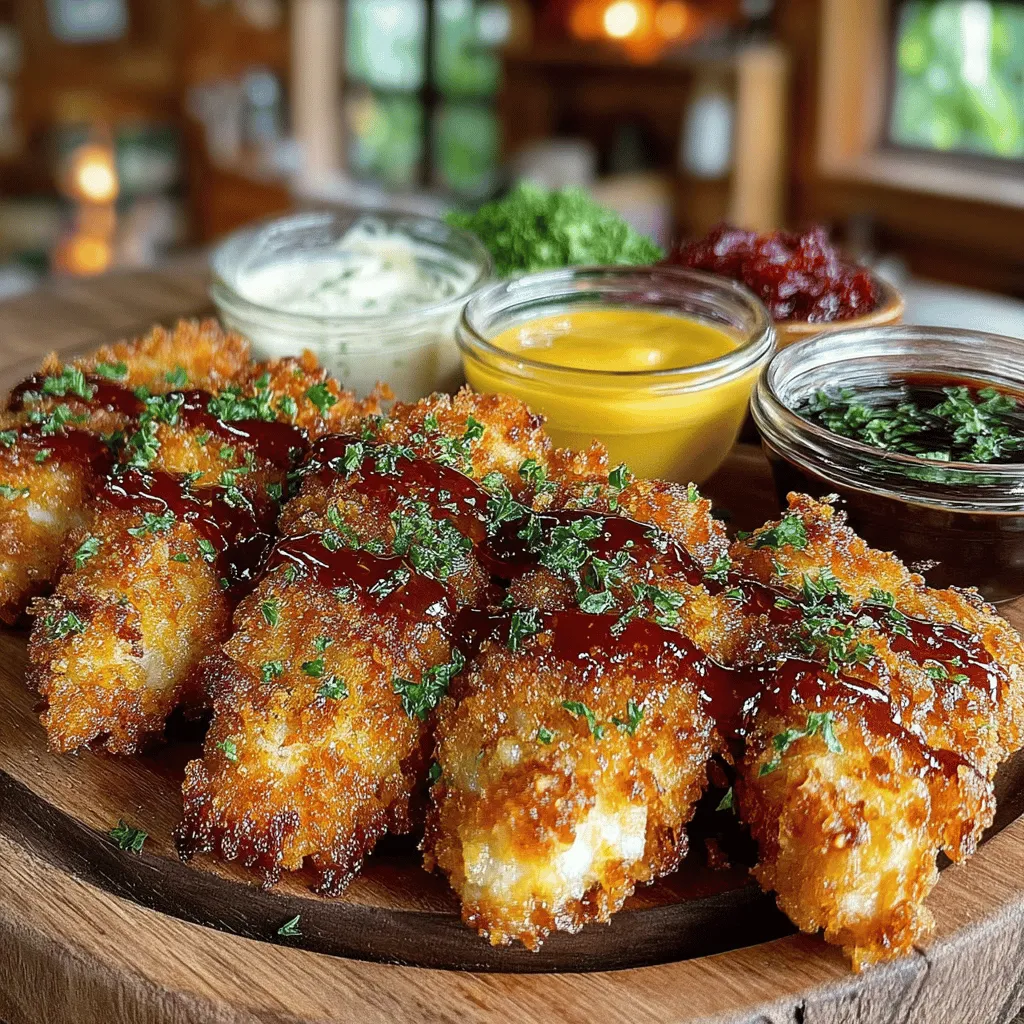
Once your crispy chicken tenders are ready, it’s time to think about how to serve them. The right dipping sauce can elevate your meal, and there are plenty of delicious options to consider.
Ideas for Dipping Sauces
– Classic Choices:
– Honey Mustard: A sweet and tangy blend that complements the savory flavor of chicken tenders.
– Ranch Dressing: Creamy and herby, ranch is always a crowd-pleaser.
– Barbecue Sauce: A smoky, sweet dip that pairs perfectly with the crispy texture of the tenders.
– Unique Options:
– Spicy Aioli: A zesty garlic mayonnaise that adds a kick to your chicken.
– Yogurt-Based Dips: Consider a tzatziki sauce for a refreshing twist. This cool dip balances the heat from fried foods beautifully.
Side Dishes that Pair Well
To create a complete meal, think about side dishes that complement your chicken tenders. Here are a few ideas:
– Coleslaw: A crunchy slaw adds a refreshing contrast to the crispy tenders.
– French Fries: Classic and indulgent, fries are a timeless pairing.
– Fresh Salad: A light, colorful salad can balance the richness of fried food. Consider a simple green salad with a tangy vinaigrette.
Nutritional Information
Understanding the nutritional content of your homemade chicken tenders is essential. Here’s a breakdown of what you can typically expect:
– Portion Sizes: A serving size of chicken tenders is usually around 3-4 pieces, depending on their size.
– Caloric Content: Each serving can range from 300 to 400 calories, depending on the coating and oil absorption during frying.
Benefits of Homemade vs. Store-Bought
Making chicken tenders at home allows you to control the ingredients and cooking methods, resulting in a fresher, healthier meal. Store-bought options often contain preservatives and additives, whereas homemade tenders can be tailored to your dietary preferences. Plus, you can experiment with different seasonings and coatings to find your ideal flavor profile.
Conclusion
In conclusion, preparing crispy golden chicken tenders at home is a rewarding experience that brings joy to both the cook and the diners. By following the key steps outlined, from seasoning your coating to mastering the frying technique, you can create tenders that are both delicious and satisfying.
Remember to take your time with each step, ensuring the oil is at the right temperature, and avoid overcrowding the pan for the best results. With a variety of dipping sauces and side dishes, you can create a delightful meal that everyone will love.
So why not gather your ingredients and try making these chicken tenders for yourself? Cooking is a wonderful way to share love and joy with friends and family, and there’s nothing quite like the satisfaction of serving a homemade meal. Enjoy the process, and savor every crispy bite!
