Introduction
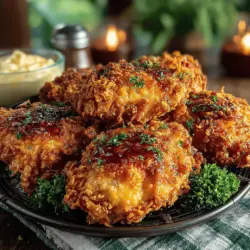
Fried chicken is more than just a meal; it’s a nostalgia-inducing comfort food that evokes memories of family gatherings, summer picnics, and festive celebrations. In the realm of fried chicken recipes, crispy buttermilk fried chicken holds a special place, celebrated for its juicy, tender meat enveloped in a delectably crunchy crust. This dish has transcended its Southern roots to become a favorite in kitchens across the globe, cherished for its authentic flavors and satisfying crunch.
In this comprehensive guide, we will navigate the entire process of crafting the perfect crispy buttermilk fried chicken, from marinating the chicken to achieving that irresistible crispy coating. With a focus on traditional techniques and rich flavors, this article will equip you with the knowledge and skills to impress family and friends alike.
Understanding the Ingredients
Buttermilk: The Secret Ingredient
At the heart of any good buttermilk fried chicken recipe lies buttermilk itself. This tangy dairy product is not just a flavorful addition; it plays a crucial role in the marinating process. The acidity in buttermilk helps to tenderize the chicken, breaking down proteins and resulting in a more succulent final dish. Moreover, buttermilk infuses the meat with a rich flavor that elevates the overall taste.
For those who might not have buttermilk readily available, there are several alternatives. A simple substitute can be made by mixing one cup of milk with one tablespoon of lemon juice or white vinegar. Let the mixture sit for about 5-10 minutes until it thickens slightly—this will mimic the acidity and thickness of buttermilk.
Spices and Seasonings
The flavor profile of crispy buttermilk fried chicken is enhanced by a careful blend of spices and seasonings in both the marinade and the flour coating. Each ingredient contributes to the overall taste, creating a harmonious balance that makes this dish unforgettable.
– Garlic Powder: A staple in many kitchens, garlic powder adds depth and a savory note that complements the chicken beautifully.
– Onion Powder: This seasoning brings a subtle sweetness and enhances the overall flavor complexity.
– Smoked Paprika: Adding a hint of smokiness, smoked paprika elevates the dish with its vibrant color and rich taste.
– Salt and Pepper: The quintessential seasonings, salt and pepper are essential for bringing out the natural flavors of the chicken and the other spices.
When creating your spice blend, feel free to adjust quantities according to your personal taste preferences. A pinch of cayenne pepper can also be added for those who enjoy a bit of heat.
Choosing the Right Chicken
Selecting the right chicken parts is essential for achieving the best results. Different cuts of chicken offer unique attributes that can influence the flavor and texture of your fried chicken.
– Chicken Wings: Perfect for parties and casual gatherings, wings are bite-sized and have a higher skin-to-meat ratio, making them extremely crispy.
– Chicken Thighs: Known for their rich flavor and juiciness, thighs are forgiving when it comes to cooking times, ensuring they remain tender even if slightly overcooked.
– Chicken Breasts: While they can dry out easily, breasts are a leaner option and can deliver great flavor if cooked properly.
– Chicken Legs: A favorite among many, chicken legs have a good balance of meat and skin, providing both flavor and texture.
Ultimately, the choice comes down to personal preference and the occasion. Whether you opt for wings, thighs, or a whole chicken, each cut can create a delicious version of this classic dish.
The Marinade Process
Creating the Perfect Marinade
Now that we have a clear understanding of the ingredients, it’s time to prepare the marinade. In a large mixing bowl, combine the buttermilk with your selected spices, ensuring an even distribution. Here’s a simple recipe to get you started:
– 2 cups buttermilk
– 1 tablespoon garlic powder
– 1 tablespoon onion powder
– 1 tablespoon smoked paprika
– 1 teaspoon salt
– 1 teaspoon black pepper
Whisk these ingredients together until well combined. The buttermilk should take on a slightly darker hue from the spices as they meld together.
Once your marinade is ready, add the chicken pieces, ensuring that each piece is fully submerged. This is crucial; the chicken needs to soak up all those delicious flavors. Cover the bowl with plastic wrap or transfer the chicken to a resealable plastic bag, squeezing out as much air as possible.
Marination Time: Overnight vs. Quick Marinade
The marination process is where the magic happens. While some recipes suggest marinating for as little as 30 minutes, the real flavor develops over time. Ideally, you should allow your chicken to marinate for at least 4 hours, but for the best results, overnight is recommended.
Longer marination times not only enhance the flavor but also improve the texture of the chicken. The buttermilk works its tenderizing magic to ensure that, when cooked, the chicken remains juicy and succulent. If you’re in a hurry, a quick marinade can still yield tasty results, but the depth of flavor may not be as pronounced.
Preparing the Dredge
Crafting the Flour Mixture
After the chicken has marinated, it’s time to prepare the dredge—the flour mixture that will create the signature crispy coating. In a separate bowl, combine all-purpose flour with additional spices to complement the marinade. Here’s a suggested flour mixture:
– 2 cups all-purpose flour
– 1 tablespoon garlic powder
– 1 tablespoon onion powder
– 1 tablespoon smoked paprika
– 1 teaspoon salt
– 1 teaspoon black pepper
– Optional: ½ teaspoon cayenne pepper for added heat
Mix the dry ingredients thoroughly to ensure an even distribution of spices. This step is crucial, as every bite should have that irresistible flavor.
Once your dredge is ready, it’s time to move on to the frying process, where the magic of crispy buttermilk fried chicken truly comes to life. Stay tuned for the next part of this guide, where we’ll dive into the frying techniques and tips to achieve that perfect golden-brown crust.
Achieving the ultimate crispy buttermilk fried chicken is both an art and a science. In this guide, we delve deeper into the techniques and secrets that ensure each piece of chicken has a golden, crunchy exterior while remaining juicy and flavorful inside. Whether you’re a novice or an experienced cook, this recipe will elevate your fried chicken game to new heights.
The Science Behind the Flour Coating
A crispy exterior is achieved through a combination of ingredients and techniques. The flour coating plays a pivotal role in this transformation. When flour is mixed with buttermilk, it creates a paste-like substance that clings to the chicken. The science here lies in the gluten formation; as the flour hydrates, it develops gluten which helps form a structure that traps moisture and creates that desired crunch during frying.
Purpose of Each Ingredient
– Buttermilk: This ingredient not only tenderizes the chicken through its acidity but also provides a tangy flavor that complements the spices. The lactic acid helps break down proteins, resulting in a more succulent piece of chicken.
– Flour: The primary coating ingredient that, when fried, creates the crunchy texture. Combining all-purpose flour with cornstarch can enhance crispiness, as cornstarch has a lower moisture content and contributes to a lighter texture.
– Spices: Incorporating a blend of spices into your flour mixture enhances flavor and can contribute to the browning effect during frying. Common additions include paprika, garlic powder, and cayenne pepper.
Tips for the Perfect Dredge
Achieving a perfect dredge is crucial for ensuring that the coating adheres well to the chicken. Here are some expert tips:
1. Pat Dry the Chicken: Before dredging, ensure your chicken pieces are patted dry with paper towels. This helps the coating stick better, as excess moisture can lead to a soggy crust.
2. Use a Two-Step Dredging Method: For an extra-thick coating, dip the chicken pieces first in seasoned flour, then in the buttermilk, and back into the flour. This double dredging creates a more substantial crust.
3. Shake Off Excess Flour: After dredging, gently shake off any excess flour. This prevents clumping and ensures even cooking. Too much flour can lead to a gummy texture instead of a crispy finish.
Frying Techniques
Choosing the Right Oil for Frying
The type of oil you choose can significantly impact the flavor and texture of your fried chicken. Here are a few options:
– Vegetable Oil: A neutral-flavored oil with a high smoke point, making it a popular choice for frying. It allows the chicken’s flavor to shine through.
– Peanut Oil: Known for its subtle nutty flavor, peanut oil has a high smoke point and is often favored for frying due to its ability to maintain temperature during cooking. However, be mindful of allergies when serving.
– Canola Oil: Another neutral option, canola oil is low in saturated fats and has a high smoke point, making it a heart-healthy choice for frying.
Heating the Oil to Perfection
The right oil temperature is crucial for achieving that signature crunch. If the oil is too hot, the coating may burn before the chicken is cooked through. If it’s too cool, the chicken will absorb excess oil and become greasy.
– Ideal Temperature: Aim for an oil temperature of 350°F to 375°F (175°C to 190°C). This range allows the coating to crisp up nicely while ensuring the chicken cooks evenly.
– Testing Oil Readiness: To check if the oil is ready, drop a small pinch of flour into the oil. If it sizzles and bubbles, the oil is hot enough. Alternatively, you can use a food thermometer for precise readings.
Batch Frying: Timing and Technique
Frying chicken in batches is essential to maintain temperature and ensure even cooking. Here’s how to do it effectively:
1. Don’t Overcrowd the Pan: Placing too many pieces of chicken in the oil at once can lower the oil temperature, resulting in soggy chicken. Fry in small batches, allowing space between pieces.
2. Timing: Cook the chicken for about 12-15 minutes, turning occasionally to ensure even browning. The internal temperature should reach 165°F (74°C) to ensure it’s fully cooked.
3. Drain Properly: After frying, place the chicken on a wire rack over a baking sheet to drain excess oil. This allows air to circulate around the chicken, preventing it from becoming soggy.
Achieving the Perfect Crisp
Resting the Chicken After Frying
Once your chicken is perfectly golden and crispy, the next crucial step is letting it rest. This may seem counterintuitive, but resting allows the juices to redistribute and the coating to firm up.
– Resting Time: Allow the chicken to rest for at least 10 minutes. This helps maintain the crispiness of the exterior while keeping the inside juicy. A wire rack is ideal for this as it prevents steam buildup.
Serving Suggestions
Crispy buttermilk fried chicken shines on its own, but pairing it with complementary side dishes can elevate your meal. Here are some classic pairings:
– Mashed Potatoes: Creamy mashed potatoes with gravy provide a comforting contrast to the crispy chicken.
– Coleslaw: A tangy, crunchy coleslaw balances the richness of the fried chicken and adds a refreshing element to the meal.
– Garden Salad: A light salad with fresh greens and a citrus vinaigrette can cleanse the palate and add freshness to the plate.
– Cornbread: Sweet cornbread can provide a delightful contrast to the savory flavors of the chicken, making for a well-rounded meal.
– Pickles: Crispy pickles or fried pickles add a delightful crunch and tanginess that complements the chicken’s flavor.
Conclusion
Crispy buttermilk fried chicken is more than just a dish; it’s a culinary experience that brings warmth and joy to any table. By following this detailed guide, you not only learn a foolproof recipe but also the techniques and science behind making perfect fried chicken. Whether it’s for a family meal or a special gathering, mastering this classic dish will leave a lasting impression on your loved ones.
So roll up your sleeves, gather your ingredients, and embark on this delicious cooking journey. The reward will be a plateful of golden, crispy buttermilk fried chicken that everyone will crave. Enjoy the process, and savor the delightful results that follow!