Introduction
Desserts have a magical way of transporting us back to cherished moments of childhood, and there’s nothing quite like the warm embrace of nostalgia when it comes to sweet treats. Imagine the joy of indulging in a rich, creamy cheesecake that harmoniously combines the beloved flavors of a childhood breakfast cereal—Cinnamon Toast Crunch. This Cinnamon Toast Crunch Cheesecake is not just a dessert; it’s a delightful journey down memory lane, offering a unique twist that satisfies both your sweet tooth and your craving for something extraordinary.
In recent years, creative cheesecake recipes have gained immense popularity, with bakers experimenting with various flavors and textures to create something truly special. This particular cheesecake stands out, embodying a perfect balance of sweet and spice that tantalizes the taste buds. The creamy, luscious filling, infused with the iconic cinnamon and sugar flavor of Cinnamon Toast Crunch cereal, is set on a crunchy, buttery crust, making it a dessert that is sure to impress at any gathering. Whether you’re hosting a dinner party or simply treating yourself to something sweet, this cheesecake is a showstopper that will have everyone asking for seconds.
Understanding the Ingredients
To create the perfect Cinnamon Toast Crunch Cheesecake, it is essential to understand each ingredient’s role in the overall flavor and texture of the dessert. Here’s a closer look at the key components that make this cheesecake a must-try:
Cinnamon Toast Crunch Cereal
The star of the show, Cinnamon Toast Crunch cereal, is known for its irresistible combination of crunchy squares coated with cinnamon and sugar. Its flavor profile offers a delightful sweetness, complemented by warm, aromatic cinnamon notes that evoke feelings of comfort and nostalgia. When incorporated into the cheesecake, this cereal not only enhances the flavor but also adds a unique texture that elevates the overall experience. The crunchiness of the cereal contrasts beautifully with the creamy filling, creating a delightful sensory experience with every bite.
Cream Cheese
Cream cheese is the backbone of any cheesecake, providing the rich, smooth, and creamy texture that makes this dessert so indulgent. Its mild flavor allows other ingredients to shine while contributing a luxurious mouthfeel that is essential for a successful cheesecake. When whipped until smooth and creamy, cream cheese forms the perfect base for the cheesecake filling, ensuring a decadent and satisfying dessert.
Sour Cream
Sour cream plays a crucial role in achieving the cheesecake’s signature tanginess and creaminess. This ingredient not only enhances the overall flavor profile but also adds moisture to the filling, resulting in a luscious texture. The slight acidity of sour cream balances the sweetness of the other ingredients, creating a harmonious blend that keeps the cheesecake from being overly sweet. This subtle tang is what sets this cheesecake apart, offering a depth of flavor that complements the cinnamon and sugar notes beautifully.
Granulated Sugar
Sugar is essential in any dessert, and in this cheesecake, it serves to balance the flavors and provide the necessary sweetness. Granulated sugar dissolves easily into the mixture, ensuring that every bite is perfectly sweet without overpowering the other flavors. The right amount of sugar is crucial to achieving the perfect balance, allowing the cinnamon and cream cheese to shine through while still satisfying your sweet cravings.
Eggs
Eggs act as a binding agent in the cheesecake filling, helping to create a cohesive structure. They provide stability and richness, ensuring that the cheesecake holds its shape once baked. Additionally, eggs contribute to the overall creaminess of the filling, enhancing the texture and mouthfeel. It’s important to incorporate the eggs properly, mixing them in gradually to avoid any lumps and achieve a smooth consistency.
Ground Cinnamon
Ground cinnamon is the aromatic spice that elevates the flavor profile of this cheesecake. Its warm, sweet notes complement the sweetness of the granulated sugar and the cinnamon in the cereal, creating a deliciously spiced filling that is both comforting and indulgent. The addition of ground cinnamon not only enhances the overall taste but also reinforces the nostalgic flavor of the Cinnamon Toast Crunch cereal, tying the entire dessert together.
Whipped Cream and Toppings
To crown this delectable dessert, whipped cream and additional toppings add the final touch of indulgence and visual appeal. A generous dollop of whipped cream not only enhances the presentation but also adds a light, airy element that contrasts beautifully with the dense cheesecake filling. You can also consider garnishing with more crushed Cinnamon Toast Crunch or a sprinkle of cinnamon sugar for a fun and festive finish. These toppings not only make the cheesecake visually appealing but also provide an extra layer of flavor and texture.
Preparing the Crust
The crust is a vital component of any cheesecake, setting the foundation for the rich filling. For our Cinnamon Toast Crunch Cheesecake, we will create a crust that is both flavorful and satisfying, perfectly complementing the creamy filling. Here’s how to prepare the crust:
Using the Food Processor
To achieve the ideal texture for the crust, a food processor is your best friend. Start by measuring out the required amount of Cinnamon Toast Crunch cereal and place it in the food processor. Pulse the cereal until it reaches a fine crumb consistency. This step is crucial, as the texture of the crust will directly impact the overall cheesecake experience. A finely crushed cereal will create a smooth and cohesive crust that holds together well.
Mixing Ingredients
Once you have the cereal crumbs, transfer them to a mixing bowl and add melted butter and granulated sugar. The melted butter acts as the binding agent, ensuring that the crumbs stick together and form a solid crust once baked. The sugar adds a touch of sweetness, complementing the flavors of the cereal. Use a fork or your hands to mix the ingredients thoroughly until the crumbs are evenly coated and have a sandy texture.
Baking the Crust
Preheat your oven to 350°F (175°C) to prepare for baking the crust. Once mixed, press the crumb mixture firmly into the bottom of a 9-inch springform pan, ensuring an even layer across the base. It’s important to pack the crumbs down tightly to prevent the crust from crumbling once the cheesecake is baked. Bake the crust in the preheated oven for about 10-12 minutes, or until it is lightly golden and fragrant. This brief baking time will help set the crust and prevent it from becoming soggy when the cheesecake filling is added. Allow the crust to cool completely before proceeding to the next steps.
Crafting the Cheesecake Filling
With the crust prepared, it’s time to focus on the star of the dessert: the cheesecake filling. This is where the magic truly happens, as we blend the ingredients to create a creamy, dreamy filling that embodies the flavors of Cinnamon Toast Crunch. Here’s how to craft the perfect cheesecake filling:
Mixing Techniques
Start by placing the softened cream cheese in a large mixing bowl. Using an electric mixer, beat the cream cheese on medium speed until it is smooth and creamy, free of any lumps. This step is crucial, as a well-mixed cream cheese base is the foundation of a successful cheesecake filling. Gradually add the granulated sugar, continuing to mix until the sugar is fully incorporated and the mixture is light and fluffy.
Next, add the sour cream and ground cinnamon to the mixture, blending until smooth. It’s important to ensure that each ingredient is thoroughly mixed before adding the next. This will prevent lumps and create a uniform filling that bakes evenly.
Incorporating Eggs
Once the cream cheese, sugar, sour cream, and cinnamon are well combined, it’s time to add the eggs. It’s best to add them one at a time, mixing thoroughly after each addition. This gradual incorporation helps maintain the smooth texture of the filling and ensures that the eggs are evenly distributed throughout the mixture. Overmixing at this stage can introduce too much air into the batter, leading to cracks in the cheesecake once it’s baked. Therefore, mix just until combined after adding each egg.
With the filling fully prepared, you’re now ready to pour it over the cooled crust, setting the stage for a delightful baking experience that will culminate in a deliciously indulgent dessert.
As we move forward with our recipe, we will guide you through the baking and cooling processes, ensuring that your Cinnamon Toast Crunch Cheesecake turns out perfectly every time! Stay tuned for the next section, where we will cover these essential steps and tips for achieving a flawless cheesecake.
Adding Eggs One at a Time
When it comes to crafting the perfect cheesecake, the technique of incorporating eggs is crucial. Start by adding the eggs to your cream cheese mixture one at a time. This method not only ensures that each egg is fully integrated into the batter before the next is added, but it also helps maintain the desired creaminess without introducing excess air. Begin by mixing your softened cream cheese until it’s smooth and free of lumps. Once your mixture is creamy, add the first egg, mixing on low speed until just combined. This gentle approach allows for a silky texture in the final product. Repeat this process, adding each egg individually, and make sure to scrape down the sides of your mixing bowl as needed to ensure all ingredients are well-blended.
Adding Flavors
The magic of a great cheesecake often lies in the flavors that elevate its taste profile. In this Cinnamon Toast Crunch Cheesecake, vanilla extract and ground cinnamon play pivotal roles. The addition of pure vanilla extract enhances the overall sweetness and adds depth to the flavor, while ground cinnamon brings a warm, nostalgic essence reminiscent of the beloved cereal. Aim for one teaspoon of high-quality vanilla extract and one to two teaspoons of ground cinnamon, adjusting to your preference. Incorporating these flavors at the right stage—after the eggs—will allow them to meld beautifully into the batter, creating a harmonious blend that delights the palate.
Baking the Cheesecake
Baking a cheesecake requires precision, as the process is as delicate as the dessert itself. Begin by preheating your oven to 325°F (163°C). This temperature is ideal for slowly and evenly baking the cheesecake, allowing it to set without browning too quickly.
Setting the Oven Temperature
Preheating your oven is crucial for achieving consistent results. An adequately heated oven helps the cheesecake rise gently and prevents it from cracking. Utilize an oven thermometer to ensure your oven is calibrated correctly, as even a slight deviation can impact the baking process.
Determining Doneness
To check for doneness without overbaking, gently jiggle the cheesecake pan. The center should have a slight wobble, while the edges should be set. This indicates that the cheesecake is cooked through but still retains a creamy texture. If you insert a toothpick into the center, it should come out with a few moist crumbs, indicating the cheesecake is perfectly baked. Remember, the cheesecake will continue to cook slightly even after being removed from the oven due to residual heat.
Cooling Techniques
Cooling the cheesecake properly is essential to prevent unsightly cracks from forming. Once baked, turn off the oven and crack the door open slightly, allowing the cheesecake to cool gradually in the oven for about one hour. This gentle cooling method minimizes temperature shock, which can lead to cracking. After an hour, remove the cheesecake from the oven and let it cool at room temperature for an additional hour before transferring it to the refrigerator.
Chilling for the Perfect Texture
After baking and cooling, the cheesecake must be chilled to achieve the ideal texture. Refrigerating the cheesecake for at least four hours is essential, but overnight chilling yields the best results. This resting period allows the flavors to meld and the texture to firm up, resulting in a luscious, sliceable dessert.
Timing for Optimal Results
While it may be tempting to dig into your cheesecake immediately, patience is key. Chilling it overnight not only enhances the flavor but also ensures that the cheesecake is perfectly set. This step is critical for a smooth, creamy consistency that holds its shape when sliced.
Storing Tips
If you have leftovers or want to prepare your cheesecake in advance, proper storage is vital for maintaining freshness. Cover the cheesecake with plastic wrap or transfer it to an airtight container before refrigerating. It can be stored in the fridge for up to one week. For longer storage, consider freezing the cheesecake. Wrap it tightly in plastic wrap and then in aluminum foil; it can be frozen for up to three months. When ready to enjoy, thaw it overnight in the refrigerator before serving.
Finishing Touches: Toppings and Presentation
Now that your cheesecake is perfectly chilled and set, it’s time to add the finishing touches that will elevate its presentation and flavor.
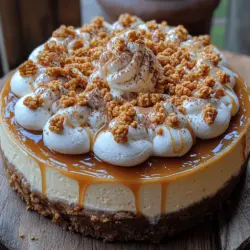
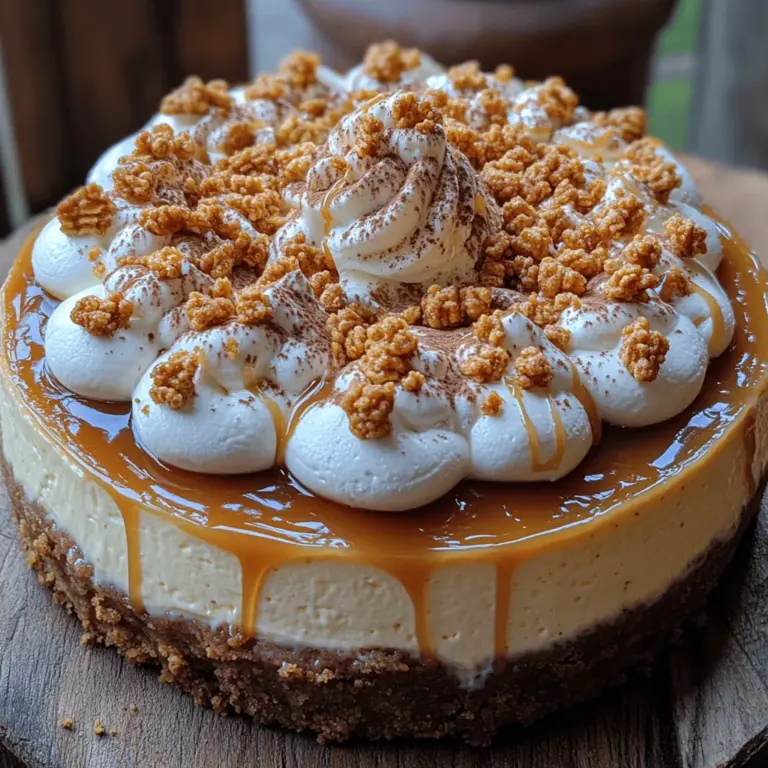
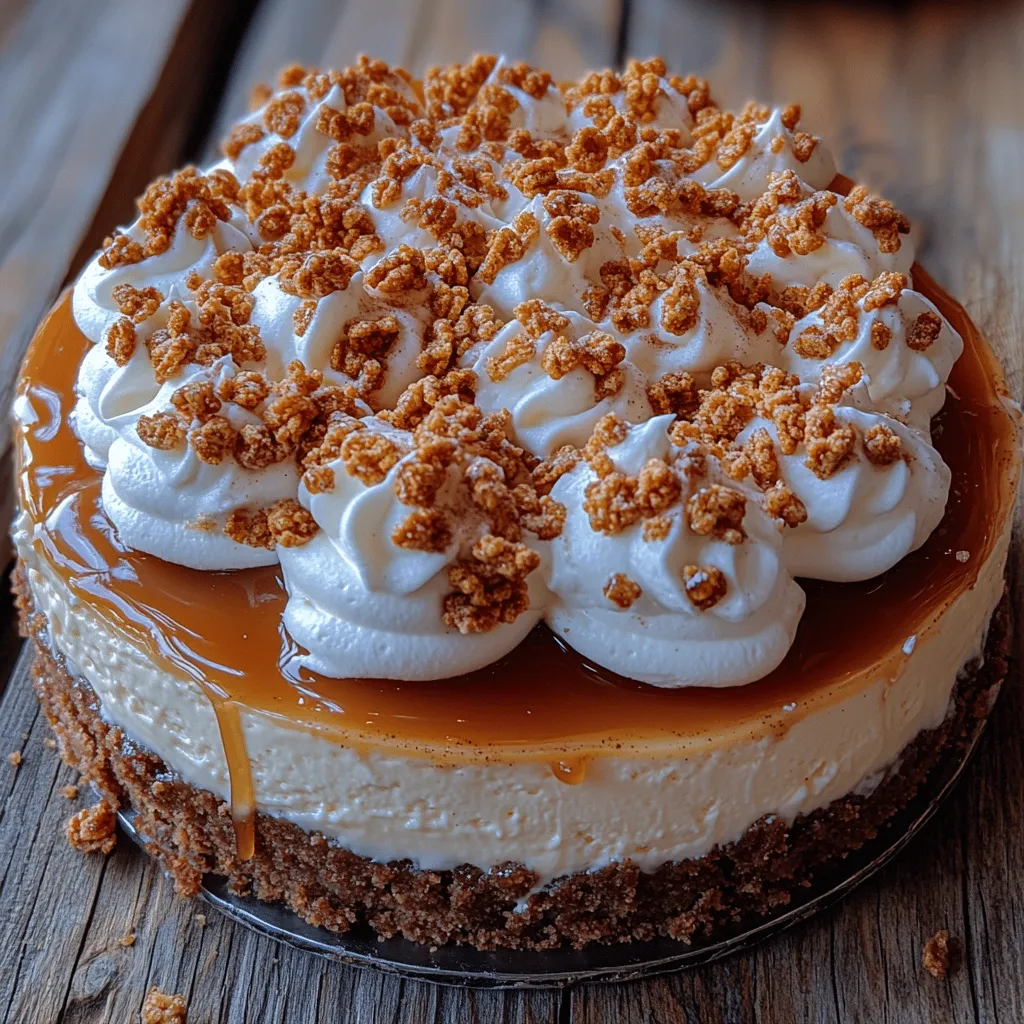
Whipped Cream Application
A light, fluffy whipped cream topping is a classic choice for cheesecakes. To create a beautiful whipped cream, start by chilling your mixing bowl and beaters for about 15-20 minutes before whipping. Use heavy whipping cream and add a tablespoon of sugar and a splash of vanilla extract to sweeten it. Beat the cream on medium speed until soft peaks form. Be careful not to overbeat, as this can turn the cream into butter. Once ready, use a piping bag fitted with a star tip to create decorative swirls on top of the cheesecake for an elegant finish.
Adding Crushed Cereal
To complement the cheesecake’s flavors and add an appealing crunch, sprinkle crushed Cinnamon Toast Crunch cereal over the whipped cream. For the best results, pulse the cereal in a food processor until it reaches a fine crumb consistency. This not only enhances the visual appeal of your dessert but also reinforces the signature flavor of Cinnamon Toast Crunch, making each bite a delightful experience.
Caramel Sauce Drizzling
Drizzling caramel sauce over the cheesecake adds an irresistible sweetness and a touch of sophistication. Use a store-bought caramel sauce for convenience or make your own by simmering sugar and cream until it reaches a thick, syrupy consistency. Once the cheesecake is topped with whipped cream and crushed cereal, use a spoon or squeeze bottle to elegantly drizzle the caramel sauce over the top. This not only looks visually stunning but also adds a rich flavor that balances the spiciness of the cinnamon.
Serving Suggestions
When it comes to serving your Cinnamon Toast Crunch Cheesecake, creativity plays a vital role in enhancing the overall experience.
Presentation Ideas
Consider garnishing slices of cheesecake with fresh fruit such as strawberries or blueberries to add a burst of color and freshness. A light dusting of cinnamon on the plate can also enhance the visual appeal and further emphasize the flavors in the cheesecake. For an extra touch of elegance, serve each slice on a decorative dessert plate, and don’t hesitate to add a few mint leaves for a pop of green.
Pairing Recommendations
Pairing your cheesecake with the right beverages can elevate the dessert experience. A rich cup of coffee or espresso complements the creaminess of the cheesecake, while a glass of dessert wine, like a late-harvest Riesling, can enhance the sweetness. For a non-alcoholic option, consider serving with a spiced chai latte to harmonize with the cinnamon flavors.
Conclusion
Creating a Cinnamon Toast Crunch Cheesecake is not just about following a recipe; it’s about embracing the joy of baking and sharing delightful experiences with loved ones. Whether you’re celebrating a special occasion or simply indulging in a sweet treat, this cheesecake is sure to impress with its creamy texture and unique flavor profile. Its nostalgic taste can transport you back to carefree mornings filled with the crunch of cereal, making it a cherished addition to any dessert repertoire. Don’t hesitate to let your creativity shine as you explore different toppings and presentation styles, ensuring that this recipe becomes a beloved favorite in your kitchen. Happy baking!