
When it comes to dessert staples, few treats can rival the timeless appeal of brownies. These rich, chocolatey squares have been a beloved choice for generations, often serving as the centerpiece of family gatherings, potlucks, and late-night indulgences. Their versatility allows for countless variations, but today, we’re diving into a unique twist that elevates the classic brownie to new heights: Biscoff Bliss Brownies.
Imagine the dense, fudgy texture of a traditional brownie, perfectly balanced with the rich, caramel-like flavor of Biscoff cookie butter. This decadent dessert doesn’t just satisfy your sweet tooth; it delivers an experience that’s equal parts indulgent and comforting. Biscoff Bliss Brownies are incredibly easy to make, inviting bakers of all skill levels to whip up a batch for family, friends, or even just for a cozy night in. Whether you’re looking to impress guests or simply treat yourself, this recipe strikes the perfect balance between simplicity and decadence.
Understanding Brownies
Brownies hold a special place in dessert culture, often regarded as the ideal combination of cake and cookie. They offer a unique texture that can range from fudgy to cakey, satisfying a variety of taste preferences. Fudgy brownies are dense and rich, boasting a moist interior, while cakey brownies are lighter and fluffier, resembling cake in consistency. The choice between fudgy and cakey often comes down to personal preference, but the Biscoff Bliss Brownies reside firmly in the fudgy category, thanks to the combination of melted butter and a higher fat-to-flour ratio.
In addition to their delightful textures, brownies are a blank canvas for flavor experimentation. The addition of Biscoff cookie butter takes this classic dessert to another level, introducing a unique flavor profile that is both nostalgic and indulgent. Biscoff, a spiced caramel cookie, lends its signature buttery taste to these brownies, creating a truly irresistible treat that’s perfect for any occasion.
Key Ingredients in Biscoff Bliss Brownies
To create the perfect Biscoff Bliss Brownies, it’s essential to understand the role of each ingredient in the recipe. Here’s a detailed breakdown of the main components that contribute to the brownies’ rich flavor and delectable texture:
– Unsalted Butter: Using unsalted butter is crucial in baking, as it allows you to control the amount of salt in your recipe. Butter adds richness and moisture to the brownies, while the unsalted variety ensures that the flavors remain balanced.
– Granulated Sugar: Sugar plays a vital role in sweetness and texture. In brownies, it helps to create a moist, fudgy interior while also contributing to the brownie’s crust. The sugar dissolves during baking, creating a chewy texture that enhances the overall experience.
– Eggs: Eggs are essential for binding the ingredients together and providing moisture. They also contribute to the structure of the brownies, ensuring a soft and fudgy texture. The number of eggs used can affect the density, so it’s important to follow the recipe closely.
– Vanilla Extract: A splash of vanilla extract enhances the flavor profile of the brownies, adding a warm and inviting aroma. It complements the chocolate and Biscoff flavors, creating a well-rounded dessert.
– All-Purpose Flour and Cocoa Powder: These two ingredients are the foundation of brownie texture. All-purpose flour provides structure, while cocoa powder adds richness and chocolate flavor. The balance between these ingredients is key to achieving the desired fudgy consistency.
– Baking Powder and Salt: Baking powder acts as a leavening agent, ensuring that the brownies rise slightly while still maintaining that dense texture. A pinch of salt is important for balancing sweetness and enhancing flavors, making every bite more enjoyable.
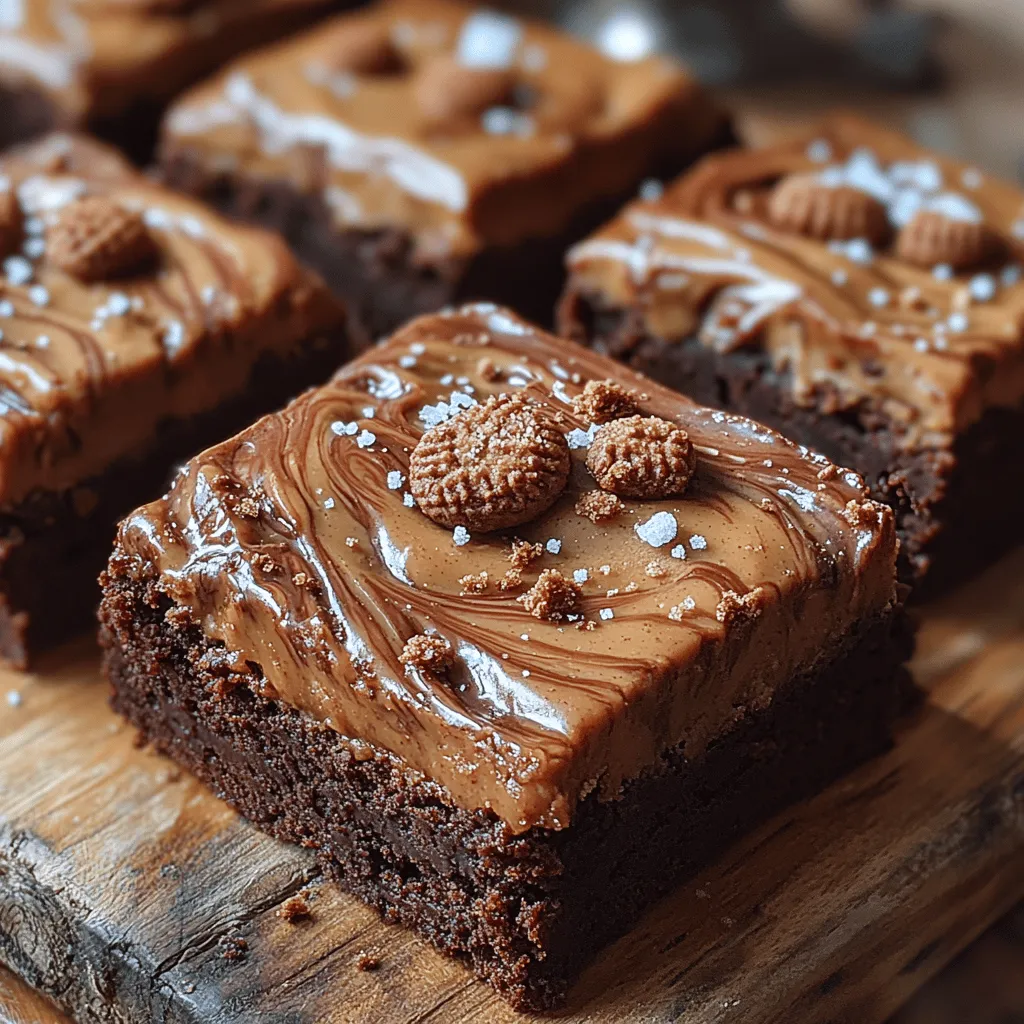
– Biscoff Cookie Butter and Crushed Biscoff Cookies: This is where the magic happens. Biscoff cookie butter adds a creamy, caramel-like flavor that elevates the brownies to new heights. When combined with crushed Biscoff cookies, you not only enhance the flavor but also add delightful texture and crunch. Biscoff cookies are made from a unique blend of spices, including cinnamon and nutmeg, which contribute to their distinctive taste.
It’s worth noting that while Biscoff Bliss Brownies are a treat for many, they do contain common allergens, including gluten and dairy. For those with dietary restrictions, there are gluten-free and dairy-free alternatives available, allowing everyone to enjoy this delightful dessert.
Step-by-Step Guide to Making Biscoff Bliss Brownies
Now that you’re familiar with the key ingredients, it’s time to roll up your sleeves and get baking! Here’s a step-by-step guide to making Biscoff Bliss Brownies, starting with the essential first steps.
Preheat the Oven:
Before you begin mixing your ingredients, it’s crucial to preheat your oven to the correct temperature. Preheating ensures that your brownies bake evenly throughout, preventing any undercooked or overcooked sections. For Biscoff Bliss Brownies, set your oven to 350°F (175°C). While the oven heats up, you’ll have time to gather all your ingredients and prepare your baking dish.
Melting the Butter:
The next step involves melting the unsalted butter. You can do this either on the stovetop in a saucepan or in the microwave using a microwave-safe bowl. If you choose the microwave, heat the butter in short intervals, stirring in between to avoid overheating. The goal is to melt the butter until it’s completely liquid but not boiling. Melting the butter not only makes it easier to combine with the other ingredients, but it also contributes to the fudgy texture of your brownies.
Once the butter is melted, let it cool slightly before adding the granulated sugar. This prevents the sugar from melting into the butter and helps create that desirable, chewy texture. Stir the sugar into the melted butter until well combined, and then follow with the eggs and vanilla extract. The mixture should be smooth and glossy, reflecting the indulgent nature of this treat.
In the next steps, you’ll continue to build the flavors and textures that make Biscoff Bliss Brownies such a standout dessert. By following the detailed instructions and using quality ingredients, you’ll achieve a batch of brownies that are sure to impress. Stay tuned as we delve deeper into the baking process, ensuring your brownies turn out perfectly every time!
Combining Wet Ingredients
To create the perfect base for your Biscoff Bliss Brownies, it’s essential to start with a smooth batter. Begin by combining the melted butter with brown sugar, granulated sugar, and eggs in a large mixing bowl. It’s recommended to use room-temperature eggs as they blend more seamlessly into the mixture. For optimal results, whisk these ingredients together until the mixture is pale and fluffy. This step not only helps to incorporate air into the batter for a lighter brownie but also ensures that the sugars dissolve properly, contributing to a rich flavor and moist texture.
When adding the wet ingredients, consider using an electric mixer on medium speed. If you’re mixing by hand, a whisk or a spatula will work well; just be vigilant about achieving a uniform consistency. If you notice any lumps in the butter or sugar, this is your cue to whisk a little longer. Remember, a smooth mixture will yield a more cohesive brownie that’s free from any grainy texture.
Mixing Dry Ingredients
The next step involves preparing your dry ingredients. In a separate bowl, combine the flour, cocoa powder, baking powder, and a pinch of salt. Whisking these ingredients together is essential for even distribution of the cocoa and leavening agent. Proper whisking plays a crucial role in the final texture of your brownies. It aerates the flour, creating a lighter batter that rises beautifully in the oven.
While it may be tempting to skip this step, taking the time to thoroughly mix your dry ingredients will make a significant difference in your brownie’s consistency. Ensure there are no clumps of cocoa powder or flour, as these can lead to uneven baking and texture issues. Once combined, set your dry mixture aside for the next step.
Combining Mixtures
Now the fun part begins: combining the wet and dry mixtures. Slowly add the dry ingredients into the bowl with the wet ingredients, stirring gently with a spatula or wooden spoon. It’s crucial to mix just until you see no dry flour; overmixing can result in tough brownies due to the development of gluten. The goal is to maintain a soft and fudgy texture, so be cautious during this step.
At this juncture, you might notice the batter looking slightly thick and sticky, which is a good sign. This is the ideal consistency for brownies, as it ensures they remain moist and chewy after baking.
Preparing the Biscoff Swirl
To create the iconic Biscoff swirl that elevates these brownies, take your jar of Biscoff spread and gently warm it in the microwave for about 15-20 seconds. Warm Biscoff is easier to drizzle and swirl into the brownie batter.
Once your batter is ready, scoop half of it into the prepared baking pan and spread it evenly. Next, dollop several spoonfuls of the warmed Biscoff spread on top of the batter. Use a knife or a skewer to swirl the spread into the brownie mixture, taking care not to overmix. The goal is to create a beautiful marbled effect without completely incorporating the Biscoff into the batter. This technique ensures that every bite will have that delicious caramelized flavor.
Layering the Batter
When layering the brownie batter, visual appeal is just as important as taste. After adding the first layer of batter and Biscoff swirl, pour the remaining brownie batter over the top. To ensure a smooth and even finish, use a spatula to gently spread the batter to the edges of the pan.
For added flair, consider reserving a small amount of Biscoff spread to swirl on the top layer before baking. This creates a lovely marbled effect that not only looks enticing but also enhances the flavor profile.
Adding the Cookie Crumble
To finish off these decadent brownies, it’s time to add the cookie crumble. Crush a handful of Biscoff cookies into small pieces, ensuring they have a rough texture rather than becoming a fine dust. The timing for this step is key; sprinkle the cookie crumble on top of the second layer of brownie batter just before it goes into the oven. This allows the cookies to bake into the brownies, creating a delightful crunch that contrasts beautifully with the soft, fudgy brownie texture.
Baking the Brownies
Once your brownies are assembled, it’s time to bake them. Preheat your oven to 350°F (175°C) and place the brownies in the center of the oven. As they bake, keep an eye out for visual cues. The top should appear set and slightly glossy, while the edges might pull away slightly from the pan.
Discussing the Toothpick Test
To confirm whether your brownies are done, perform the toothpick test. Insert a toothpick into the center of the brownies; if it comes out with a few moist crumbs attached, they are perfect. If the toothpick comes out clean, you may have overbaked them, leading to a drier texture. Remember, brownies continue to firm up as they cool, so it’s better to err on the side of slightly underbaking.
Importance of Cooling Time
Once out of the oven, resist the urge to dig in immediately. Allow the brownies to cool in the pan for at least 20-30 minutes before slicing. This cooling period is crucial because it helps the brownies set and develop a better texture. Cutting into them too soon can result in a gooey mess rather than the beautiful, fudgy squares you’re aiming for.
Serving Suggestions
When it comes to serving your Biscoff Bliss Brownies, presentation is key. For a professional touch, use a sharp knife to cut the brownies into even squares, wiping the knife between cuts to maintain clean edges. Arrange the brownies on a decorative plate or a wooden board for a rustic feel.
Optional Toppings
To elevate your dessert further, consider drizzling melted chocolate and a sprinkle of sea salt on top of the brownies just before serving. The rich chocolate complements the caramel notes of the Biscoff, while the sea salt enhances the overall flavor profile, balancing sweetness with a touch of savory.
Pairing Options
Beverages can significantly enhance your dessert experience. Consider serving your Biscoff Bliss Brownies with a glass of cold milk, a hot cup of coffee, or even a scoop of vanilla ice cream. Each pairing offers a delicious contrast to the brownies, making for a decadent treat that will impress all your guests.
Storing and Reheating Biscoff Bliss Brownies
To maintain freshness, store your brownies in an airtight container at room temperature for up to five days. If you want to keep them for a more extended period, consider freezing them. Cut the brownies into squares, layer them between sheets of parchment paper in a freezer-safe container, and freeze for up to three months.
Tips for Reheating
When you’re ready to enjoy your brownies again, reheating is straightforward. Simply microwave a square for about 15-20 seconds until warmed through. This will restore their fudgy texture and bring out the delicious Biscoff flavor once again.
Nutritional Information
Each serving of Biscoff Bliss Brownies offers a delightful indulgence. Typically, a standard brownie square (approximately 2 inches) contains around 250-300 calories, depending on portion size and specific ingredients used. They offer a balanced mix of carbohydrates, fats, and sugars, making them a treat that’s best enjoyed in moderation.
When indulging in desserts, it’s important to appreciate the flavors and craftsmanship that go into them. Enjoying a rich brownie is about balancing indulgence with moderation.
Conclusion
Biscoff Bliss Brownies are a unique dessert that combines the rich, fudgy texture of traditional brownies with the distinctive flavor of Biscoff cookies. Their appeal lies not just in their taste, but also in their beautiful presentation and the delightful contrast of textures. With a few simple steps, you can create a dessert that’s sure to impress.
We encourage you to try this recipe and experience the delicious combination of flavors that Biscoff Bliss Brownies have to offer. Whether you’re serving them at a gathering or enjoying a quiet moment at home, these brownies are sure to bring joy to any occasion. Happy baking!
