Introduction
Summer is the perfect season for indulgent desserts that bring joy and refreshment to gatherings, celebrations, and family moments. One such delightful treat that has captured the hearts of many is the Strawberry Bliss Ice Cream Cake. This dessert is not just a feast for the eyes with its vibrant colors; it also offers a symphony of flavors and textures that make it a must-try for anyone looking to elevate their summer dessert game.
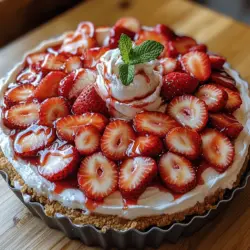
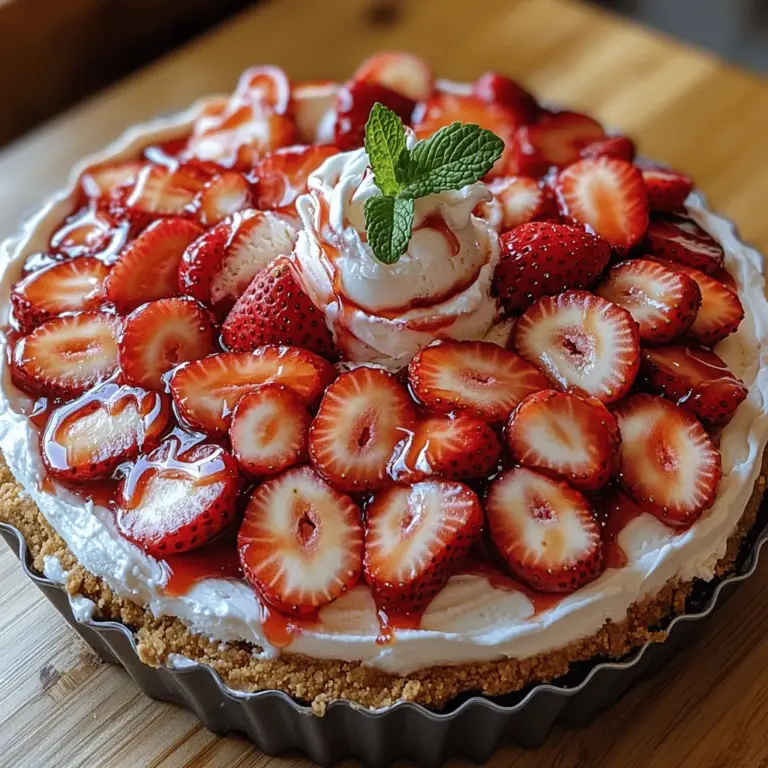
The Strawberry Bliss Ice Cream Cake seamlessly blends the creamy richness of vanilla and strawberry ice creams with a crunchy graham cracker crust, providing an irresistible contrast. Each slice reveals layers of sweet, fruity goodness, enhanced by the freshness of real strawberries and a luscious strawberry syrup that ties everything together. Topped with a light, airy whipped cream and garnished with mint leaves, this cake is as beautiful as it is delicious. It’s the perfect centerpiece for birthday parties, family reunions, or a simple afternoon treat with friends.
In this article, we will guide you through the process of creating your very own Strawberry Bliss Ice Cream Cake, ensuring that you impress your guests and satisfy your sweet tooth. We’ll begin by exploring the essential ingredients needed for this delightful dessert and then dive into the preparation steps, starting with the graham cracker crust.
Understanding the Ingredients
Before we embark on our ice cream cake-making journey, let’s take a closer look at the key ingredients that will make this dessert a hit. Each component plays a significant role in crafting the perfect balance of flavors and textures.
Key Ingredients
1. Ice Cream: The stars of this dessert are the vanilla and strawberry ice creams. Vanilla ice cream provides a rich and creamy base that complements the fruity notes of strawberry ice cream. The combination of these two flavors is not only classic but also incredibly refreshing, especially during the warmer months.
2. Graham Crackers: These crunchy treats form the foundation of our cake. The graham cracker crust adds a delightful crunch and serves as a great counterbalance to the smoothness of the ice cream. Using freshly crushed graham crackers ensures that you achieve that perfect texture.
3. Fresh Strawberries: The addition of fresh strawberries elevates the flavor profile of the cake. Their natural sweetness and slight tartness enhance the overall taste, making each bite a burst of fresh fruitiness. Plus, they add a beautiful pop of color to the dessert.
4. Strawberry Syrup: To amplify the strawberry flavor, we incorporate strawberry syrup. This syrup not only adds sweetness but also creates a lovely visual appeal with its vibrant red hue. It’s drizzled throughout the layers and can also be used as a topping.
5. Whipped Cream: A dollop of whipped cream on top of the ice cream cake adds a light and airy finish. It balances the richness of the ice cream and adds a creamy texture that melds beautifully with the other ingredients.
6. Mint Leaves: Finally, fresh mint leaves are used as a garnish. They not only enhance the visual appeal of the cake but also add a refreshing aroma and flavor that complements the dessert beautifully.
Importance of Each Ingredient
The combination of these ingredients creates a harmonious dessert that is both satisfying and refreshing. The vanilla ice cream provides a creamy backdrop, while the strawberry ice cream brings a fruity punch. The graham cracker crust is essential for texture, and the fresh strawberries and strawberry syrup ensure that every bite is bursting with flavor. The whipped cream and mint leaves serve as the perfect finishing touches, making this cake not only delicious but also beautiful.
Preparing the Graham Cracker Crust
Now that we understand the importance of each ingredient, let’s dive into the first step of making our Strawberry Bliss Ice Cream Cake: preparing the graham cracker crust. This step is crucial, as a well-made crust provides a sturdy base for the layers of ice cream.
Ingredients for the Graham Cracker Crust
– 1 ½ cups graham cracker crumbs
– ½ cup unsalted butter, melted
– ¼ cup granulated sugar (optional, for added sweetness)
Instructions
1. Crush the Graham Crackers: Begin by placing the graham crackers in a food processor. Pulse them until they reach a fine crumb consistency. If you don’t have a food processor, you can place them in a zip-top bag and crush them using a rolling pin.
2. Mix with Butter and Sugar: In a medium mixing bowl, combine the graham cracker crumbs, melted butter, and granulated sugar (if using). Mix well until all the crumbs are evenly coated with the butter. The mixture should resemble wet sand and hold together when pressed.
3. Press into the Pan: Prepare a 9-inch springform pan by lightly greasing the bottom and sides. Transfer the graham cracker mixture into the pan and use the bottom of a measuring cup or your fingers to press it firmly and evenly into the bottom. Ensure that the crust is compact and reaches the edges of the pan.
4. Chill the Crust: Once the crust is pressed into place, place the springform pan in the refrigerator for at least 30 minutes. Chilling the crust is essential, as it allows the butter to solidify and helps the crust hold its shape when you add the ice cream layers.
Tips for Perfecting the Graham Cracker Crust
– Use Melted Butter for Binding: Melted butter is key to binding the graham cracker crumbs together. Be sure it’s fully melted for an even consistency.
– Press Evenly: When pressing the crust into the pan, take your time to ensure it is evenly distributed. An uneven crust can lead to difficulty serving the cake.
– Chill for Best Results: Do not skip the chilling step. A chilled crust will hold its shape better and provide a solid foundation for your ice cream layers.
Layering the Ice Cream
With the graham cracker crust prepared and chilled, we can now move on to the exciting part: layering the ice cream. This step is where the fun begins, as you can get creative with the arrangement of flavors.
Step-by-Step Guide to Layering
1. Soften the Ice Cream: Before you start layering, it’s crucial to soften both the vanilla and strawberry ice creams. Remove them from the freezer and allow them to sit at room temperature for about 10-15 minutes. The ice cream should be soft enough to scoop but not too melted.
2. First Layer of Vanilla Ice Cream: Using an ice cream scoop, add a generous layer of softened vanilla ice cream on top of the chilled graham cracker crust. Use a spatula to spread it evenly across the crust, ensuring it reaches the edges.
3. Add Strawberry Syrup: Drizzle a layer of strawberry syrup over the vanilla ice cream. You can create a swirl effect by using a knife or a toothpick to gently mix the syrup into the ice cream. This adds an extra burst of strawberry flavor.
4. Layer of Strawberry Ice Cream: Next, scoop the softened strawberry ice cream on top of the vanilla layer. Again, use a spatula to spread it evenly. The vibrant pink color of the strawberry ice cream will create a beautiful contrast against the white vanilla layer.
5. Repeat if Desired: If you have enough space in your springform pan, you can repeat the layers for a more substantial cake. Start with another layer of vanilla ice cream, followed by syrup, and then a layer of strawberry ice cream. This will create a stunning striped effect when sliced.
6. Final Layer of Whipped Cream: Once you have completed the layering, spread a generous layer of whipped cream on top of the last layer of ice cream. This will serve as a delightful topping and add a lightness to the dessert.
Softening Ice Cream for Layering
It’s important to achieve the right consistency when softening the ice cream. If the ice cream is too hard, it will be difficult to spread, leading to a messy layer. Conversely, if it’s too melted, the layers may not hold together well. Aim for a consistency that allows for easy scooping and spreading without melting into a puddle.
With the layers in place, your Strawberry Bliss Ice Cream Cake is well on its way to becoming a show-stopping dessert. In the next section, we will explore some finishing touches and tips to ensure your cake is a success. Stay tuned for more details on garnishing and serving this delightful treat!
Techniques for Smoothing the Ice Cream Layers for a Professional Finish
Achieving a professional-looking finish on your Strawberry Bliss Ice Cream Cake is all about the details, particularly when it comes to smoothing the ice cream layers. Use a straight-edged spatula or a bench scraper to level off each layer of ice cream in the cake pan. Start by gently pressing the spatula against the ice cream to create an even surface. If you find the ice cream is too hard to spread, let it sit at room temperature for a few minutes until it softens slightly. This will make it easier to work with.
Another technique is to dip your spatula in warm water before smoothing each layer. The heat will help to melt the surface slightly, allowing for a smoother finish. Make sure to wipe the spatula clean between layers to avoid mixing the colors and flavors. By taking the time to ensure each layer is smooth and even, your cake will not only look stunning but also provide a delightful texture when served.
Importance of Freezing Each Layer to Achieve the Perfect Consistency
Freezing each layer of ice cream properly is crucial for the final consistency of your Strawberry Bliss Ice Cream Cake. After spreading each layer, place the cake back into the freezer for at least 30 minutes to an hour before adding the next layer. This allows the ice cream to firm up, ensuring that the layers hold their shape and do not melt into each other.
For best results, consider using a cake ring or springform pan, as these will allow for easy removal once the cake is fully assembled. Monitoring the freezing time is essential; if you let the layers freeze too long, they may become difficult to spread or cut through later. A well-frozen layer will provide the right amount of firmness without becoming rock hard, leading to the perfect scoop every time.
Adding Fresh Strawberries and Syrup
Incorporating fresh strawberries and syrup into your Strawberry Bliss Ice Cream Cake not only enhances the flavor but also adds a beautiful visual appeal. Start by selecting ripe strawberries, as their sweetness and juiciness will significantly impact the overall taste of the cake. Look for strawberries that are bright red, firm, and free from blemishes. If possible, buy organic strawberries to avoid pesticides and enhance the flavor.
To include strawberries, wash them thoroughly and remove the green tops. Slice the strawberries into thin pieces or quarters, depending on your preference. After spreading the first layer of ice cream, evenly distribute the strawberries across the surface before adding the next layer of ice cream. This ensures that each slice of cake will have a delightful burst of fresh strawberry flavor.
For the syrup, consider using a simple homemade strawberry syrup. Combine equal parts of fresh strawberries and sugar in a saucepan over medium heat, stirring until the sugar dissolves and the strawberries break down. Allow the mixture to simmer for a few minutes until slightly thickened. Cool the syrup completely before drizzling it over the strawberries in the cake. This adds an extra layer of sweetness and moisture, making every bite irresistible.
Tips for Selecting Ripe Strawberries for the Best Flavor
1. Color: Choose strawberries that are completely red; avoid any with white or green patches, which indicate they are not fully ripe.
2. Firmness: Gently squeeze the strawberries; they should be firm but yield slightly to pressure. Overripe strawberries will be mushy.
3. Fragrance: Ripe strawberries should have a sweet, fragrant aroma. If they smell bland, they may not be ripe.
4. Size: While size doesn’t necessarily indicate flavor, select medium-sized strawberries for a balance of sweetness and texture. Larger strawberries can sometimes be watery.
5. Seasonality: Whenever possible, select strawberries that are in season. They are likely to be fresher, tastier, and more affordable.
How to Evenly Distribute Strawberries and Syrup for Balanced Taste
When layering the strawberries and syrup, aim for an even distribution to ensure every slice of cake delivers a well-balanced flavor. Begin by placing a thin layer of syrup on the ice cream, followed by a single layer of sliced strawberries. Use a spoon or spatula to gently spread the syrup, ensuring it reaches all corners of the layer. Avoid piling the strawberries too high; a single layer will prevent the cake from becoming overly soggy and maintain structural integrity.
After spreading the strawberries, drizzle a little more syrup over them before adding the next layer of ice cream. This layering technique will create a delightful contrast between the creamy ice cream, fresh strawberries, and sweet syrup, ensuring every bite is a blissful experience.
Freezing the Cake
Proper freezing techniques are essential to ensure your Strawberry Bliss Ice Cream Cake maintains its shape and texture. After assembling the cake with the ice cream and strawberry layers, cover it with plastic wrap or aluminum foil. This will protect it from freezer burn and prevent any unwanted odors from affecting the cake’s flavor. If you have a cake dome or an airtight container, these can be great options for covering your cake while it freezes.
The recommended freezing time for optimal firmness is at least 4-6 hours, although overnight is best. This will allow the layers to meld together beautifully and create a cake that is easy to slice. If you plan to serve the cake later, you can freeze it for up to a month. Just remember to let it sit at room temperature for about 10-15 minutes before serving for easier slicing.
Serving Suggestions
When it comes time to serve your Strawberry Bliss Ice Cream Cake, presentation can make all the difference. Start by removing the cake from the freezer and allowing it to sit at room temperature for about 10-15 minutes. This slight thawing will make slicing easier and will improve the overall flavor experience as the ice cream softens slightly.
To achieve clean slices, use a sharp knife that has been warmed in hot water and wiped dry before cutting. This helps the knife glide through the layers without compressing the cake or creating a messy edge. Wipe the knife between cuts to maintain a neat appearance.
For a beautiful presentation, serve each slice with a dollop of freshly whipped cream on the side and garnish with mint leaves. This not only adds a pop of color but also enhances the flavor profile, making for a visually appealing and delicious dessert.
Conclusion
Making and enjoying a Strawberry Bliss Ice Cream Cake is a truly joyous experience, whether you are celebrating a special occasion or simply indulging in a treat for yourself. The combination of creamy ice cream, fresh strawberries, and sweet syrup creates a dessert that is both refreshing and satisfying.
As you gather around the table with family and friends, this cake serves as a perfect centerpiece for your summer gatherings, birthdays, or any occasion worth celebrating. The simplicity of the recipe allows both novice and experienced bakers to create something extraordinary, making it a delightful addition to your dessert repertoire.
So, roll up your sleeves, gather your ingredients, and dive into this delightful recipe. Once you experience the bliss of this cake, you’ll want to share it with everyone you know!