Indulging in a sweet treat doesn’t always have to involve extensive baking sessions, and that’s where these No Bake Turtle Mini Cheesecakes come into play. Perfectly portioned and irresistibly delicious, this dessert combines rich creaminess with crunchy textures and sweet toppings. If you’ve ever craved a cheesecake but didn’t want to deal with the fuss of baking, these mini cheesecakes are the perfect solution. In this article, we will delve into the delightful world of no-bake cheesecakes, guiding you through the recipe step-by-step while also exploring the origins and variations of this beloved dessert.
The Allure of No Bake Desserts
Understanding No Bake Desserts
No bake desserts are just what they sound like: sweet treats that require no oven time. These recipes typically rely on refrigeration or freezing to set, making them a convenient option for those who want to enjoy a dessert without the heat of the kitchen. One of the main benefits of no bake recipes is their simplicity; they often require fewer ingredients and less time than traditional baked goods. This allows home cooks to whip up something delicious without the stress or mess of baking.
No bake desserts have surged in popularity in recent years, largely due to their ease of preparation and the ability to create impressive desserts that look as good as they taste. They are particularly appealing during the warmer months when turning on the oven feels like a chore. Additionally, no bake recipes often lend themselves to creative variations, allowing bakers to experiment with flavors and ingredients without the constraints of traditional baking.
The Rise of Cheesecakes
The history of cheesecakes dates back to ancient Greece, where they were made from simple ingredients like cheese, honey, and flour. The Romans later adopted the cheesecake, incorporating it into their culture and spreading it throughout their empire. Over the centuries, cheesecakes have evolved into numerous variations, adapting to different cultures and tastes.
The evolution into no-bake versions of cheesecakes has made this dessert even more accessible to home cooks. No bake cheesecakes are typically made with cream cheese, sugar, and whipped cream or Cool Whip, resulting in a light and airy texture that sets nicely in the refrigerator. This modern take on a classic dessert has captured the hearts and taste buds of many, making it a favorite for gatherings, celebrations, and even casual weeknight treats.
Mini cheesecakes, in particular, have become a crowd favorite. Their small size makes them perfect for portion control, allowing everyone to indulge without overindulgence. They are also visually appealing, as they can be easily decorated with toppings and garnishes, making them an attractive centerpiece for any dessert table.
Ingredients Breakdown
Essential Ingredients for the Crust
The crust is the foundation of any cheesecake, providing a crunchy contrast to the creamy filling. For our No Bake Turtle Mini Cheesecakes, you can choose between digestive biscuits and graham crackers. Both options have their merits, and each brings a unique flavor and texture to the dessert.
– Digestive Biscuits vs. Graham Crackers: Digestive biscuits are slightly less sweet and have a more robust flavor, which can complement the richness of the cheesecake filling. On the other hand, graham crackers are sweeter and have a more delicate texture, providing a classic base for cheesecakes. The choice between the two often comes down to personal preference—both work well, so feel free to experiment!
– The Role of Butter and Sugar in Crust Formation: The combination of crushed biscuits and melted butter creates a cohesive crust that holds together once set. The butter adds richness, while the sugar enhances the sweetness of the crust. A little salt can also be added to balance the flavors, ensuring that the crust doesn’t become overwhelmingly sweet.
Cheesecake Filling Ingredients
The filling is where the magic happens in a cheesecake, and for this no bake version, we’ll be focusing on a few key ingredients that work together to create the perfect creamy texture.
– Importance of Cream Cheese and Its Alternatives: Cream cheese is the star of the show, providing the rich and tangy flavor that cheesecakes are known for. For those who are looking for alternatives, mascarpone or even a vegan cream cheese can be used, though they may slightly alter the flavor and texture of the final product. It’s important to use softened cream cheese to ensure a smooth filling without lumps.
– The Role of Powdered Sugar and Vanilla Extract in Flavor: Powdered sugar is preferred over granulated sugar in cheesecake fillings because it dissolves more easily, creating a smooth texture. Vanilla extract adds warmth and depth of flavor, enhancing the overall taste of the cheesecake. For an extra twist, you can experiment with flavored extracts or even a splash of liqueur in the filling.
Exploring the Toppings
What makes these No Bake Turtle Mini Cheesecakes extra special are the toppings that elevate them into something truly indulgent.
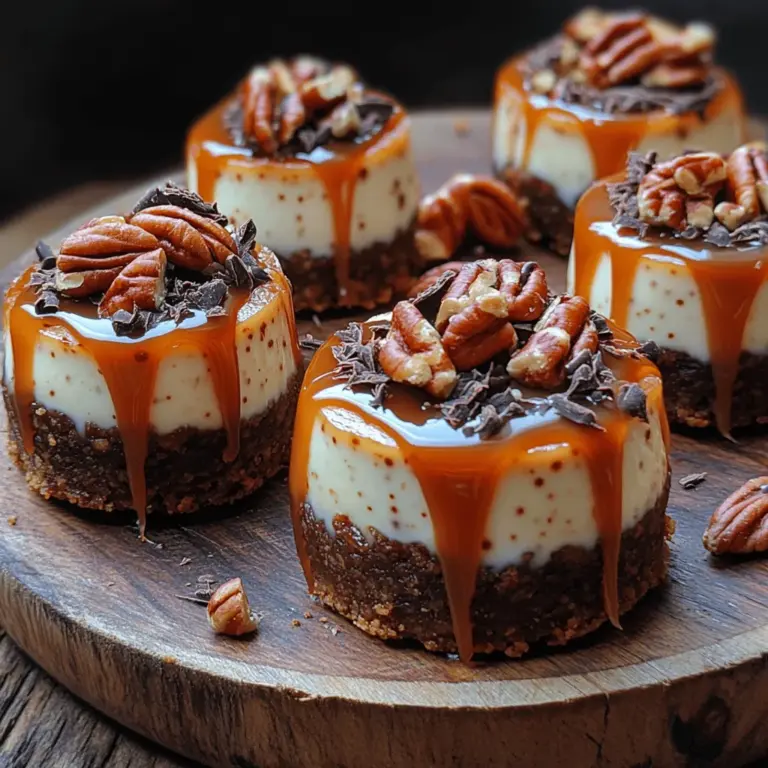
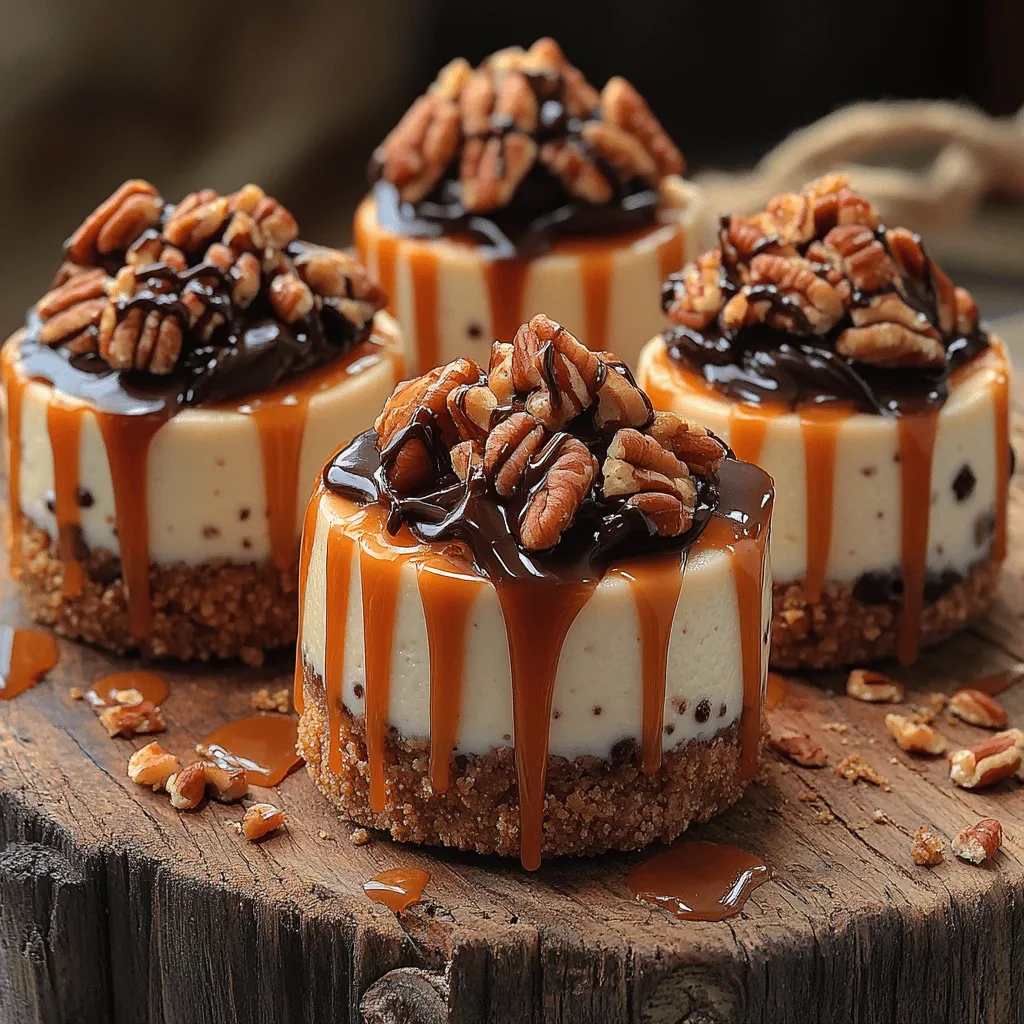
– Caramel and Chocolate Sauce Options: Store-Bought vs. Homemade: The classic turtle flavor profile includes both caramel and chocolate. While you can certainly use store-bought sauces for convenience, making your own can take the flavors to the next level. Homemade caramel sauce is relatively easy to prepare and can be customized to your liking. The same goes for chocolate sauce—melted chocolate or a simple ganache can be drizzled on top for a decadent finish.
– The Crunchy Contrast: Benefits of Adding Pecans: Pecans are a traditional topping for turtle desserts, adding a delightful crunch and nutty flavor that perfectly complements the creamy cheesecake. You can chop them finely for a subtle texture or leave them in larger pieces for a more pronounced crunch. Toasting the pecans enhances their flavor, making them even more irresistible.
Step-by-Step Instructions
Preparing the Crust
Now that we’ve covered the ingredients, let’s dive into the preparation of our No Bake Turtle Mini Cheesecakes, starting with the crust. This step is crucial, as the crust sets the tone for the entire dessert.
1. Crush the Biscuits: Begin by crushing your chosen biscuits—digestive biscuits or graham crackers—into fine crumbs. You can do this by placing them in a resealable plastic bag and using a rolling pin to crush them, or you can use a food processor for a more efficient method. Aim for a texture similar to sand, as this will help the crust hold together well.
2. Mix with Butter and Sugar: In a mixing bowl, combine the crushed biscuits with melted butter and powdered sugar. The butter should be just melted—if it’s too hot, it can affect the texture of the crust. Use a fork or your fingers to mix until the crumbs are evenly coated and the mixture resembles wet sand.
3. Press into Mini Cheesecake Tins: Spoon the crust mixture into the bottoms of mini cheesecake tins or a muffin pan lined with cupcake liners. Use the back of a spoon or your fingers to firmly press the mixture down, ensuring an even layer. The firmer you pack the crust, the better it will hold together when serving.
4. Chill to Set: Once the crusts are ready, place them in the refrigerator for about 15-20 minutes to allow them to set. This chilling step is essential for achieving a sturdy crust that won’t crumble when you add the filling.
By following these steps, you will create a delicious base for your No Bake Turtle Mini Cheesecakes. Make sure to check back for the next part of the article, where we’ll explore the process of preparing the cheesecake filling, adding those irresistible toppings, and all the tips you need to ensure your mini cheesecakes are a hit at any gathering.
Crafting the Cheesecake Filling
Creating the perfect cheesecake filling is crucial to the success of your No Bake Turtle Mini Cheesecakes. The filling should be rich, creamy, and smooth, providing a delightful contrast to the crunchy crust and the sweet toppings.
Techniques for Achieving a Smooth Cream Cheese Mixture
Start by ensuring that your cream cheese is at room temperature. Cold cream cheese will not blend well, leading to lumps in your filling. For optimal results, cut the cream cheese into smaller chunks and let it sit out for at least 30 minutes before mixing.
To begin, use a large mixing bowl and an electric mixer. Beat the softened cream cheese on medium speed until it becomes smooth and creamy—this should take about 2 to 3 minutes. Scrape down the sides of the bowl as needed to ensure all the cream cheese is incorporated. Once the cream cheese is smooth, gradually add in granulated sugar and vanilla extract, mixing until fully combined.
For a touch of flavor depth, consider adding a pinch of salt to balance the sweetness, enhancing the overall taste of your filling.
Whipping Cream: Understanding Stiff Peaks and How to Fold
The next step in crafting your cheesecake filling is whipping the cream. Start with heavy whipping cream that is chilled for maximum volume. Pour the cream into a clean mixing bowl and beat it on medium-high speed until it begins to thicken. Continue beating until you reach stiff peaks, meaning that the cream holds its shape when the whisk is lifted.
Be cautious not to over-whip the cream, as this can turn it into butter. Once you achieve stiff peaks, it’s time to gently fold it into the cream cheese mixture. Use a spatula to incorporate the whipped cream, folding it gently in thirds to maintain the light and airy texture. This step is critical, as it contributes to the signature fluffy feel of your cheesecake filling.
Assembling the Cheesecakes
With your cheesecake filling ready, it’s time to assemble your mini cheesecakes.
Techniques for Filling and Smoothing the Cheesecake Mixture
Take your prepared crusts from the previous steps and begin spooning the cheesecake mixture into each mini cheesecake cup. You can use a piping bag for a neater application, or simply a spoon will do. Fill each cup to the top, smoothing the mixture with the back of the spoon or a spatula.
To ensure an even surface, gently tap the filled cups on the countertop to settle the filling. This helps eliminate any air bubbles and creates a smoother appearance.
Importance of Chilling for Optimal Texture
Once your cups are filled, it’s essential to chill them in the refrigerator for at least 4 hours, although overnight is ideal. Chilling allows the filling to set and develop its flavor, resulting in a cheesecake that holds together beautifully when served.
For best results, cover the cheesecakes with plastic wrap or a lid to prevent them from absorbing any odors from the refrigerator.
Adding the Finishing Touches
Now that your cheesecakes are chilled and set, it’s time to add the finishing touches that will elevate your dessert.
Creative Ways to Drizzle Sauces
A classic turtle cheesecake is known for its sweet toppings, and drizzling chocolate and caramel sauces over your mini cheesecakes is a must. Use store-bought sauces for convenience, or create your own by melting chocolate chips and combining them with heavy cream for a ganache.
For a homemade caramel sauce, melt sugar in a saucepan until it turns amber, then carefully whisk in butter and cream. Allow the sauce to cool before drizzling it over your cheesecakes. Use a squeeze bottle or a spoon for a more controlled drizzle, creating beautiful patterns that enhance the visual appeal of the dessert.
Presentation Tips for an Eye-Catching Dessert
Presentation is key when it comes to serving desserts. Consider using a variety of toppings to create texture and color. Chopped pecans provide a delightful crunch, while a sprinkle of sea salt can enhance the sweet flavors.
For an elegant touch, garnish with a dollop of whipped cream atop each cheesecake, and place a few chocolate shavings or pecan halves on the cream. Serve the cheesecakes on a decorative platter, and consider adding a few fresh berries or chocolate-covered pretzels for added flair.
Flavor Variations and Customization
The beauty of No Bake Turtle Mini Cheesecakes lies in their versatility. Here are some exciting ways to customize your creation.
Exploring Different Flavor Profiles
For those looking to switch things up, consider alternative toppings such as fresh fruit. Sliced strawberries, raspberries, or blueberries can add a refreshing contrast to the rich filling. You might even experiment with chocolate chips, crushed cookies, or even crushed candy bars for additional texture and flavor.
If you’re feeling adventurous, infuse different flavors into the cheesecake base. Try adding a bit of almond extract for a nutty twist, or fold in peanut butter for a rich, creamy flavor. You can also mix in a bit of espresso powder for a coffee-flavored cheesecake.
Dietary Considerations
For guests with dietary restrictions, you can easily adapt this recipe to accommodate various needs.
Gluten-Free Options for Crusts: Substitute the graham cracker crust with gluten-free cookies or almond flour for a gluten-free option.
Dairy-Free Substitutes for a Vegan Version: Use vegan cream cheese and coconut cream in place of heavy cream to create a dairy-free version of the filling. You can also replace the condensed milk with a coconut-based sweetened condensed milk alternative.
Serving Suggestions
These No Bake Turtle Mini Cheesecakes are perfect for various occasions, making them a versatile dessert choice.
Ideal Occasions for No Bake Turtle Mini Cheesecakes
Whether it’s a festive holiday gathering, a summer barbecue, or a cozy family dinner, these mini cheesecakes are sure to impress. Their individual portions make them an ideal dessert for parties and gatherings, allowing guests to indulge without the need for slicing and serving.
Pairing Suggestions: Wine, Coffee, or Tea
To elevate the dining experience, pair your cheesecakes with complementary beverages. A rich dessert wine, such as a late-harvest Riesling, enhances the sweetness of the cheesecakes. Alternatively, a bold cup of coffee or a warm cup of chai tea can balance the rich flavors of the dessert.
Presentation Ideas
Creating an eye-catching dessert table can make your No Bake Turtle Mini Cheesecakes the star of the event.
Creative Serving Platters and Garnishes
Consider serving your cheesecakes on tiered stands for a striking display. Arrange them alongside colorful fruits, fresh mint leaves, or edible flowers to add visual interest.
For garnishing, you could use decorative elements like chocolate curls or gold leaf to add a touch of luxury.
How to Make Your Dessert Table Stand Out
Incorporate themed decorations that reflect the season or occasion. For example, use fall leaves and pumpkins for Thanksgiving or vibrant flowers for a summer gathering.
Utilize fabric runners or colorful tablecloths that complement the colors of your dessert, ensuring that your No Bake Turtle Mini Cheesecakes shine as the centerpiece.
Conclusion
The No Bake Turtle Mini Cheesecakes are more than just a dessert; they encapsulate the joy of indulgence without the stress of baking. With a rich filling, crunchy crust, and delectable toppings, they are an easy yet impressive treat for any occasion. This recipe not only simplifies the dessert-making process but also opens up a world of creativity, allowing you to experiment with flavors and presentations.
Embrace the ease and delight of no bake desserts and treat yourself and your loved ones to these delicious mini cheesecakes. Whether you’re preparing for a party or simply looking to satisfy your sweet tooth, these cheesecakes are sure to bring smiles and satisfaction. Enjoy creating your own versions and sharing the joy of this delightful treat!
